Logo

Fix 169 IP address error in Windows 10

169 IP address error can stop your computer from connecting to the internet which could be a very frustrating experience. In this guide, we will cover simple but effective tips on how to fix this error so you can continue with internet use.

  1. Reconnect your Modem or Router

    Simple and sometimes effective solution, unplug and plug back in modem or router so IP is fetched again, it is very likely that computer will pick right IP address with this stunt.

  2. Use built-in Windows Network troubleshooter

    Press ⊞ WINDOWS + X top open secret menu
    Go to settings
    Go to Network & Internet
    Inside click on Network troubleshooter
    Follow onscreen instructions
    After the troubleshooter ends reboot your PC

  3. Reconfigure IP address

    Press ⊞ WINDOWS + R to open the run dialog
    Inside run dialog type ncpa.clp and press ENTER
    Right-click on your network adapter and select properties
    Uncheck Internet Protocol Version 6 (TCP/IPv6) and click on OK
    Now press ⊞ WINDOWS + X and click on Command prompt (admin)
    In command prompt type and after each line press ENTER
    netsh winsock reset catalog
    netsh int ip reset reset.log
    ipconfig /release
    ipconfig /renew
    Reboot your computer

  4. Restart DHCP client

    Press ⊞ WINDOWS + R to open the run dialog
    In run dialog type services.msc and click on OK
    Find DHCP client
    Right-click on it and choose Restart
    Reboot PC

  5. Reinstall Network Adapter

    Press ⊞ WINDOWS + X to open the windows menu
    Click on Device Manager
    Expand Network Adapter and right-click on wireless or ethernet adapter, click on Uninstall device
    Reboot the computer to automatically reinstall the device driver

  6. Reset IP and subnet mask

    Press ⊞ WINDOWS + R to open the run dialog
    In run dialog type in ncpa.cpl and press OK
    Right-click on your network adapter and select properties
    Uncheck Internet Protocol Version 6 (TCP/IPv6)
    Double click on Internet Protocol Version 4 (TCP/IPv4)
    Select Use the following IP address and change it to 192.168.0.1
    Change Subnet mask to 255.255.255.0
    Leave default gateway blank
    Click OK to save changes

Do You Need Help with Your Device?

Our Team of Experts May Help
Troubleshoot.Tech Experts are There for You!
Replace damaged files
Restore performance
Free disk space
Remove Malware
Protects WEB browser
Remove Viruses
Stop PC freezing
GET HELP
Troubleshoot.Tech experts work with all versions of Microsoft Windows including Windows 11, with Android, Mac, and more.

Share this article:

You might also like

Windows installation stuck on Set up a Pin
After you fresh install Windows 10 on your computer, it allows you to set up a PIN just before you can start using it. However, a number of users reported that the Windows 10 installation gets stuck on the “Set up a Pin” phase. If you are one of the users who experience the same thing, then read on as this post will walk you through fixing the problem. As users start to use their newly installed Windows 10 computer, they reported that the screen is still stuck even after they enter the correct PIN twice and there is no way for them to go forward or backward. Note that this is a part of the account setup and that your computer must stay connected to your internet connection before you finalize everything. And even though the PIN works when the computer is offline, the account setup still needs an internet connection, at least for a fresh installation. The solution for this kind of issue is quite easy and there won’t be any problem even if your computer shuts down or restarts since the installation is already complete and all that’s left is the account setup. To fix this problem, follow the steps given below. Step 1: The first thing you have to do is to turn off your internet connection or disable all connectivity from your computer. Note: If you are using either an Ethernet cable or a Wi-Fi switch to connect to the internet, you have to disable or remove them. But if you don’t have any options, just completely turn off your internet connection. Step 2: The next thing you have to do is to force your computer to shut down and then restart your computer. The setup process will eventually pick up exactly where it left off. The only difference is that there is no connection to the internet and your screen will no longer be stuck on the PIN setup screen so you now have the option to skip it and wait until you’re logged in for the first time. Step 3: Once you’re done, you can then you can choose to Setup Pin later on and turn your internet connection back on or connect your computer with an internet connection.
Read More
Free Wifi Hotspot Removal Guide for Windows

The Free Wifi Hotspot is offered to users that own a laptop and a desktop PC that has a wired connection to the Internet and no WiFi modem. The Free Wifi Hotspot is said to help users share their Internet connection with mobile devices that support the 2G/3G/4G/USB tethering connectivity. However, users will need a 2G/3G/4G modem attached to the computer/laptop with access to the Internet if they intend to benefit from the Free Wifi Hotspot software. Additionally, the Free Wifi Hotspot may collect data like your Internet history, downloads log, and software configuration for product placement optimization. PC users that run the Free Wifi Hotspot software may be shown pop-up windows with marketing materials from time to time and maybe redirected to promotional offers.

Several anti-virus applications have flagged Free Wifi Hotspot as a Potentially Unwanted Applications and may come bundled with other PUP-s that may harm your computer or steal some information, due to these risks it is marked for optional removal.

About Potentially Unwanted Applications

Everybody has experienced it – you download a piece of free application, then you see some unwanted applications on your computer or find a strange toolbar has been included with your browser. You didn’t install them, so how did they appear? These unwanted applications, which are referred to as Potentially Unwanted Programs, or PUPs in short, typically tag along as a software package when downloading the application and can ruin your PC or cause major annoyances. PUP does not involve malware in the traditional sense. The reason is, the majority of PUPs end up in a computer not because they slip through the security holes, for example, but because the users have got installed them themselves – totally unintentionally needless to say. A PUP might not be regarded as malicious or harmful but nonetheless, it is a standard reason for clunky OSs; some PUPs are a lot more aggressive by deliberately slowing down your computer or laptop.

How does unwanted software impact you?

Unwanted programs come in many forms. Usually, they can be seen in adware bundlers that are known to utilize aggressive and misleading advertising. The majority of bundlers install many adware programs from several vendors, each of which has its own EULA policy. Safebytes Anti-malware totally eliminates this threat and safeguards your machine against PUP or adware infection. The PUPs likewise get installed into your computer in the form of browser add-ons and toolbars. They will modify web browser settings, change the default search engine, substitute the default home page with their very own websites, slow down browsing speed, and also will ruin your system also. Potentially unwanted programs apply aggressive distribution methods to get onto your personal computer. The worst part of installing a PUP is the spyware, adware, and keystroke loggers that may hide inside. These are software programs that don’t do anything good for you; in addition to occupying space on the hard disk, they will also slow down your PC, often change settings without your approval, the list of troublesome features goes on and on.

Tips on avoiding PUPs

• When installing anything on your desktop, always read the fine print, like the license agreement. Do not accept terms of use that are for bundled programs. • Don’t accept standard, express, default, or any other installation settings which are recommended. Always opt for “custom” installation. • Make use of an antivirus program to boost your protection. Anti-malware programs like Safebytes Anti-malware has got real-time features that will block PUPs before they harm your computer. • Avoid adding freeware software you won’t make use of. Nowadays ‘freeware’ isn’t actually freeware – but ‘crapware’ bundling nonsense. • Always download programs from the original website. Most PUPs find their way onto your PC is through download portals, so avoid it entirely. Comply with these tips and you will almost never get potentially unwanted programs on your computer.

How To Get Rid Of Malware That Is Blocking Antivirus Downloads?

Every malware is bad and the level of the damage can vary greatly depending on the type of malware. Some malware sits in between the computer and the internet connection and blocks some or all websites that you really want to check out. It will also block you from adding anything to your PC, especially the anti-virus program. If you’re reading this, you may have affected by a virus that prevents you from downloading a security application such as Safebytes Anti-Malware. There are some options you could try to get around with this particular issue.

Use Safe Mode to resolve the problem

In the event the malware is set to run at Windows startup, then booting in safe mode should avoid it. Since just the bare minimum programs and services launch in “Safe Mode”, there are rarely any reasons for conflicts to happen. Listed here are the steps you need to follow to boot into the Safe Mode of your Windows XP, Vista, or 7 computers (check out Microsoft site for directions on Windows 8 and 10 PCs). 1) At power on, press the F8 key before the Windows splash screen starts to load. This will conjure up the “Advanced Boot Options” menu. 2) Make use of the arrow keys to select Safe Mode with Networking and hit ENTER. 3) When you are into this mode, you should have access to the internet once again. Now, use your browser normally and navigate to https://safebytes.com/products/anti-malware/ to download and install Safebytes Anti-Malware. 4) Following installation, run a complete scan and allow the program to delete the threats it detects.

Switch over to some other internet browser

Certain malware might target vulnerabilities of a particular web browser that obstruct the downloading process. If you suspect that your Internet Explorer happens to be hijacked by a trojan or otherwise compromised by cybercriminals, the most effective thing to do is to switch to an alternate browser such as Chrome, Firefox, or Safari to download your chosen security application – Safebytes Anti-Malware.

Install security software on a USB drive

Another solution is to download and transfer antivirus software from a clean PC to run a scan on the affected computer. Abide by these steps to run the antivirus on the infected computer. 1) On a virus-free PC, install Safebytes Anti-Malware. 2) Plug in the pen drive to a USB slot on the uninfected computer. 3) Double-click the Setup icon of the antivirus software to run the Installation Wizard. 4) Select the flash drive as the destination for saving the software file. Follow activation instructions. 5) Now, insert the thumb drive into the infected system. 6) Double click the Safebytes Anti-malware icon on the pen drive to run the application. 7) Click “Scan Now” to run a complete scan on the infected computer for viruses.

SafeBytes Anti-Malware Benefits

If you are looking to download anti-malware software for your PC, there are lots of tools on the market to consider however, you should not trust blindly anyone, regardless of whether it is free or paid software. Some are very good ones, some are decent, and some are just bogus anti-malware software that will harm your computer themselves! You should opt for a tool that has gained a good reputation and detects not only viruses but other kinds of malware too. On the list of recommended software by industry leaders is SafeBytes Anti-Malware, a popular security application for Microsoft Windows. Safebytes is one of the well-established PC solutions companies, which provide this complete anti-malware software program. When you have installed this software, SafeByte's state-of-the-art protection system will ensure that no viruses or malware can seep through your computer.

SafeBytes anti-malware provides a plethora of enhanced features which set it apart from all others. Below are some of the best ones:

Live Protection: SafeBytes offers an entirely hands-free active protection and is set to monitor, block, and get rid of all computer threats at its first encounter. They’re very efficient in screening and getting rid of different threats because they are continuously revised with new updates and safety measures. World-class AntiMalware Protection: This deep-cleaning anti-malware program goes much deeper than most anti-virus tools to clean out your computer. Its critically acclaimed virus engine finds and disables hard-to-remove malware that conceals deep inside your personal computer. Safe Web Browsing: SafeBytes checks and provides a unique safety rating to every single website you visit and block access to webpages considered to be phishing sites, thus safeguarding you from identity theft, or known to contain malware. Lightweight Tool: SafeBytes is a lightweight and easy-of-use antivirus and antimalware solution. As it uses minimum computer resources, this program leaves the computer power exactly where it belongs to: with you actually. Fantastic Technical Support: Expert technicians are at your disposal 24/7! They will promptly resolve any technical issues you may be encountering with your security software. SafeBytes can keep your PC protected from most advanced malware threats automatically with almost no input needed from you again. Once you’ve downloaded and installed SafeBytes Anti-Malware, you will no longer need to bother about malware or other security worries. If you want sophisticated forms of protection features & threat detections, buying SafeBytes Anti-Malware could be worth the dollars!

Technical Details and Manual Removal (Advanced Users)

If you’d like to perform the removal of Free Wifi Hotspot manually instead of using an automated software tool, you may follow these steps: Go to the Windows Control Panel, click the “Add or Remove Programs” and there, select the offending application to uninstall. In case of suspicious versions of browser extensions, you can actually remove them via your web browser’s extension manager. You’ll probably also want to totally reset your internet browser to its default configuration settings. To ensure the complete removal, manually examine your hard drive and Windows registry for all of the following and eliminate or reset the values accordingly. Please remember that only professional users should attempt to manually edit the registry because incorrect file removal leads to a major problem or even a computer crash. Furthermore, certain malware is capable of replicating itself or preventing deletion. It is advisable that you carry out the removal procedure in Windows Safe Mode.
Files: %APPDATA%\Microsoft\Windows\Start Menu\Programs\Free WiFi Hotspot %ALLUSERSPROFILE%\Microsoft\Windows\Start Menu\Programs\Free WiFi Hotspot %ALLUSERSPROFILE%\Application Data\Start Menu\Programs\Free WiFi Hotspot %Appdata%\Free WiFi Hotspot New Version Available Registry: HKEY_LOCAL_MACHINE\Software\[APPLICATION]\Microsoft\Windows\CurrentVersion\Uninstall..Uninstaller Free WiFi Hotspot_is1
Read More
Fix Update Standalone Installer 0x80096002
If you are using a Windows Update Standalone Installer to install Windows Updates in your Windows 10 computer but you suddenly encounter an error saying, “Installer encountered an error: 0x80096002, The certificate for the signer of the message is invalid or not found”, read on as this post will guide you on how you can fix it. This kind of error could be due to the vendor’s certificate that might have become invalid, compromised, or pulled. Aside from that, it is also possible that the update is not targeted at your OS version. You could get this error when you try to install an incompatible update or software on your computer. This error can also appear due to misconfigured system files or when you try to install BitLocker To Go Drive Encryption or BitLocker Drive Preparation Tool. To fix this error, you can try to run the standalone installer in Compatibility mode or enable the Windows Identity Foundation or run the Windows Update troubleshooter. Make sure to check if the error was resolved after every suggestion. It will help you learn what fixed the problem.

Option 1 – Try to run the installer in Compatibility mode

  • Look for the setup file.
  • Once you find it, right-click on it and select Properties from the context menu.
  • After that, go to the Compatibility tab and mark the checkbox for “Run this program in compatibility mode for:” and from the drop-down list, select the Windows OS version you want the installer to run on.
  • You also have to check the “Run as administrator” option.
  • Now click the Apply button and then click OK to save the changes made and check if it has resolved the issue or not.

Option 2 – Try to troubleshoot compatibility

This option is almost the same as the first one except it is an alternative way of fixing the error 0x80096002 in case the first one didn’t work. In this option, you will troubleshoot the compatibility issue.
  • Look for the setup file.
  • Then right-click on it and select the “Troubleshoot compatibility” from the context menu.
  • After that, click on the “Try recommended setting” option. Once the process is done, the error message should be gone.

Option 3 – Try to enable the Windows Identity Foundation

You might also want to enable the Windows Identity Foundation as some users reported that it helped in resolving the error for them. To do so, follow these steps:
  • In the Windows Start Search, type “Turn Windows features on or off” and click on the matching result.
  • This will open a list of Windows Features and from there, look for the Windows Identity Foundation.
  • Once you found it, click on its checkbox and click OK to enable it and save the changes made.
  • Now see if it has fixed the error or not. If not, you have to disable the feature.

Option 4 – Run the Windows Update Troubleshooter

Running the built-in Windows Update troubleshooter is one of the things you can first check out as it is known to automatically resolve any Windows Update errors like error 0x80096002. To run it, go to Settings and then select Troubleshoot from the options. From there, click on Windows Update and then click the “Run the troubleshooter” button. After that, follow the next on-screen instructions and you should be good to go.
Read More
A Guide to Quickly Fixing Error 103

What Is Error 103?

Error 103 is an error that is usually encountered by those who use Google Chrome. This error is usually generated because of a conflict arising between Google Chrome and the antivirus program running on the user’s computer. Primarily, error 103 is an incompatibility issue. It is not critical in nature. However, since it will disrupt the smooth functioning of the browser, it is strongly advised to rectify this error that is generated due to any temporary conflicts between the logic of the two programs namely Google Chrome and antivirus. In layman's terms, it would be only justified to say that this error has a lot to do with the way programs react to each other in real-time.

Solution

Restoro box imageError Causes

When the error is displayed to the user, it usually states something like ‘chrome error 103 connection aborted’, ‘chrome error 103 err_connection_aborted’ or ‘Error 103 (net: ERR_CONNECTION_ABORTED): Unknown error. This begs the question, what triggers this error? Here it is important to understand that Google Chrome constantly applies to upgrade. In most instances, the upgrades almost go unnoticed. In the meanwhile, there are other programs running on any system such as firewall, Antispyware, or antivirus programs. All such programs govern the functionality of the web browser. Now, when the web browser attempts to update and any programs on the system view the update as a threat, the connection to the internet will be terminated. It is also important to understand that these programs will keep you from upgrading or from doing anything with your browser.

Further Information and Manual Repair

google chrome error 103Before we move on to the discussion of fixing the underlying causes for error 103, it is important to understand all those programs that are most likely to generate this error. A list of all such programs is outlined below as follows.
  • Kaspersky Pure 3.0
  • Kaspersky ONE
  • Kaspersky small office security 2013
  • Kaspersky internet security 2013
  • Kaspersky antivirus 2013
A downside associated with error 103 is that it won’t disappear on its own. That’s why it is important to make some manual changes as there are no tools available online to rectify this error automatically. Follow the steps listed below to easily fix the problem.
  • Click on the Start button.
  • In the search box, enter ‘expand.exe’.
  • Right-click on the file that appears and select the option ‘Open Folder Location’.
  • Now, copy the file and paste it at the destination ‘C:\Windows\System32’.
  • If you are not able to find the file, it is advised you copy it from Windows Installation Disk.
  • Now, click on the ‘Start’ button again.
  • Find and select ‘Run’.
  • Now enter ‘C: ’ in the search box and press Ok.
  • Now right-click anywhere on the screen, select new, and then select folder.
  • Rename this folder. Change the name from ‘New Folder’ to ‘Temp’.
  • Now go to the Start button again.
  • Select ‘Run’ once again.
  • Type ‘cmd.exe’ in the command prompt and press Ok.
  • Now type Command. Press enter.
  • Now type this code as it is: ‘set TMP=C:temp’ and press enter.
  • Now restart the browser.
  • If it fails, install Google Chrome once again.
  • Just make sure everything is in sync to avoid any data loss.
Read More
Error 0x00000024 – A Quick Fix

What is Error 0x00000024?

Error 0x00000024 can be seen when you start up and a screen comes up asking which mode you would startup in. Regardless of the mode you select, it leads up to the Windows screen with the loading bar and your computer crashes from there onwards. When you press F8 in order to select the “Disable Automatic Restart On System Failure” option, that is when this error shows up:
ST0P 0X00000024 (x00190203, 0x82700550, 0xc000012, 0x00000000)
Due to this error, both Safe and Normal modes become inaccessible.
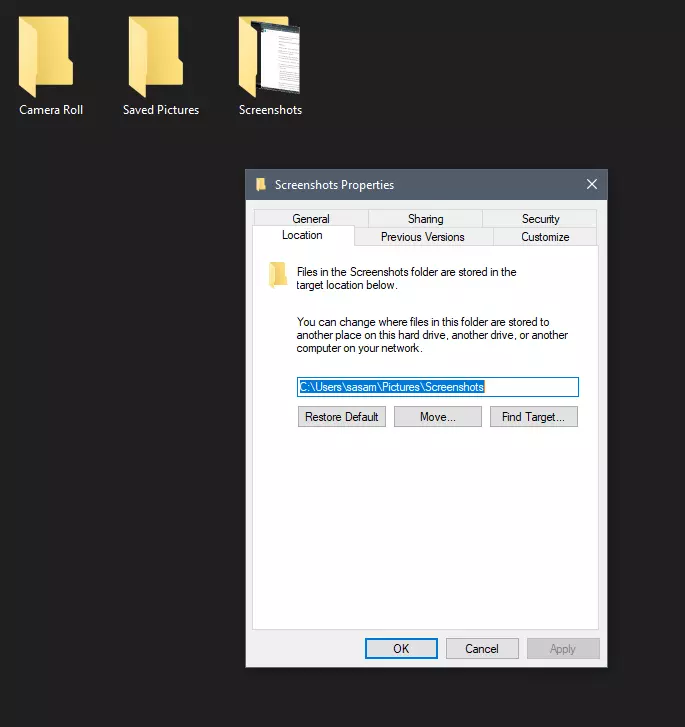
Solution

Restoro box imageError Causes

If you’re having this error then it is the indication of an issue with the file NTFS.sys. Further, there might also be problems with the IRP (Interrupt Request Packet) or the disk may have been corrupted. There are multiple other causes of this error, including heavy fragmentation of your hard drive or problems caused by your antivirus software.

Further Information and Manual Repair

First and foremost, you are suggested to run Chkdsk. In order to do this, you have to enter your BIOS and select CDROM as your primary booting device. Now follow the below-mentioned steps:
  1. Insert your Windows XP installation CD into the CDROM and reboot your PC.
  2. Press any key to proceed with the boot from CD when you are prompted to do so.
  3. When the Windows XP setup menu shows up, hit the “R” key to proceed with repairing Windows.
  4. If there is only one Windows installed on your computer then hit the “1” key and proceed by pressing enter. If there are more than two Windows then hit the number which is associated (according to the screen you are viewing) to the Windows you want to repair. Usually, this is C:/Windows and associated with “1” but if that is not the case then you should simply press the number that corresponds with the windows you want to repair and proceed.
  5. Now, you will see a screen that prompts you to enter your administrator password. Most people don’t have an admin password and in that case, you should simply hit enter and you’d be good to go. If you do have an administrator password, however, then you should type it in, hit enter, and proceed.
  6. When the DOS prompt shows up, type in chkdsk/f and hit return.
If you see no improvement in solving Error 0x00000024, and the problem keeps persisting, then you should start over. But this time you should type sfc/scannow instead of chkdsk/f and hit return. There are a few other complex methods that you can try as well but this is the most recommended procedure as it is easier, quicker, and most likely to fix the error.
Read More
A Quick Guide to Resolving Error 0146 on Your Dell Laptop

Error 0146 - What is it?

Dell laptop is a great choice for laptop users who like to have the best configuration, fast working platform, and long warranty period. But this does not mean that your errors can’t pop up on Dell laptops. Users can experience a variety of hardware and software-related issues on Dell laptops. And one such error is the error code 0146. This is a typical Dell laptop hard drive-related error code. It can cause your Dell laptop to freeze and system applications to stop responding for a long period of time. Therefore, it is recommended to fix the error immediately.

Solution

Restoro box imageError Causes

Error 0146 may be triggered due to several reasons on your system. These include:
  • Program corruption
  • Viral infection
  • Hard drive issues

Further Information and Manual Repair

The good news is that error 0146 is easy to fix. Here are some of the easy do it yourself methods that you can try to resolve error 0146 on your system:

Method 1 - Run a Virus Scan

Malware and viruses can corrupt and damage the hard drive and trigger error 0146. In such an event, it is recommended that you open your antivirus, update it and run a full virus scan on your PC. Once the scan is complete, remove all the viruses. This will hopefully resolve the error 0146.

Method 2 - Run Your Laptop in Safe Mode and Clean Boot

Another alternative is to run your Dell laptop in safe mode and clean boot. To do this, simply disconnect all the attached devices like wireless printers, routers, and USB keys and turn off your laptop. Turn it on again and then press and hold the F8 key. Make sure you do it quickly before the Windows logo comes up. Now select ‘Safe mode with networking’ and press enter. After that, open System Configuration Utility by going to the start menu and typing ‘msconfig’ in RUN, and then click OK. In the System Configuration Utility click General then selective startup. Now uncheck the load startup items box ad select services and then check the hide all Microsoft services box and disable all. To apply these changes, click ‘Apply’ and then OK.  Now restart your laptop.

Method 3 - Change to SATA Drive

Sometimes error 0146 may pop up due to hard drive configuration changes. If this is the reason for error occurrence, then simply go to Dell Laptop BIOS. Check whether the hard drive configuration has been changed to AHCI SATA from SATA Drive. If it has changed, then it is advisable to change it back to SATA Drive. When you are done back up all your data, and then format your hard drive. It is important to create a backup because formatting will make you lose all your data. Once you format the hard drive, reinstall Windows from scratch.

Method 4 - Run a Registry Scan

If the error 0146 results due to program corruption then there is a possibility that the underlying reason might be registry damage. Therefore it is advisable to run a registry scan and repair it. To do so, download Restoro. This is a cutting-edge and user-friendly PC Fixer integrated with a registry cleaner. Run it to scan for registry issues. It removes all obsolete files corrupting and damaging the registry, repairs important and damaged system files and cleans the registry in the shortest time. Click here to download Restoro and resolve error 0146.
Read More
Change screenshot location

Each time when you press WINDOWS + PrtScn key on your keyboard a screenshot is taken and saved on your Hard drive, to be more precise, it is saved in a specific folder which is in c:\Users\Your user name\Pictures\Screenshots. Now, this specific location is not anything that's bad but it is a little deep and not so user-friendly for quick access.

screenshot properties

Luckily this default location can be changed into any folder that you like.

Changing location

First thing is to open File Explorer and then navigate to your PC. Once you go to your PC, go to Pictures, and inside right-click on the Screenshots folder. If there is no screenshots folder inside, this means that since Windows was installed no screenshots were taken with WINDOWS + PrtScn key combination. Please note that just by pressing PrtScn you will create a screenshot but you will place it inside the clipboard ready to be pasted somewhere, with WINDOWS + PrtScn you are saving the screenshot directly in a file on your hard drive.

So once you clicked on the Screenshots folder, go to the bottom and click on properties. Inside properties go to the Location tab. In the location, tab clicks on MOVE and browse to your new location where you would like screenshots to be saved. Once you select the folder for screenshots, click on the Select Folder button and confirm with OK. After this, Windows will ask you would you like to move existing screenshots into the chosen folder. Click YES or NO, depending on your preference.

After this easy setup, all of your new screenshots will be placed now inside the chosen folder.

Thank you for reading and I hope to see you tomorrow. Take care.

Read More
How to remove Ammyy Admin

What is Ammyy Admin

AmmyyAdmin is a software developed by Ammy. This software allows you to manage network computers and servers remotely without complicated NAT settings adjustments or Firewall problems. The program is similar in marketed function to TeamViewer or LogMeIn. This software does not require installation and it lets you control other computers or share files over the software. It usually comes bundled with other software. This software copes files into your computer and sometimes creates new startup keys that allow it to start each time your computer is restarted. AmmyAdmin might display additional ads in your browser as well as pop-up ads. Due to its ability to silently install and run remote administration, it could be used maliciously by those who intend to damage your computer or steal data. AmmyyAdmin is flagged for optional removal, and if you did not intentionally install it, removal is highly recommended

What is a Potentially Unwanted Program (PUP)?

If you’ve ever downloaded freeware or shareware, odds are high that your computer can get installed with a bunch of unwanted programs. A PUA / PUP (potentially unwanted application / potentially unwanted program) is a software program that comes bundled with freeware/shareware and you agree to install it on your computer system. These are programs you definitely don’t want on your system simply because it does not give any beneficial service. PUP doesn’t involve malware in the traditional sense. One simple difference between malware and PUP is distribution. Malware is typically dropped through vulnerability exploitation and in contrast, PUP gets installed with the consent of the end-user, who consciously or unknowingly authorizes the PUP installation on their computer. A PUP might not be viewed as malicious or harmful but nonetheless, it is a common cause of clunky operating systems; some PUPs are a lot more aggressive by deliberately slowing down your PC.

How PUPs affect you?

Potentially Unwanted Programs appear in different forms and varieties, but most times, they are adware programs that exhibit irritating pop-up adverts and advertisements on web pages you explore. In addition, most free software nowadays comes with quite a few unwanted add-ons; in many instances a web browser toolbar or browser modification like a homepage hijacker. They’ll modify browser settings, change default search provider, substitute the default home page with their very own websites, decelerate internet speed, and will damage your computer as well. They could look harmless but PUPs are usually spyware. Some might carry dialers, keyloggers, web browser hijackers, and tracking components that will collect system details, or tracks customer habits and relays these records to third-party organizations. Because of this unwanted program, your application might freeze, your security protections could get disabled which may leave the computer susceptible, your system may get damaged, and the list goes on and on.

Tips on protecting yourself from unwanted software

• When installing anything on your PC, always read the fine print, including the EULA. Do not accept terms of use that are for bundled programs. • Select the “custom” install whenever downloading a software program. Particularly, pay attention to those small boxes which have been checked as default, where you might ‘agree’ to receive advertisements or install software bundlers. • Use anti-PUP software. Security applications like Safebytes Anti-Malware offer the very best real-time protection from PUPs and also other malware. • Be alert if you download and install freeware, open-source programs, or shareware. Avoid downloading and installing browser extensions and programs you are not knowledgeable about. • Use only official product sites for downloading applications. Avoid download websites completely since the majority of websites force users to download the software using their own download manager, which is often bundled with some kind of unwanted program.

Safebytes Anti-Malware scans and detects malware for free. To complete removal, and ensure full PC protections, a paid license key is required.

Malware could potentially cause a lot of damage to your computer. Some malware sits in between the computer and the net connection and blocks a few or all internet sites that you would like to check out. It could also block you from installing anything on your computer, particularly anti-virus programs. If you are reading this article now, you’ve perhaps recognized that a malware infection is a reason behind your blocked net connectivity. So what do if you need to download and install an anti-virus application like Safebytes? There are a few solutions you can attempt to get around with this issue.

Boot Windows in Safe Mode

The Windows-based PC includes a special mode called “Safe Mode” where only the minimum required programs and services are loaded. In the event the malware is blocking internet connection and affecting your PC, running it in Safe Mode enables you to download antivirus and run a scan while limiting potential damage. To enter into Safe Mode or Safe Mode with Networking, press F8 while the system is booting up or run MSCONFIG and locate the “Safe Boot” options in the “Boot” tab. Once you’re in Safe Mode, you can try to download and install your anti-malware software program without the hindrance of the malicious software. Following installation, run the malware scanner to eliminate most standard infections.

Obtain the security program in an alternate web browser

Certain malware may target vulnerabilities of a specific web browser that obstruct the downloading process. If you seem to have a virus attached to Internet Explorer, then switch over to an alternate browser with built-in security features, such as Firefox or Chrome, to download your favorite antivirus program – Safebytes.

Create a portable anti-malware for removing malware

Here’s another solution which is utilizing a portable USB antivirus software that can check your system for malicious software without the need for installation. Adopt these measures to run the anti-malware on the infected computer system. 1) On a clean computer, install Safebytes Anti-Malware. 2) Plug the Thumb drive into the uninfected computer. 3) Double-click the exe file to run the installation wizard. 4) Pick a USB flash drive as the location when the wizard asks you where you want to install the program. Follow the on-screen instructions to finish the installation process. 5) Remove the flash drive. Now you can utilize this portable anti-virus on the affected computer system. 6) Double-click the anti-malware program EXE file on the flash drive. 7) Run Full System Scan to identify and clean-up up all sorts of malware. These days, an anti-malware program can protect your computer from different forms of online threats. But how to select the right one amongst countless malware protection software that is available in the market? As you might be aware, there are numerous anti-malware companies and products for you to consider. Some of them are great, some are ok types, while some will ruin your computer themselves! You have to choose one that is reliable, practical, and has a strong reputation for its malware source protection. One of the strongly recommended software is SafeBytes AntiMalware. SafeBytes has a superb reputation for quality service, and customers appear to be very happy with it. SafeBytes can be described as a highly effective, real-time anti-malware application that is created to assist everyday computer users in safeguarding their computers from malicious internet threats. Using its cutting-edge technology, this application will assist you to eradicate multiples types of malware like computer viruses, PUPs, trojans, worms, ransomware, adware, and browser hijackers. There are many wonderful features you will get with this security product. Below are some typical features found in this software: Robust, Anti-malware Protection: Built on a highly acclaimed anti-virus engine, this malware removal application has the capacity to find and get rid of various obstinate malware threats like browser hijackers, PUPs, and ransomware that other common antivirus software will miss. Real-time Protection: Malware programs attempting to get into the system are identified and stopped as and when detected by the SafeBytes active protection shields. They are very effective in screening and eliminating different threats because they’re constantly improved with the latest updates and alerts. Internet Security: Safebytes assigns all sites a unique safety score that helps you to get an idea of whether the webpage you’re going to visit is safe to browse or known to be a phishing site. Light-weight: This software program is not “heavy” on the computer’s resources, so you’ll not notice any performance problems when SafeBytes is working in the background. 24/7 Online Support: Skilled technicians are at your disposal 24/7! They will promptly resolve any technical issues you might be experiencing with your security software. SafeBytes has come up with a wonderful anti-malware solution that can help you conquer the latest malware threats and virus attacks. Once you’ve installed SafeBytes Anti-Malware, you will no longer need to bother about malware or other security worries. To ensure the complete removal, manually check your hard drive and registry for all of the following and remove or reset the values accordingly. Please note that this is for advanced users only and may be difficult, with incorrect file removal causing additional PC errors. In addition, some malware is capable of replicating or preventing deletion. Doing this in Safe Mode is advised.
Files: %APPDATA%AMMYY C:%DOCUMENTS%%%USER%%LocalTemp$inst.tmp C:%DOCUMENTS%%%USER%%LocalTemp$insttemp_0.tmp C:%DOCUMENTS%%%USER%%LocalTempAA_v3.exe C:%DOCUMENTS%%%USER%%LocalTempencrypted.exe C:Documents and Settings%USER%Application DataCasablanca C:Documents and Settings%USER%Application DataBl 430 493 557.ADO C:Documents and Settings%USER%Application DataDakar C:Documents and Settings%USER%Application DataMegaloblast.a C:Documents and Settings%USER%Application DataCrypto.dll C:%DOCUMENTS%%%USER%%LocalTempnsh2.tmpSystem.dll Key: HKUS-1-5-21-1801674531-413027322-2147225017-500SoftwareAmmyy Key: HKLMSOFTWAREAmmyy
Read More
Cooler Master XG850 PLUS PLATINUM

Enter Cooler Master XG850 PLUS PLATINUM, a new, in-house designed power supply from Cooler Master. I will admit that in last years I was a big fan of Cooler Master and their components, well not all but power supply and PC cases were always products from them that I liked and used. The latest power supply from them does not disappoint and I must say that I like it very much, it is hi-quality, it is silent, it has a large LCD display where you can see its current state and also has some RGB lights so it looks cool in your case.

cooler master power supply XG850 PLUS PLATINUM

Technical specifications

So without further detours here are the technical specifications and then we will talk a little about it.

Model: MPG-8501-AFBAP-X
ATX Version: Intel ATX 12V Ver. 2.53
PFC: Active PFC
Input Voltage: 100-240V
Input Current: 12-6A
Input Frequency: 50-60Hz
Dimensions (L x W x H): 160 x 150 x 86 mm
Fan Size: 135mm
Fan Speed: 1800 RPM
Noise Level @ 100%: ≤ 25 dBA
Efficiency: ≥ 92% @ Typical Load
80 PLUS Rating: 80 PLUS Platinum
ErP 2014 Lot 3: Yes
Operating Temperature: 0-50°C
Power Good Signal: 100 - 150 ms
Hold Up Time: ≥ 16ms
MTBF: >100,000 Hours
Protections: OPP, OVP, OCP, UVP, SCP, OTP, Surge, and Inrush Protection
Regulatory: TUV, cTUVus, CE, BSMI, FCC, CCC, EAC, UKCA
ATX 24 Pin Connectors: 1
EPS 4+4 Pin Connectors: 1
EPS 8 Pin Connector: 1
SATA Connectors: 12
Peripheral 4 Pin Connectors: 4
PCI-e 6+2 Pin Connectors: 6
USB Protocol 10P: 1
Series: XG Series
80 Plus: Platinum
Modular: Full Modular
Wattage: Above 750W

Opinion about Cooler Master XG850 PLUS PLATINUM

If we put aside the technical characteristics of the power supply itself we are left with visual and real working experience. Now real working experience will not be covered here since yea it is working great but it needs some time and a long period of testing in order to be able to say that it is indeed reliable and great but considering I have never had any issues personally with power supplies from Cooler Master I will assume that this one is also very reliable and hi-quality.

That leaves us basically with looks and feels of supply itself and I must say that I like it, and I mean I like it a lot. It feels hi-quality and it looks hi-quality. The LCD display is very good looking and it is very crisp and readable. With power supply some proprietary software so you can choose what you want on display on the screen and also you can control RGB and display colors with it.

I have not opened the power supply to see how it looks inside but from what I could see I think this would be my new power supply if I were building a new PC now. I recommend it and if you decide to get it I hope it will serve you long long time.

Thank you for reading and I hope to see you next time.

Read More
Switch audio devices in Windows 11 taskbar
windows 11 audio settingsWindows 11 has brought some new features and changed some of the existing ones. One of these changes includes quick switching of audio devices which will play audio. Audio switching can still be done under the taskbar, it is just a little different and one could say even hidden. Follow this quick guide and you will be switching from your headphones to speakers as an example in a matter of seconds.
  1. Click on the speaker icon located in the far-right part of the taskbar.
  2. After the quick settings menu appears click on the right arrow located right of the volume slider. If the arrow is not present, instead of click on the pencil icon, then on add, and finally select Volume from the list.
  3. After clicking on the arrow icon, a list of all enabled audio devices on the system will replace the volume slider. Click on the desired audio device in order to make it active.
  4. Click anywhere outside the quick setting menu to save changes and close it.
Note: in the Quick settings menu if you choose More Volume Settings it will bring you to System > Sound where you can access more sound input and output options.
Read More
1 2 3 171
Logo
Copyright © 2023, ErrorTools. All Rights Reserved
Trademark: Microsoft Windows logos are registered trademarks of Microsoft. Disclaimer: ErrorTools.com is not affiliated with Microsoft, nor claims direct affiliation.
The information on this page is provided for information purposes only.
DMCA.com Protection Status