In case you don’t know, Windows 10 now allows users to check the Bluetooth battery level of devices. More often than not, the accessories or peripherals users use for their Windows 10 devices are connected to it using Bluetooth technology. This high-speed low-powered wireless technology is designed to link mobile devices, computers, and other network devices over a short distance wirelessly.
Monitoring the battery level of a device where Bluetooth is enabled isn’t an easy task as most of these devices do not support the Bluetooth battery monitor or the battery level display. And even when on devices that do, you still have to install additional software to find it. However, Windows 10 eliminates this requirement and all you have to do is add a Bluetooth device and connect that Bluetooth device. How? Follow the instructions provided below.
Step 1: Adding a Bluetooth Device
The easiest way to get your Bluetooth device battery to be displayed on your Windows 10 screen is to simply add a Bluetooth device. To do so, follow these sub-steps:
First, turn on the Bluetooth mode on your device.
Next, go to Windows Settings > Devices > Bluetooth & other devices.
From there, click on the “+” button next to the ‘Add Bluetooth or other devices” option and select the type of device you want to add.
Step 2: Connecting the Bluetooth Device
Once you’ve added the device, it will be visible under the “Add a device” screen.
Now select the newly added Bluetooth device and click the “Done” button.
After that, it will now be connected. Go back to the “Bluetooth & other devices” window and scroll down to the section of “Mouse, Keyboard, and Pen”.
From there, move the cursor alongside the connected device to display its battery level.
Keep in mind that there are several ways in which you can display the battery information of the Bluetooth device. However, Windows 10 understands only one of them per se. So if your device is not a Bluetooth Low Energy device, Windows 10 won’t be able to show its battery information and won’t display its battery level.
Taking information from the internet or from other sources usually involves selecting the text, copying it into the clipboard, and then pasting it into your file. In today's modern applications pasting text will most of the time take its formating with it.
By formatting what I am talking about are parameters like font size, line breaks, hyperlinks, font styles, etc. and sometimes you do not want any of these in your file, you would like and prefer to have just plain text so you can format it as you wish.
In order to paste just plain text instead of using the CTRL + V keyboard shortcut, press CTRL + SHIFT + V instead. This shortcut will paste the only text into your file.
Shortcut and Microsoft Word
Leave it to Microsoft to make its shortcut not work in their application. In Microsoft Word, you can only use the standard CTRL + V shortcut, if you press CTRL + SHIFT + V nothing will happen. So in order to paste the only text into a word document, choose to paste special > text only
Other applications
I have tried CTRL + SHIFT + V in various applications like photoshop, illustrator, InDesign, visual studio code, slack, discord, WordPress installations, etc and only one that has not worked for me was Word and office in general so you are safe to use this trick and have desired results.
When you get the error information, "The Software Can Not Begin Because MSVCR100.Dll Is Missing", what this implies is that the Computer will be lacking the MS Visual C++ 2010 libraries.
The malfunction is rather frequent throughout installations. It doesn't matter the number of times you try to reinstall the program.
The malfunction can happen whether you've been utilizing your pc for many years, or it's really a recent one.
Solution
Error Causes
a) Missing MSVCR100.DLL: As the problem message indicates, you get this information mainly because MSVCR100.DLL is completely missing.
b) Broken MSVCR100.DLL: When the msvcr100.dll is broken, you will also get the same error, suggesting the software won't start.
The thing you need to understand is the fact that MSVCR100.DLL is playing an important role in the application referred to as MS Visual C++ 2010 Redistributable Package.
Without the MS Visual C++ 2010 Redistributable Package, any software that you simply make an effort to install won't start. You could possibly complete installing it by pursuing proper installation procedures, and then end up getting the "The Software Can Not Begin Because MSVCR100.Dll Is Missing" error.
Further Information and Manual Repair
If you get the "The Software Can Not Begin Because MSVCR100.Dll Is Missing" error information on an effective setup of any software, you shouldn't worry. You can really repair the issue and commence your recently installed software without any more hassle.
Start by checking whether you presently use 64-bit or 32-bit Windows. Visit the start button, in case you use Winxp. Type winver. On the window that appears, click Run, subsequently push enter. Head to Start, in case you use both Win7 or Vista.
Subsequently, click on the search box and type “Computer”. Right-click windows and subsequently click on Properties. Under Windows Edition, you'll find whether your Windows is 64-bit or 32-bit.
Search for the correct variation of MS Visual C++ 2010 Redistributable Package, as soon as you discover whether your Windows is 64-bit or 32-bit. Down load the x86 variant of MS Visual C++ Redistributable Package if your version is 32-bit and you must obtain the x64 variant of MS Visual C++, for those who own a-64-bit version of Windows Operating System.
You must never obtain MS Visual C++ 2010 Redistributable Package from third-party websites.
This is because Microsoft doesn't charge a cent for the files. The files are openly and easily available on Microsoft. These files come in many different variants. Consequently, select what's suitable for your own Computer with regards to the version of Windows which you operate.
Never pick the edition of MS Visual C++ 2010 Redistributable Package that's not compatible or appropriate to your Windows Operating System.
Make use of the release date, when installing MS Visual C++ 2010 Redistributable Package. You might also look out for Service Pack 1 and obtain it for your Windows. Service Pack 1 only ensures that you simply obtain the latest edition.
As soon as you end installing the most up-to-date version of MS Visual C++ 2010 Redistributable Package as demonstrated above, reboot your computer and you'll not have to worry about getting the annoying"The Software Can Not Begin Because MSVCR100.Dll Is Missing" error message anymore.
If by any chance your search result in Windows is misleading, missing, or incorrect then it is a high probability that your search index is out of date. To repair this issue follow this guide step by step.
Please take note that rebuilding the whole search index can take a long time on some systems depending on the size of the index itself, CPU speed, HD speed, etc. Sometimes it can take even hours on large drives.
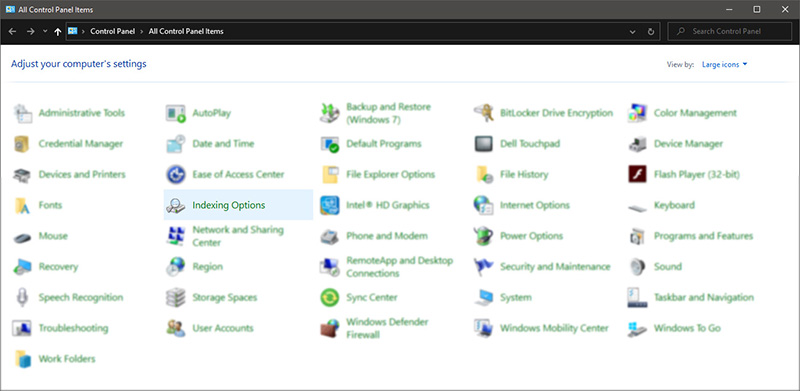
First, press ⊞ WINDOWS + R to open the run dialog and type in it Control panel to open the control panel.
Once you are in the control panel, switch your view to large icons and locate Indexing options.
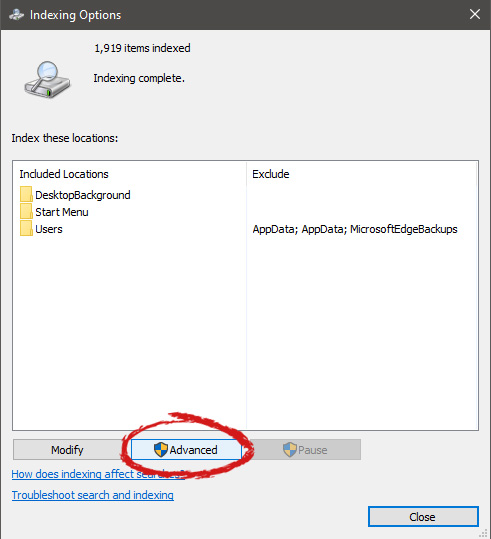
Inside indexing options, click on advanced.
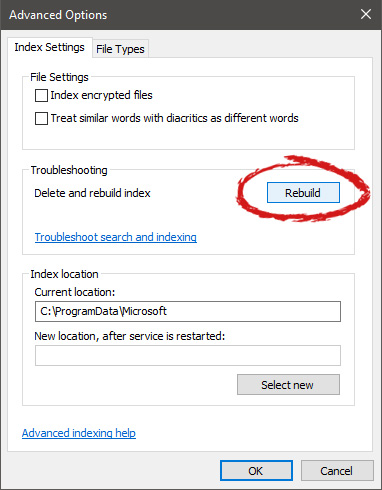
In advanced options click on the rebuild and confirm.
Leave your computer to finish and your searches should be working fine now.
If your Windows PC encounters an error, it will display a Blue Screen of Death or BSOD error which usually comes up for a fraction of second and creates some logs or Dumps Files as what other user prefers to call it and then boots your PC suddenly. This process usually takes place quickly that most users find it hard to get the error code and won’t probably be able to check what really went wrong with their PCs. This is where the dump files come in. They are stored internally in your computer and can only be accessed by an administrator. They are classified into 4 main types and in Windows 10 they are either:
Complete Memory Dump
Kernel Memory Dump
Small Memory Dump (256 KB)
Active Memory Dumps
Dump Files are useful as they could help you in resolving the problem and so you need to configure your Windows 10 PC to create them but first, you need to make a system restore point. This is essential as you are about to modify some system files as well as critical Windows 10 settings. There are two ways you can create Dump files – first is by modifying the settings in the Startup and Recovery and lastly is via the WMIC command line. Refer to the instructions prepared below to be guided on how you can create Dump files after any BSOD error using these options.
Option 1 – via Startup and Recovery
Type in “control panel” in the Cortana Search box and then click on Control Panel from the search results to open it.
After opening Control Panel, you need to make sure that you view the contents by their Category then click on the header link which is labeled “System and Security” or you could also right-click on the This PC icon and then click on Properties.
Next, select the Advanced system settings from the left panel. Once you do, a new and small window will pop up.
Under the newly opened window, look for the section called Startup and Recovery and then click on the Settings button.
And from the System Failure section, you can choose any option from the drop-down for Write debugging information such as:
None – this means that there is no dump file created by Windows
Small Memory Dump – this means that Windows will create a Minidump file on BSOD
Complete Memory Dump – this means that Windows will create a Complete Memory Dump file on BSOD
Automatic Memory Dump – this means that Windows will create an Automatic Memory Dump file on BSOD
Active Memory Dump – this means that Windows will create an Active Memory Dump file on BSOD
Note: The complete dump needs a page file that is allowed to be the size of the physical memory installed in your PC with a dedicated 1 MB of space for just the page header.
Now once you have selected the most suitable option for you, just click on OK/Apply and then exit.
Restart your PC to successfully apply the changes made.
Option 2 – via the WMIC command line
The first thing you need to do to create Dump files via the WMIC command line is to tap the Win + X keys combination or simply right-click on the Start button and then select the Command Prompt (Admin) option. You could also type in “cmd” in the Cortana search box and then right-click on Command Prompt from the results and select Run as administrator.
After that, type in any of the commands given below depending on your preferences so that your Windows 10 PC will be configured to create Dump Files:
No dump file: wmic RECOVEROS set DebugInfoType = 0
Small Memory Dump: wmic RECOVEROS set DebugInfoType = 3
Kernel Memory Dump: wmic RECOVEROS set DebugInfoType = 2
Complete Memory Dump: wmic RECOVEROS set DebugInfoType = 1
Automatic Memory Dump: wmic RECOVEROS set DebugInfoType = 7
Active Memory Dump: wmic RECOVEROS set DebugInfoType = 1
Note: A complete dump has to have a Page file which is allowed to be the size of the physical memory installed on your PC accompanied by a 1 MB space for just the page header.
Now type in “exit” in the Command Prompt to exit it.
Restart your PC to apply the changes made successfully.
The GeForce Experience on graphics card manufactured by NVIDIA is an advantage for users who loves gaming as it makes enhances users’ gaming experience. However, there are times when it may also encounter some problems. One of the problems users may encounter is the error code 0x0001. This kind of error occurs when users open the NVIDIA GeForce Experience utility. Here’s the full content of the error message:
“Something went wrong, try rebooting your PC and then launch GeForce Experience, ERROR CODE: 0x0001.”
Errors like this one diminish the overall experience of users due to the fact that when this error occurs, the NVIDIA GeForce experience wouldn’t even start which renders its features useless. There are several potential fixes you can check out to resolve this error but before you check them out, you can try to restart your computer first and then open the NVIDIA GeForce Experience once again, if you still encounter the error, then you need to check the NVIDIA Display Driver Services or update your NVIDIA display drivers or switch to the BETA release. You could also try to install and reinstall the NVIDIA display drivers or perform System Restore and see if it helps. For detailed instructions, follow the given options below.
Option 1 – Try to check the NVIDIA Display driver services
Tap the Win + R keys to open Run and then type “services.msc” in the field and hit Enter to open the Services Manager.
From there, look for the following NVIDIA services and make sure that their Startup types are as follows:
NVIDIA Display Container LS – Automatic
NVIDIA NetworkService Container – Manual
NVIDIA LocalSystem Container – Automatic
NVIDIA LocalSystem Container – Automatic
NVIDIA GeForce Experience Service – Automatic (Delayed Start)
NVIDIA Geforce Experience Backend Service – Automatic (Delayed Start)
NVIDIA Telemetry Container service – Automatic
Next, double click on each one of the services and go to Properties. Here, check if the service is running. If it’s not, just click on the Start button. On the other hand, if they’re already running, just click on Stop and then click on Start again.
Option 2 – Try to update the NVIDIA Display drivers
You can also try updating the NVIDIA display drivers as it might help in fixing the error. To update them, follow the steps below.
Tap the Win + R keys to open the Run dialog box.
Next type in “dxdiag” in the field and click OK or hit Enter to open the DirectX Diagnostic Tool.
From there, you can see what type of NVIDIA graphics card that your system is on.
Take note of your graphics card information and then look for the best drivers for your operating system. Once you’ve downloaded and installed the file, restart your PC.
Note: If you want to try out the beta release of the NVIDIA display drivers, click on this link. Beware though that the beta software is unstable and buggy and may cause some different bugs.
Option 3 – Try to roll back the driver to the previous version
If updating the NVIDIA display drivers didn’t work for you, then it’s time to roll back the device drivers. It is most likely that after you updated your Windows computer that your driver also needs a refresh.
Tap the Win + R keys to launch the Run window and then type in the “msc” command and hit Enter to open the Device Manager window.
Under the Device Manager, you will see a list of drivers. From there, look for the NVIDIA Drivers and expand it.
Next, select the driver entries that are labeled appropriately.
Then select each one of them and double click to open a new mini window.
After that, make sure that you’re on the Driver tab and if you are not, just navigate to it then click the Roll Back Driver button to switch back to the previous version of the NVIDIA Drivers.
Now restart your computer to successfully apply the changes made.
Option 4 – Try to run System Restore
You could also run System Restore as it might help fix the error code 0x0001 in NVIDIA GeForce Experience.
Tap the Win + R keys to open the Run dialog box.
After that, type in “sysdm.cpl” in the field and tap Enter.
Next, go to the System Protection tab then click the System Restore button. This will open a new window where you have to select your preferred System Restore point.
After that, follow the on-screen instructions to finish the process and then restart your computer and then check if the error code 0x0001 in GeForce Experience is now fixed.
Option 5 – Do a clean install on the NVIDIA driver
Before you do a clean install on the NVIDIA driver, you have to download the latest version of the Display Driver first.
Boot your Windows 10 PC into Safe Mode.
After that, double click on the executable file of the Display Driver Uninstaller to run and install it.
After the installation, open the program. Once you do, you should see the following window on your screen:
In the program window, click on the “Clean and restart” button.
After your PC has rebooted, download the NVIDIA drivers.
Then select your Product Type, Product Series, Product, Operating System, and Language appropriate for your hardware specifications as well as personal requirements.
Next, click on Search to display the latest available driver as per the information you entered.
And click on Agree and Download to start downloading the latest driver executable file.
Run the executable file after you finished downloading the latest driver executable file and then select Custom and click on Next.
Afterward, select “Clean Install” and proceed. Doing so would install the latest driver on your PC.
Restart your PC and check if the error’s now fixed. If not, you can try installing an older version of the driver instead.
There has been recently discovered in the field of malware targeting Android devices. Affecting more than 10 million users of Android phones, the malware GriftHorse is doing its attacks via phishing and premium services scams. A lot of applications have been discovered that are hosts for this malware and many of them are inside the Google store and available for download.
According to Zimperium zLabs, this malware that was recently detected has been doing its scams and attacks even in November of 2020 and has thus far accumulated hundreds of thousands of dollars in its scam.
On the surface it looks very harmless, asking for typical permissions like internet access, calls, and other related needed functions, and then it waits. After few months the real attack happens when users get charged with premium service they never subscribed to in the first place.
List of Infected Applications that Carry GriftHorse Trojan
Zimperium zLabs listed out some of the apps with this malware. Users are advised to avoid installing them.
Amazing Video Editor
Bag X-Ray 100% Scanner
Bus – Metrolis 2021
Call Recoder Pro
Call Blocker-Spam Call Blocker
Cinema Hall: Free HD Movies
Coupons & Gifts: InstaShop
GPS Phone Tracker – Family Locator
Fingerprint Changer
Fitness Point
Free Calls WorldWide
Geospot: GPS Location Tracker
GPS Phone Tracker – Family Locator
Handy Translator Pro
Horoscope : Fortune
iCare – Find Location
iConnected Tracker
Instant Speech Translation
Lifeel – scan and test
My Chat Translator
My Locator Plus
Plant Camera Identifier
Racers Car Driver
Safe Lock
Screen Mirroring TV Cast
Slime Simulator
Smart Spot Locator
These are only some of the many infected apps available on the internet.
Zimperium zLabs also warned that GriftHorse Trojan exists in over 70 countries worldwide. The infected app quickly changes the language and displays content depending on the user’s IP address.
When clean Windows is installed or when you place new hardware in your computer usually Windows itself detects the device and installs its driver. The question that comes now is, do you keep that driver or do you install the manufacturer's one.
In order to answer this question let's analyze what is difference between the two drivers and other factors which could influence your decision.
Difference between drivers
First of all, know that drivers Windows installs are also drivers from the device manufacturer which have gone through Microsoft quality control in order to be included in Windows itself. Now naturally question which occurs, what is the difference, well answer to that would be this: in Windows, you have stripped down driver, just a driver in order for Windows to know what device is plugged and how to use it, meaning that for example if you install printer device, you will be able to print documents and Windows will know it is a printer but ...
You will not get the control panel for that printer where you can adjust the printer itself and all of its features like let's say paperweight, etc. So if you need these kinds of features in that case it would be better to install a complete driver suite from the manufacturer and get the whole package. Windows will recognize the RAZER mouse for example but you will not be able to change its colors of program custom buttons on it until you install RAZER drivers.
One more important thing to note is that drivers which are in Windows are less updated than drivers from the manufacturer's site. That being said, if you prefer and want to have the latest drivers you will prefer to get them again from the manufacturer.
Conclusion
So it seems that manufacturer's drivers are always in some form of advantage and that you will always want them and most of the time this is true, as a matter of fact, the only time I could think that you could use bare down Windows drivers is when new drivers update breaks something in Windows and device start behaving improperly. in this particular case, it is better to roll back to the previous Windows driver which has passed Microsoft quality control and is working for sure.
In any other case, you are better off with the latest manufacturers drivers
If you would like to read more helpful articles and tips about various software and hardware visit errortools.com daily.
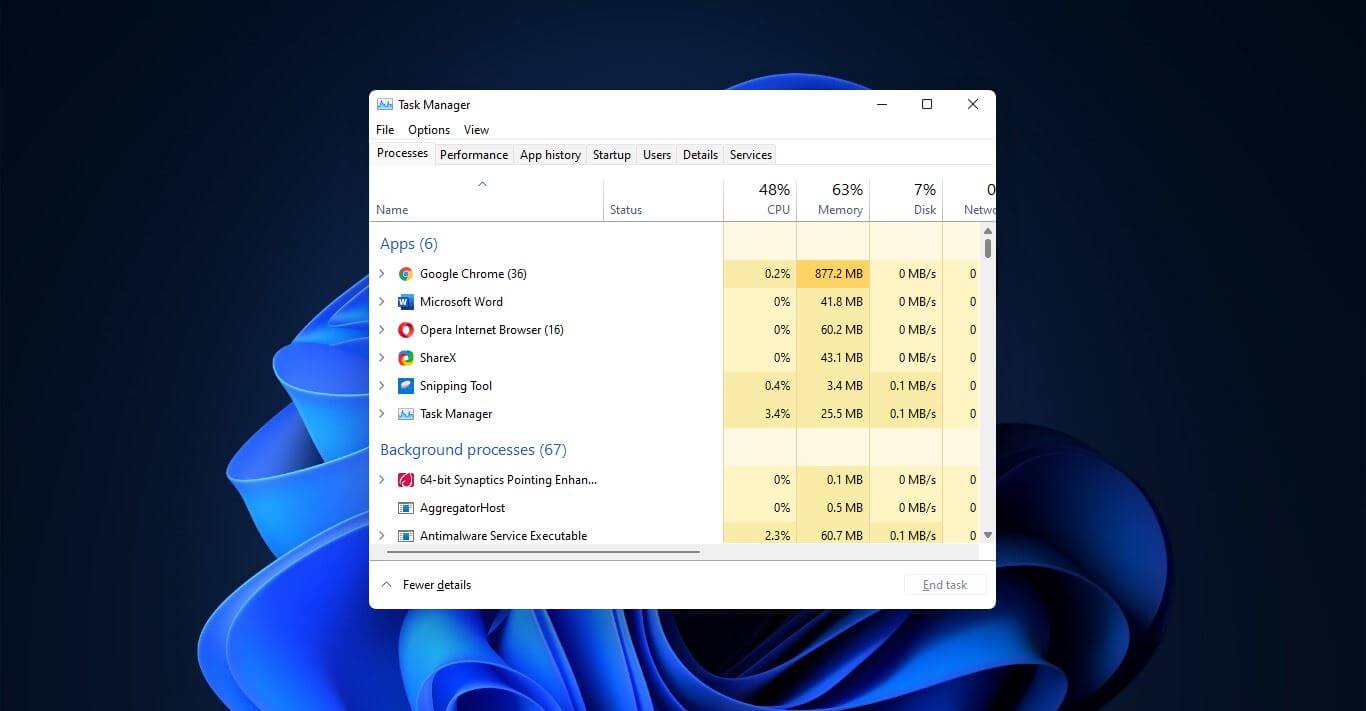
Something we are used to doing in a certain way inside Windows 10 is slightly changed in Windows 11. One of those things is how you open task manager, well kind of.
Option to right-click on the taskbar and launch task manager is gone but do not worry there are other same and simple ways you can launch it.
Press CTRL + SHIFT + ESC or CTRL + ALT + DEL
Right-click on the START button
Type task manager in start search on top in the start menu
Type taskmgr in command prompt
Press ⊞ WINDOWS + R to open run dialog and type in taskmgr
And that’s it, now depending on your situation, you might use different methods to evoke task manager.
After a lot of backlash about choosing the default Windows browser, Microsoft has officially backed up and brought back a one-click browser change into Windows 11.
For anyone who is not aware, when Windows 11 was released if you wanted to switch to another browser you had to go into the settings app and choose the default browser for different types of file extensions like HTML, HTM, PDF for opening on the web, etc. Of course, this was completely unnecessary and it was not well received by users. So after some time, Microsoft backpedaled to standard one click, choose your default browser solution that existed in the previous version of Windows OS.
Altho sometimes Microsoft knows how to irritate its users base, it is good to know that they can also listen and fix things that are required.
The New and upcoming HAF 700 Evo from Coller master is a beast of a case, but so is its price. The case itself is still not released but as sources say it will be soon, well at least we hope so. The price will be around $500 which is a little on the expensive side of things but the features it is bringing are very impressive.
HAF 700 EVO Size and its advantages
HAF stands for High Airflow and with this case, you are going to get it but first let us talk about other characteristics of the case. Firstly case is ATX full tower, pretty big going 24.64 x 11.45. x 26.22 inches in size but like all full tower cases it can hold all motherboard types including Mini-ITX, Micro-ATX, ATX, E-ATX. The large case size also lets you place a pretty big GPU, going to 19.29 inches (490 mm) in its length covering currently all available Graphic cards on market.
Being a very big computer case is not just placing motherboard and big GPU, there are other great advantages of it, firstly that you can go wild with your CPU cooler, going all the way to 6.5 inches in cooler height will satisfy all users and having 12x 2.5 or 3.5-inch internal bays will. And if even that is not enough you have 8 expansion slots available.
Inside HAF 700 EVO
Inside the casing you will also find 2 front fans with 200mm diameter, 2 rear fans sized 120mm, and 1 bottom fan of 120mm. You can also manually mount standard 120mm fans on top of the case for maximum airflow.
Front panel and outsides
The front side is filled with 4x USB 3.2 Gen 1 Type-A (5 Gbps), 1X USB Type-C (up to 10Gbps), 3.5mm both headphone and audio jack along with a reset switch. Also, the circle in the very front is a hi-resolution LCD customizable display, you know, just to add more flavor and personal touch to the case. Fron is also filled with glass panels emitting RGB light.
Of course, you must also have a Tempered Glass Side Panel and well weight of 53.57 pounds (24.3 kg), yup you read that correctly, beside its hefty price tag this cooler master beast also is pretty heavy. Granted all of the weight comes from the glass front panel it is still a little hard on moving and taking out of the box.
This is also the case where you will not need a single screwdriver, everything is made to be assembled with your hands alone pushing easy assembly into the front row.
Conclusion
So in the end what are my thoughts about this expensive and heavy PC case? Would I recommend it? The answer to that question could depend really on your budget, let us be really honest here if you can afford it, YES, wholeheartedly I would recommend the case, it is great, it feels great, it looks great and the airflow is amazing. However, if you are tight on a budget, there are other great cases with excellent airflow and you might want to skip this one.


 Once you are in the control panel, switch your view to large icons and locate Indexing options.
 Inside indexing options, click on advanced.
 In advanced options click on the rebuild and confirm.
 Leave your computer to finish and your searches should be working fine now.
 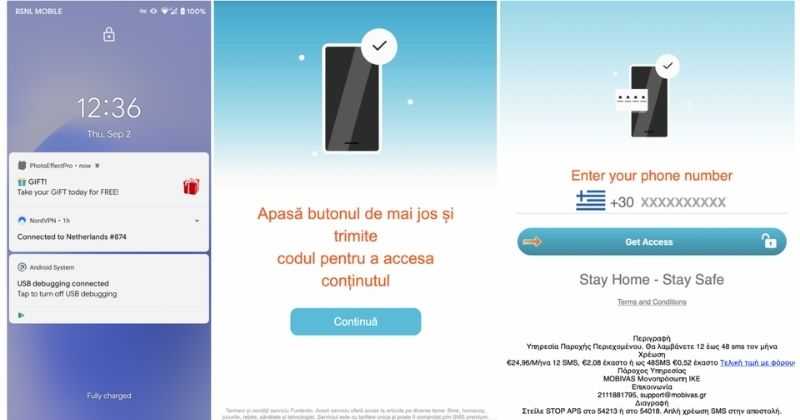 According to Zimperium zLabs, this malware that was recently detected has been doing its scams and attacks even in November of 2020 and has thus far accumulated hundreds of thousands of dollars in its scam.
On the surface it looks very harmless, asking for typical permissions like internet access, calls, and other related needed functions, and then it waits. After few months the real attack happens when users get charged with premium service they never subscribed to in the first place.
According to Zimperium zLabs, this malware that was recently detected has been doing its scams and attacks even in November of 2020 and has thus far accumulated hundreds of thousands of dollars in its scam.
On the surface it looks very harmless, asking for typical permissions like internet access, calls, and other related needed functions, and then it waits. After few months the real attack happens when users get charged with premium service they never subscribed to in the first place.
 Option to right-click on the taskbar and launch task manager is gone but do not worry there are other same and simple ways you can launch it.
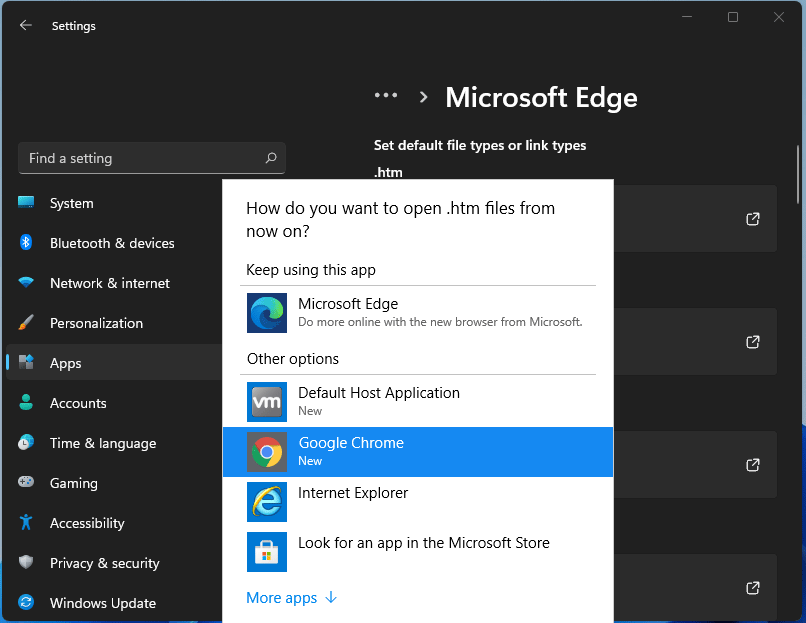 For anyone who is not aware, when Windows 11 was released if you wanted to switch to another browser you had to go into the settings app and choose the default browser for different types of file extensions like HTML, HTM, PDF for opening on the web, etc. Of course, this was completely unnecessary and it was not well received by users. So after some time, Microsoft backpedaled to standard one click, choose your default browser solution that existed in the previous version of Windows OS.
Altho sometimes Microsoft knows how to irritate its users base, it is good to know that they can also listen and fix things that are required.
For anyone who is not aware, when Windows 11 was released if you wanted to switch to another browser you had to go into the settings app and choose the default browser for different types of file extensions like HTML, HTM, PDF for opening on the web, etc. Of course, this was completely unnecessary and it was not well received by users. So after some time, Microsoft backpedaled to standard one click, choose your default browser solution that existed in the previous version of Windows OS.
Altho sometimes Microsoft knows how to irritate its users base, it is good to know that they can also listen and fix things that are required. 
