There are times when an IT admin has to set up multiple IP addresses to the same network adapter. Setting up multiple IP addresses in scenarios like hosting various SSL sites, speed up traffic exchanges can help in avoiding being blacklisted in the SPAM filters, and so on. So in this post, you will be guided on how exactly you can assign multiple IP addresses to the network adapter in your Windows 10 computer.
There are several ways to assign multiple IP addresses in a network adapter. You can do it using the Network Adapter settings or using the Netsh utility, as well as the Windows PowerShell utility. To get started, refer to each one of the options provided below.
Option 1 – Assign multiple IP addresses via Network Adapter settings
Go to Settings first and from there, select Network & Internet, and then click on the Change adapter options. This will show you a list of both the physical and virtual network adapters in your computer.
Next, double click on the Ethernet adapter where you want to assign the multiple IP addresses and then click on the Properties button.
After that, you should see the Ethernet properties where you have to select the “TCP/IPv4” or “TCP/IPv6”.
Once done, click on the Properties button and then select the “Use the following IP address” option under the General tab.
Now you have to add an IP address, subnet, and default gateway to the network adapter and then click on the Advanced button.
This will open the Advanced TCP/IP settings where you have to click on the Add button so you can add an IP address. From here, you can keep adding multiple IP addresses to the network adapter. You also have the option to add multiple gateways or DNS IP addresses.
Once done, if you execute the “ipconfig” command, you should see all the secondary IP addresses listed.
Option 2 – Assign multiple IP addresses using the Netsh command
Another way to assign multiple IP addresses to your network adapter is via the Netsh command.
In the Start Search, type “command prompt” and from the search results that appear, right-click on Command Prompt and then select the “Run as administrator” to open it with admin privileges.
If a User Account Control or UAC prompt pops up, just click on Yes.
After that, run this command: Netsh int ipv4 add address name="Local Area Connection" 192.168.100.100 255.255.255.0 SkipAsSource=True
Note: You have the option to set “SkepAsSource” since it depends on your needs using the Netsh command. When it is configured as true, the IP address won’t be used by the OS for outbound connections.
Option 3 – Assign multiple IP addresses via Windows PowerShell
Tap the Win + X key combination and click on the “Windows PowerShell (Admin)” option.
After opening Windows PowerShell as admin, use the NetIPAddress command so you can add more IP addresses. Execute this command: Get-NetIPAddress | ft IPAddress, InterfaceAlias, SkipAsSource
Next, assign an IP address to a network adapter by executing this command: New-NetIPAddress –IPAddress 192.168.100.100 –PrefixLength 24 –InterfaceAlias “vEthernet” –SkipAsSource $True
Now to modify the “SkipAsSource” parameter, use this command: Get-NetIPAddress 192.168.100.100 | Set-NetIPAddress -SkipAsSource $False
There are times when you suddenly encounter a Blue Screen error like DRIVER_POWER_STATE_FAILURE error when resuming from Sleep or right after you shut down or restart as well as switch from Hibernate mode. This kind of Blue Screen error is due to some issue with the driver state. Moreover, the bug check “0x0000009F” in the error also indicates that a driver is in an inconsistent or invalid power state.
The DRIVER POWER STATE FAILURE Blue Screen error usually occurs during events that involve power state transitions like shutting down, moving in or out of standby mode, or hibernate mode. To resolve this error, you can check out the suggestions given below.
Option 1 – Update the Device drivers
The device driver installed in your computer might be incompatible with your operating system which is the reason why the DRIVER POWER STATE FAILURE Blue Screen error occurs. To fix that, you have to update your device drivers.
Reboot your computer into Safe Mode with networking support.
Tap the Win + R keys on your keyboard to open the Run dialog box.
After that, type “msc” in the field and hit Enter or click OK to open the Device Manager.
After opening the Device Manager, update all the outdated Device drivers on your computer.
Next, right-click on all the driver entries that are appropriately labeled, and then click the Update driver option.
Now restart your PC and check if the BSOD error is fixed or not.
Option 2 – Uninstall any faulty device drivers
Tap the Win + R keys on your keyboard to open the Run dialog box.
After that, type “msc” in the field and hit Enter or click OK to open the Device Manager.
From there, look for any device driver which has a yellow exclamation mark which indicates that something is wrong with them.
And then right-click on each one of them and click on Uninstall.
Once you’re done uninstalling the faulty drivers, restart your computer and allow your computer to reinstall the drivers you just uninstalled.
Option 3 – Run the Blue Screen Troubleshooter
The Blue Screen troubleshooter is a built-in tool in Windows 10 that helps users in fixing BSOD errors like rtwlane.sys Blue Screen error. It can be found on the Settings Troubleshooters page. To use it, refer to these steps:
Tap the Win + I keys to open the Settings panel.
Then go to Update & Security > Troubleshoot.
From there, look for the option called “Blue Screen” on your right-hand side and then click the “Run the troubleshooter” button to run the Blue Screen Troubleshooter and then follow the next on-screen options. Note that you might have to boot your PC into Safe Mode.
Option 4 – Try to remove external hardware
If there is any external hardware plugged into your computer especially the new ones, you can try removing it and then check if the Blue Screen error persists. If the problem gets solved, you might want to update the driver of that particular hardware. On the other hand, if you’re still getting the error, then proceed to the next given options below.
Option 5 – Try resetting Windows 10
To fix this BSOD error, you can try resetting Windows 10. Doing so won’t get rid of any file in your system – instead of erasing all your media files and documents, this reset option resets all the system settings and files.
Option 6 – Try running the System File Checker Scan
The SFC or System File Checker scan could detect and automatically repair damaged system files that could be causing the DRIVER POWER STATE FAILURE Blue Screen error. SFC is a built-in command utility that helps in restoring corrupted files as well as missing files. It replaces bad and corrupted system files to good system files. To run the SFC command, follow the steps given below.
Tap Win + R to launch Run.
Type in cmd in the field and tap Enter.
After opening Command Prompt, type in sfc /scannow
The command will start a system scan which will take a few whiles before it finishes. Once it’s done, you could get the following results:
Windows Resource Protection did not find any integrity violations.
Windows Resource Protection found corrupt files and successfully repaired them.
Windows Resource Protection found corrupt files but was unable to fix some of them.
The New and upcoming HAF 700 Evo from Coller master is a beast of a case, but so is its price. The case itself is still not released but as sources say it will be soon, well at least we hope so. The price will be around $500 which is a little on the expensive side of things but the features it is bringing are very impressive.
HAF 700 EVO Size and its advantages
HAF stands for High Airflow and with this case, you are going to get it but first let us talk about other characteristics of the case. Firstly case is ATX full tower, pretty big going 24.64 x 11.45. x 26.22 inches in size but like all full tower cases it can hold all motherboard types including Mini-ITX, Micro-ATX, ATX, E-ATX. The large case size also lets you place a pretty big GPU, going to 19.29 inches (490 mm) in its length covering currently all available Graphic cards on market.
Being a very big computer case is not just placing motherboard and big GPU, there are other great advantages of it, firstly that you can go wild with your CPU cooler, going all the way to 6.5 inches in cooler height will satisfy all users and having 12x 2.5 or 3.5-inch internal bays will. And if even that is not enough you have 8 expansion slots available.
Inside HAF 700 EVO
Inside the casing you will also find 2 front fans with 200mm diameter, 2 rear fans sized 120mm, and 1 bottom fan of 120mm. You can also manually mount standard 120mm fans on top of the case for maximum airflow.
Front panel and outsides
The front side is filled with 4x USB 3.2 Gen 1 Type-A (5 Gbps), 1X USB Type-C (up to 10Gbps), 3.5mm both headphone and audio jack along with a reset switch. Also, the circle in the very front is a hi-resolution LCD customizable display, you know, just to add more flavor and personal touch to the case. Fron is also filled with glass panels emitting RGB light.
Of course, you must also have a Tempered Glass Side Panel and well weight of 53.57 pounds (24.3 kg), yup you read that correctly, beside its hefty price tag this cooler master beast also is pretty heavy. Granted all of the weight comes from the glass front panel it is still a little hard on moving and taking out of the box.
This is also the case where you will not need a single screwdriver, everything is made to be assembled with your hands alone pushing easy assembly into the front row.
Conclusion
So in the end what are my thoughts about this expensive and heavy PC case? Would I recommend it? The answer to that question could depend really on your budget, let us be really honest here if you can afford it, YES, wholeheartedly I would recommend the case, it is great, it feels great, it looks great and the airflow is amazing. However, if you are tight on a budget, there are other great cases with excellent airflow and you might want to skip this one.
If by any chance your search result in Windows is misleading, missing, or incorrect then it is a high probability that your search index is out of date. To repair this issue follow this guide step by step.
Please take note that rebuilding the whole search index can take a long time on some systems depending on the size of the index itself, CPU speed, HD speed, etc. Sometimes it can take even hours on large drives.
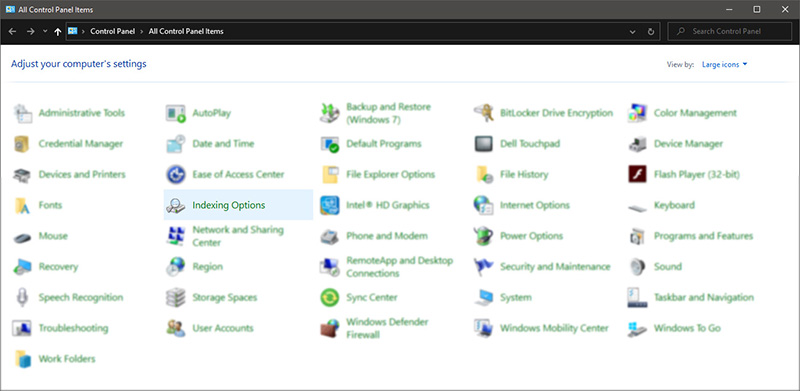
First, press ⊞ WINDOWS + R to open the run dialog and type in it Control panel to open the control panel.
Once you are in the control panel, switch your view to large icons and locate Indexing options.
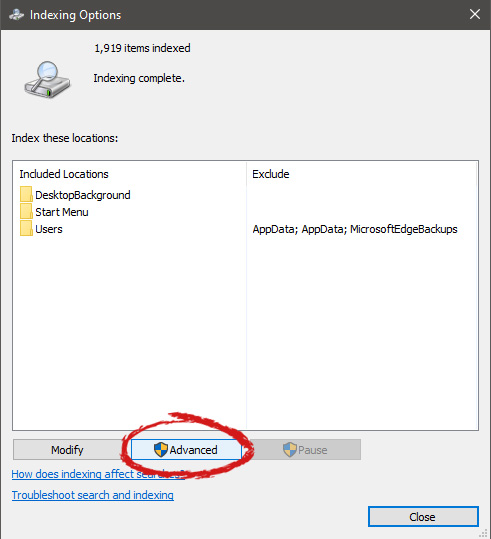
Inside indexing options, click on advanced.
In advanced options click on the rebuild and confirm.
Leave your computer to finish and your searches should be working fine now.
One of the cool and interesting features in Windows is the Screensaver which allows users to display animation or change the wallpaper automatically when the computer is not being used. This feature can also time out and lock your computer when it remains idle for quite some time. However, if you notice that the screensaver of your computer turns on a lot earlier, then you’ve come to the right place as this post will guide you on how you can change the timeout settings of the screensaver of your Windows 10 computer.
Usually, the screensaver in Windows 10 is turned off by default, however, if some other user has turned it on or if you have turned it on, you can actually change the timeout settings of the screensaver using several methods. You can do it through the Personalization settings, Registry Editor, as well as the Group Policy Editor.
Before you proceed with the instructions provided below, make sure that you create a System Restore point first. Once done, follow each one of the suggestions carefully to successfully change the Screensaver timeout settings in Windows 10.
Option 1 – Modify the timeout settings of Screensaver via Personalization settings
Open the Start menu and type “screen saver” in the field.
On the search results that appear, click on the “Change Screen Saver” option.
From there, you have the option to change the screen saver type, preview, open settings, change the wait time, as well as choose to display lock screen on your resume.
Now to change the timeout settings of your screensaver, you have to increase the wait time from 1 to 15 or anything that works for you.
Once done, click OK and exit to save the changes made.
Option 2 – Try to change the screensaver time via Registry Editor
The next option you can try to change the timeout settings in the screensaver is using the Registry Editor. To get started, follow these steps:
Tap the Win + R keys to launch the Run utility and type “regedit” in the field and hit Enter to open the Registry Editor.
Next, navigate to this registry path: ComputerHKEY_CURRENT_USERSoftwarePoliciesMicrosoftWindows
From there, right-click on Windows located in the right pane and select New > Key.
Name the key as “Control Panel” and right-click on it and select New > Key and then name it as “Desktop”.
Once done, click on the newly created Desktop key to highlight it.
After that, right-click on any empty space in the right pane and select New > String Value and then type “ScreenSaveTimeOut” and hit Enter to save it.
Now right-click on ScreenSaveTimeOut and select Modify and then set its value data in seconds.
Click on OK and exit the Registry Editor to save the changes made.
Option 3 – Change Screensaver timeout settings via Group Policy Editor
Tap the Win + R keys to open the Run dialog box and type “gpedit.msc” in the field and hit Enter to open the Group Policy Editor.
Next, navigate to User Configuration > Administrative Templates > Control Panel > Personalization.
Then look for a policy setting named “Screen saver timeout” and double click on it and then click on the Enabled option to enable it.
Add the screen timeout in seconds and click on the Apply and OK buttons to save the changes.
Restart your computer.
Note: If you want to disable the screensaver feature in your computer, you can always do so by disabling a policy setting named “Enable Screen Saver”.
Can graphic cards wear out over a longer period of time? Recent studies and experience from crypto miners say no but they can die due to different reasons like improper use, low cleaning habits, factory mistakes, etc.
Many gamers and people who use GPU intense applications tend to think that some glitches and hiccups in the software are a sign that graphic card is dying out and that it is time to be replaced. Altho this could be true in many cases these kinds of behavior are mostly due to old drivers and software issues.
Older cards can produce these kinds of results due to their old age and new software is often more demanding than these cards can handle.
So in order to diagnose and be sure that your GPU is indeed dying out lookout for these signs.
The Main Signs of a Dying GPU:
The Computer Crashes and Won’t Reboot
If your computer shutdown while working in the graphic application or while playing the game and the monitor loses signal there is a high chance the graphic card is soon going to be gone. Some motherboards have hardware detection failure and can signal immediate fail. If when turning your computer ON you are greeted with a blue screen with the message that the signal can not be found or you do not have picture at all it is most likely that GPU has failed.
Graphic Glitches While Playing Games
If you are playing the game and all of sudden you get off-color pixels, screen flickering, strange graphic behaviors, random artifacts, or similar and that keeps repeating in multiple games it is likely that GPU days are coming to an end.
Abnormal Fan Noise or Performance
Fans are an essential part of cooling the GPU and over time if they are intensively used they could wear out and need replacing. If however you have not noticed and have not replaced the fans card can sustain overheating damage.
Many cards have cooling fans that are designed to spin at a higher RPM only when the GPU is under load. It prevents bearings in the fans from dying prematurely, so don’t worry if one of your fans is inactive while you are browsing the web.
However, when you play games that utilize software that your card isn’t built to support, the bearings in the fans wear out faster. Once the fans stop working under load, the graphics card can quickly die.
How to Diagnose a Dying Graphics Card
Presented next are essential steps in order to recognize a dying graphic card.
Check Motherboard Error Codes
Many motherboards today completely shut down a component that is no longer working. If your graphics card has died completely, this may be one of the easiest ways to tell. If your motherboard doesn’t have display codes, you can try testing the card in a new system.
Open the computer case: Use your screwdriver to remove screws on the side panel and gently slide it back.
Locate the error code display on your motherboard: If you have a motherboard with error codes, they should appear near an outer corner.
Try to reboot your computer: Record each error number you see after you boot your computer.
Consult the motherboard manufacturer manual for error codes: Open the manual and locate the list for your error codes. If the code matches a graphics processing unit error, your video card could have died.
Check Hardware for Damage or Debris
A graphics card that has damage or debris on the physical parts might quickly overheat and kill the card.
Remove the screws holding the GPU in place: There are typically one or two screws holding the card to a bracket on the case.
Unhook the power cords from the GPU and pull the release tab: Remove the power cords from your GPU by pushing in their tabs and gently rocking them out. Once you remove each cord, gently push or pull up on the release tab near the motherboard.
Inspect the GPU for damage/debris: Check the card for any dirt or debris buildup and clean it out with a Q-tip. You can replace broken fan pieces from the manufacturer.
Test Your GPU Under Load
Download GPU stress-testing and heat-monitoring software.
With the card installed, run a stress test.
As you are running the stress test, run heat-monitoring software: With the stress test running, check your heat-monitoring software for GPU overheating. Any reading over 80 degrees Celsius is too hot.
Check device manager for outdated drivers: If your GPU is clean, but still running too hot, your software drivers are not installed correctly. To check, type in “device manager” at the bottom of your desktop and click on Device Manager. Find your display adapter and right-click on it to see if it’s working. If your drivers are not working correctly, it is indicated here usually. However, the driver may appear to be functioning even if it says otherwise in the properties.
Keep your graphic card drivers updated
When you don’t have the right driver installed, graphics cards can quickly burn up, and their cooling components may fail faster. That’s why you should always keep drivers updated for each new game you install or play. Older games may also release new software patches, so your GPU drivers should be updated accordingly.
Windows 11 has some cool animations including fading effects which make working in it feels nice and futuristic but the cost of this is that there is a slight delay to certain actions performed. If you want the snap fast feature in Windows 11 and do not care about this eye candy there is an easy way to turn animations off inside it.
First, open Windows Settings by pressing ⊞ Windows + I on your keyboard
Alternatively, click on Start, search for Settings, and then click its icon.
When Settings appears, look in the sidebar and select Accessibility.
In Accessibility settings, click on Visual Effects.
In Visual Effects, switch Animation Effects to Off.
That’s it, changes will be applied automatically, you can close settings and continue working inside Windows 11 without animations and fades.
You can always switch animations back On via settings if you change your mind.
The previous Windows versions all came with Microsoft's browser Internet Explorer. A lot of users love it because not only that it is easy to use. It is also very fast. Users didn’t have to worry about compatibility because it is almost always compatible with its Windows Version.
When they introduced Windows 10, they changed the name of the browser from Internet Explorer to Microsoft Edge. It is faster and more user-friendly compared to its predecessors. But after the Creator Update, some experienced receiving the inet_e_resource_not_found error code.
In contrary to what everyone expects, you actually don’t have to uninstall and reinstall the Microsoft Edge App. What you can do is reset the browser in your Apps & Features Settings in your Microsoft Settings.
To reset the browser you can follow the steps below:
Click on the Windows icon and go to settings.
Click on Apps and this will bring you to the Apps & Features page. Look for Microsoft Edge from the list of Apps and click on it.
Choose Advance Option
Scroll down then Under Reset, click on repair or reset. When you repair it will fix the existing problem but the data that caused the problem may still be present and can still cause problems. If you click on reset, it will delete all the cache and cookies that are installed in your browser but it will save your Favorites as well as your bookmarks.
Another way to resolve this is by disabling the feature TCP Fast Open on Microsoft Edge. To disable this, go ahead and follow the steps below:
Open the Microsoft Edge browser.
Type in about: flags on the Address (URL) bar.
Under Networking, uncheck the Enable TCP Fast Open.
Close your Microsoft Edge browser and open a new one.
Flushing the DNS also worked for other Users. Sometimes, the error code the inet_e_resource_not_found is caused by a corrupted DNS cache. There are 2 ways to flush your DNS. The first option is to use the command prompt to run the command.
To access the Command prompt or CMD, you can search for it on Cortana or you can click on the Windows icon to access the Programs, scroll down to the Windows System folder and click on it.
A drop-down menu will show up, click on Command Prompt which is the first on the list.
Type in the code ipconfig /flushdns and press enter.
There will be a message that will show that says Windows IP configuration successfully flushed the DNS Resolver Cache
Exit the CMD by typing exit and press enter.
The easiest way to do this is to Press the keys Window + R on your keyboard. Type in ipconfig /flushdns in the search box and hit enter or click on OK.
These are only some of the ways to resolve the inet_e_resource_not_found. There are other ways to further troubleshoot this issue such as reinstalling your Wifi Adapter Driver or adjusting the DNS Server Address. But most of the time, users are able to resolve the issue with the steps provided above.
Each you connect time external devices like scanners, printers, and the likes to a Windows 10 computer, the device either pushes the drivers through the USB or any other port, or you are expected to install the drivers through external media. In both cases, the driver will be loaded into the system, allowing you to use the device. However, it doesn’t always go smoothly as you could encounter some errors like the “Windows cannot load the Device Driver for this hardware because a previous instance of the Device Driver is still in memory ( Code 38 )”.
If you encounter such an error in the Device Manager, then this means that a previous version of the device driver is still in memory and that each time the device is used, that previous version is loaded into memory and then unloaded which triggers the “Windows cannot load the Device Driver for this hardware because a previous instance of the Device Driver is still in memory (Code 38)” error. This kind of error occurs if the operating system loads the unwanted driver or if it fails to unload the driver.
It could be that there is an obsolete version of the driver that’s still installed in the system or it could also be that you need to update your USB drivers as they could be outdated or the problem could also be due to some third party program that is interfering with the installation. Whatever the cause is, here are some suggestions you can check out to resolve the problem.
Option 1 – Uninstall previously installed drivers and reinstall their latest working version from the manufacturer’s website
The first thing you can do is to uninstall the drivers that are currently installed on your computer and then reinstall their latest working versions from their official sites. This kind of error is commonly encountered while loading drivers for scanners and printers. This is due to the fact that their drivers and software come along with a package which is usually in external media like CD or DVD. So when you install the software package, there’s a possibility that a newer version has been launched by its manufacturer. When that happens, you have to uninstall the previously installed driver package and then download the drivers from the manufacturer’s website and install them.
Option 2 – Run the Hardware and Devices Troubleshooter
The first thing you need to do is click on Start and then on the gear-like icon to pull up the window for Settings.
After opening Settings, look for the Update and Security option and select it.
From there, go to the Troubleshoot option located on the left-hand side of the list.
Next, select Hardware and Devices from the list and open the Troubleshooter and run it. Once it is doing its job, wait for it to complete the process and then restart the system.
After the system restarts, check if the problem’s now fixed. If not, refer to the next option given below.
Option 3 – Update or reinstall the Universal Serial Bus Controller driver
Since it could be a driver issue, you can try to update or reinstall the Universal Serial Bus Controller drivers using the Device Manager. Refer to the following steps:
First, click the Start button and type “device manager”.
Then click on the “Device Manager” from the search results to open it.
From there, look for the “Universal Serial Bus controllers” option and then right-click on each one of the USB drivers and select the Update Driver from the menu.
Note: If it is a regular USB drive, then it will be listed as a USB Mass Storage Device but if you have a USB 3.0 device, then look for a USB 3.0 Extensible Host Controller.
Restart your PC and then click the “Search automatically for updated driver software” option.
Note: If updating the USB Controller drivers didn’t work, you can try to reinstall them instead.
Option 4 – Restart your computer in a Clean Boot State
If the first three given options didn’t work and you still see the error when you connect external devices, you can try putting your computer in a Clean Boot State and then try connecting them again.
Log onto your PC as an administrator.
Type in MSConfig in the Start Search to open the System Configuration utility.
From there, go to the General tab and click “Selective startup”.
Clear the “Load Startup items” check box and make sure that the “Load System Services” and “Use Original boot configuration” options are checked.
Next, click the Services tab and select the “Hide All Microsoft Services” check box.
Click Disable all.
Click on Apply/OK and restart your PC. (This will put your PC into a Clean Boot State. And configure Windows to use the usual startup, just simply undo the changes.)
Now try to connect the external devices and check if the error is now gone.
If you recently upgraded your computer or if you’ve just switched to a new Windows 10 PC, the most common errors you might encounter are the Windows Activation errors. This issue boils down to the Windows Activation server which has either failed to validate or recognize the license tied to the digital account. In this post, you will be guided on how to fix an activation error in an organization with an error code 0x8007007B. It contains this exact error message:
“We can’t activate Windows on this device as we can’t connect to your organization’s activation server. Make sure that you’re connected to your organization’s network and try again. If you continue having problems with activation, contact your organization’s support person. Error code 0x8007007B.”
Various computers are activated via the KMS licensing (Key Management Server) in organizations. Computers that are activated using this process do not get a permanent activation and have to stay connected to the organization instead of for at least 7 months or 180 days. It is common in Pro and Enterprise versions that are deployed in bulk for at least hundreds or thousands of computers. So imagine a user with a personal computer in the office who decided to leave the organization but will still have an activated Windows key. And so to prevent that from happening, organizations use the KMS licensing. Another possible cause of the error is in case some user used an organization key and later on, the PC just got upgraded or downgraded to a version that is not compatible with that copy of Windows.
To fix this Windows Activation error, here are some suggestions that might help.
Option 1 – You can try connecting to the organization’s network and activate the computer. But before that, you need to first check if the computer actually belongs to an organization or not.
Tap the Win + R keys to open the Run dialog box.
Type “cmd” and hit Enter to open an elevated Command Prompt.
After that type the vbs /dlv command and hit Enter to execute it.
Next, check if the Product Key Channel says “GVLK”. If it does, then it means that your computer was activated using volume licensing.
Option 2 – Change Licence Key
If you’ve recently left an organization then it’s best if you buy another copy of Windows 10 and then change the license key. This time, make sure that the license key is for the same version of Windows. However, if it’s different, you need to format your computer.
Option 3 – You can try activating Windows 10 using a mobile phone
Activating Windows 10 can also be done using your phone. Just note that you have to call Microsoft to do so.
In the Start Search box, type in “Slui 4” and tap Enter.
Next, select your country and click on Next.
Keep the window open and call the toll-free number of the country you’re from.
Afterward, a confirmation ID should be given by the automated system which you must take a note of.
Finally, in the box on the window, type in the confirmation ID and click on the Activate button. That should do it.
Option 4 – If you think that the issue is caused by some hardware changes, you can try using the Activation Troubleshooter.
There are times when users already have the license keys and were able to activate Windows. However, it doesn’t last long and only works for a while and it’s suddenly throwing up an activation error like this one. To use the Windows Activation Troubleshooter, just go to Settings and to Activation and then run the troubleshooter from there.
If you've made some modifications to your hardware, you have to click the “I changed hardware on this device recently” option for further suggestions.
The File Explorer in Windows 10 provides several ways to organize the contents of folders and files in the system. Windows users can utilize some efficient styles to view the contents of the file system as per the user’s requirement. A user may opt to display the file picture in large size thumbnails while the other one could opt to set the icons of folder and files in a small or medium size list. On the other hand, while setting up several styles for the folder and file icons, some Windows 10 users have experienced some unusual issues where there is the Black background showing up behind folder icons. They tried refreshing the File Explorer a couple of times but it didn’t help in fixing the problem and the black squares are still visible on some folder icons.
The black squares behind the folder icons might look disturbing though it’s not really a big problem and is merely a graphical glitch that does not cause any damage or whatsoever to the content of the folder and files. The most likely cause of this glitch might have something to do with the corrupted system files or it could also be caused by outdated thumbnail caches. In addition, graphical glitches like this one could also occur if you are using out outdated graphics drivers. To fix this problem, you need to follow the options laid out below.
Option 1 – Try using the Disk Cleanup to remove Thumbnail files
The Disk Cleanup tool is one of the options you can try to fix the black squares behind the folder icons. Through this tool, you can delete all the Thumbnail files on your disk. To use it, refer to these steps:
Open the Search bar and type “disk cleanup” in the field.
After opening Disk Cleanup from the search results, then from the drop-down menu select the C: drive to clean up and click OK.
Wait for the scanning process to complete. Once it’s done, select the files you want to delete.
Ensure that you select the box labeled “Thumbnails” under the Files to Delete section then click on OK.
After that, a confirmation box will appear, just click on Delete files to delete the files permanently.
Restart your PC.
Option 2 – Try resetting the Thumbnail cache
You have the option to manually delete the Thumbnail Cache to resolve the black square background behind the folder icons issue. Follow the steps given below to reset the Thumbnail cache.
Open the File Explorer.
Next, navigate to the View tab and select the option with Hidden items to display all the hidden folders and files.
Next, go to this path: C:Users<username>AppDataLocal
In the given path, make sure that you put your actual username in the username field. Then look for a file named “IconCache.db”. Right-click on this file and click on Delete.
After that, go to this path: C:Users<username>AppDataLocalMicrosoftWindowsExplorer
From there, select all the files and delete them.
Note: If a prompt appears saying, “The files are in use and cannot be deleted”, simply select the “Do this for all current items” option and then click on Try Again. If you get an error message, click on Cancel to close the window and restart your computer.
Option 3 – Try updating or reinstalling the Graphics driver
Tap the Win + R keys to open the Run dialog box and then type in devmgmt.msc and tap Enter or click OK to open the Device Manager.
Expand the section for the outdated device drivers.
And then select the outdated driver(s) and right-click on it/them.
From the drop-down menu, select the Update Driver option if you wish to update the driver or select the Uninstall device if you want to uninstall the driver and then follow the on-screen instructions to install the latest version of the driver.
Restart your PC after the installation to allow the system to reinstall the driver.


 Once you are in the control panel, switch your view to large icons and locate Indexing options.
 Inside indexing options, click on advanced.
 In advanced options click on the rebuild and confirm.
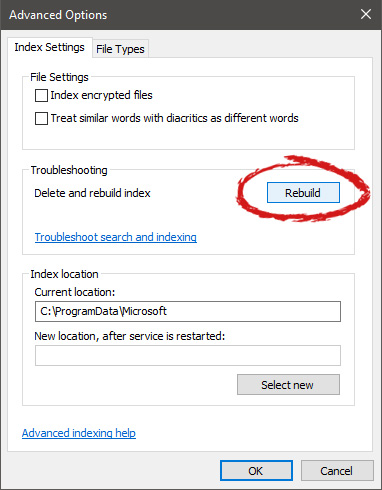 Leave your computer to finish and your searches should be working fine now.
  Windows 11 has some cool animations including fading effects which make working in it feels nice and futuristic but the cost of this is that there is a slight delay to certain actions performed. If you want the snap fast feature in Windows 11 and do not care about this eye candy there is an easy way to turn animations off inside it.