Logo

Fix Err Connection Timed Out issue in Chrome

If you are using Google Chrome browser in surfing the web, you might have experienced a situation where you’re trying to connect to a website but were unable to since Chrome failed to fetch the website to the browser and throws an error that says, This webpage is not available – Err Connection Timed Out. Aside from an issue with the network connection, there are also other reasons why this error suddenly shows up, read on to fix it.

There are times when the Windows computer is responsible for this kind of issue. And it can happen not just to Google Chrome but to other browsers as well. To resolve this issue, here are some suggestions that might be of help.

Option 1 – Try checking the network cables and then restart your router and reconnect

The first thing you can do is to check if all the network cables are properly connected be it to your computer or to the router. And if your computer is connected via Wi-Fi, you need to restart your router once. And of course, you can always opt to forget the Wi-Fi details and then reconnect again just make sure that you know the password.

Option 2 – Check the Windows Host file

You can also try to cross-check the Windows Hosts file to find out if the website you are trying to open has been blocked because if it is, then it’s no wonder why you’re getting the ERR CONNECTION TIMED OUT error in Chrome. There are instances when some third-party application modifies the file and adds some websites to the blocklists. So if the website is indeed blocked, you need to remove it from the list.

Option 3 – Try removing Proxy

Removing the Proxy might also help you in fixing the ERR CONNECTION TIMED OUT error. Here’s how you can do it:

  • Tap the Win + R keys to open the Run dialog box.
  • Then type “inetcpl.cpl” in the field and hit Enter to pull up the Internet Properties.
  • After that, go to the Connections tab and select the LAN settings.
  • From there. Uncheck the “Use a Proxy Server” option for your LAN and then make sure that the “Automatically detect settings” option is checked.
  • Now click the OK and the Apply buttons.
  • Restart your PC.

Note: If you are using a third-party proxy service, you have to disable it.

Option 4 – Try to clear the browsing data of Google Chrome

If your browsing data in Chrome hasn’t been cleared for some time now then that might be the reason why you’re suddenly getting the ERR CONNECTION TIMED OUT error when you browse the web. To fix this error, you need to clear your web browsing data. Refer to the following steps to do so.

  • Tap the Ctrl + Shift + Delete buttons to go to the Clear browsing data section in Chrome.
  • Next, set the time range to “All time” and tick all the boxes and then click on the Clear data button.
  • After that, restart the Chrome browser and try to open the website you were trying to open earlier.

Option 5 – Flush the DNS and reset TCP/IP

You might also want to flush the DNS and reset TCP/IP as it could help in fixing the ERR CONNECTION TIMED OUT error. To do so, refer to these steps:

  • Click the Start button and type in “command prompt” in the field.
  • From the search results that appear, right-click on Command Prompt and select the “Run as administrator” option.
  • After opening Command Prompt, you have to type each one of the commands listed below. Just make sure that after you type each command, you hit Enter
    • ipconfig /release
    • ipconfig /all
    • ipconfig /flushdns
    • ipconfig /renew
    • netsh int ip set dns
    • netsh winsock reset

After you key in the commands listed above, the DNS cache will be flushed and the Winsock, as well as the TCP/IP, will reset.

  • Now restart your computer and open Google Chrome then try opening the website you were trying to open earlier.

Option 6 – Run the built-in Malware Scanner and Cleanup Tool in Chrome

In case you don’t know, there is actually a built-in malware scanner and cleanup tool in Chrome that helps you get rid of any unwanted ads, pop-ups, and even malware, as well as unusual startup pages, toolbars, and other things that could affect the performance of the browser.

Option 7 – Reset Chrome

Resetting Chrome can also help you get rid of the ERR CONNECTION TIMED OUT error. Resetting Chrome means restoring its default settings, disabling all the extensions, add-ons, and themes. Aside from that, the content settings will be reset as well and the cookies, cache, and site data will also be deleted. To reset Chrome, here’s what you have to do:

  • Open Google Chrome, then tap the Alt + F keys.
  • After that, click on Settings.
  • Next, scroll down until you see the Advanced option, once you see it, click on it.
  • After clicking the Advanced option, go to the “Restore and clean up the option and click on the “Restore settings to their original defaults” option to reset Google Chrome.
  • Now restart Google Chrome.

Do You Need Help with Your Device?

Our Team of Experts May Help
Troubleshoot.Tech Experts are There for You!
Replace damaged files
Restore performance
Free disk space
Remove Malware
Protects WEB browser
Remove Viruses
Stop PC freezing
GET HELP
Troubleshoot.Tech experts work with all versions of Microsoft Windows including Windows 11, with Android, Mac, and more.

Share this article:

You might also like

Ventoy software review

There is a lot of software on the market today, but from time to time we discover something extraordinary and unique worth sharing and today we have a threat for you. Ventoy is a tool that will help you with system reinstallations and system maintenance once and for all.

If you are a computer user that has multiple operating systems or you are installing and maintaining different hardware via different OS there is a high chance that you have multiple USB sticks with different operating systems on them.

Now the problem with that is that there are probably too many unlabeled sticks around or you do not have enough so you keep making system USBs depending on which one you might need.

ventoy

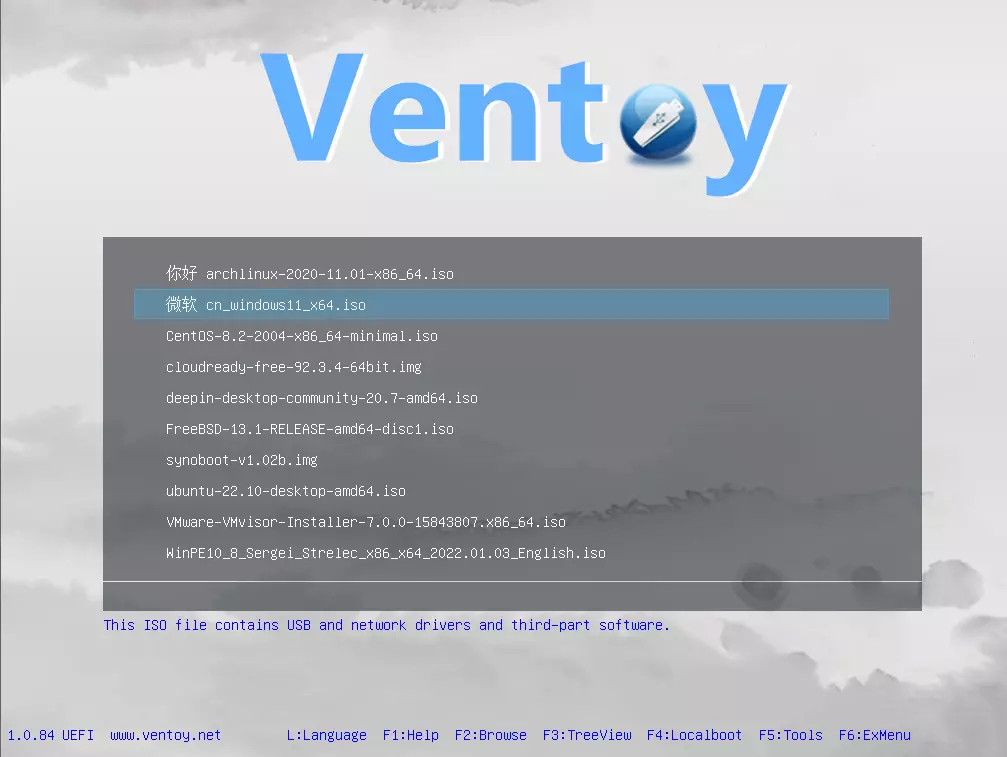
Ventoy solves all of these problems by letting you have as many operating systems images as your USB has capacity. The only thing you need to do is get the software here: https://www.ventoy.net/en/index.html and make a USB with it, then you can freely just copy your ISO images onto the USB and once it is inserted into the computer you will be given a menu to choose which one you would like to start with, simple as that.

Features

  • 100% open source (license)
  • Very simple to use (Get started)
  • Fast (limited only by the speed of copying the iso file)
  • Can be installed in USB/Local Disk/SSD/NVMe/SD Card
  • Directly boot from ISO/WIM/IMG/VHD(x)/EFI files, no extraction needed
  • Support to browse and boot ISO/WIM/IMG/VHD(x)/EFI files in local disk Notes
  • No need to be continuous in disk for ISO/WIM/IMG/VHD(x)/EFI files
  • Both MBR and GPT partition styles are supported
  • x86 Legacy BIOS, IA32 UEFI, x86_64 UEFI, ARM64 UEFI, MIPS64EL UEFI supported
  • IA32/x86_64 UEFI Secure Boot supported Notes
  • Linux Persistence supported Notes
  • Windows auto installation supported Notes
  • Linux auto installation supported Notes
  • Variables Expansion supported for Windows/Linux auto-installation script Notes
  • FAT32/exFAT/NTFS/UDF/XFS/Ext2(3)(4) supported for main partition
  • ISO files larger than 4GB supported
  • Menu alias, Menu tip message supported
  • Password protect supported
  • Native boot menu style for Legacy & UEFI
  • Most types of OS supported, 1000+ iso files tested
  • Linux vDisk(vhd/vdi/raw...) boot solution Notes
  • Not only boot but also complete the installation process
  • Menu dynamically switchable between ListView and TreeView mode Notes
  • "Ventoy Compatible" concept
  • Plugin Framework and GUI plugin configurator
  • Injection of files into runtime environment
  • Boot configuration file dynamically replacement
  • Highly customizable theme and menu style
  • USB drive write-protected support
  • USB normal use unaffected
  • Data nondestructive during a version upgrade
  • No need to update Ventoy when a new distro is released
Read More
Setting default applications in Windows 11
Setting default applications in Windows 11Same as in previous Windows versions, Windows 11 will also use certain applications as default ones for opening certain file types and file extensions. And yes, same as in previous versions it will come preconfigured for certain file types and associated applications like for example photos for pictures. Of course, users usually have their own favorite applications for certain file types and much more prefer to open them inside the application of their choice instead of the default one. 
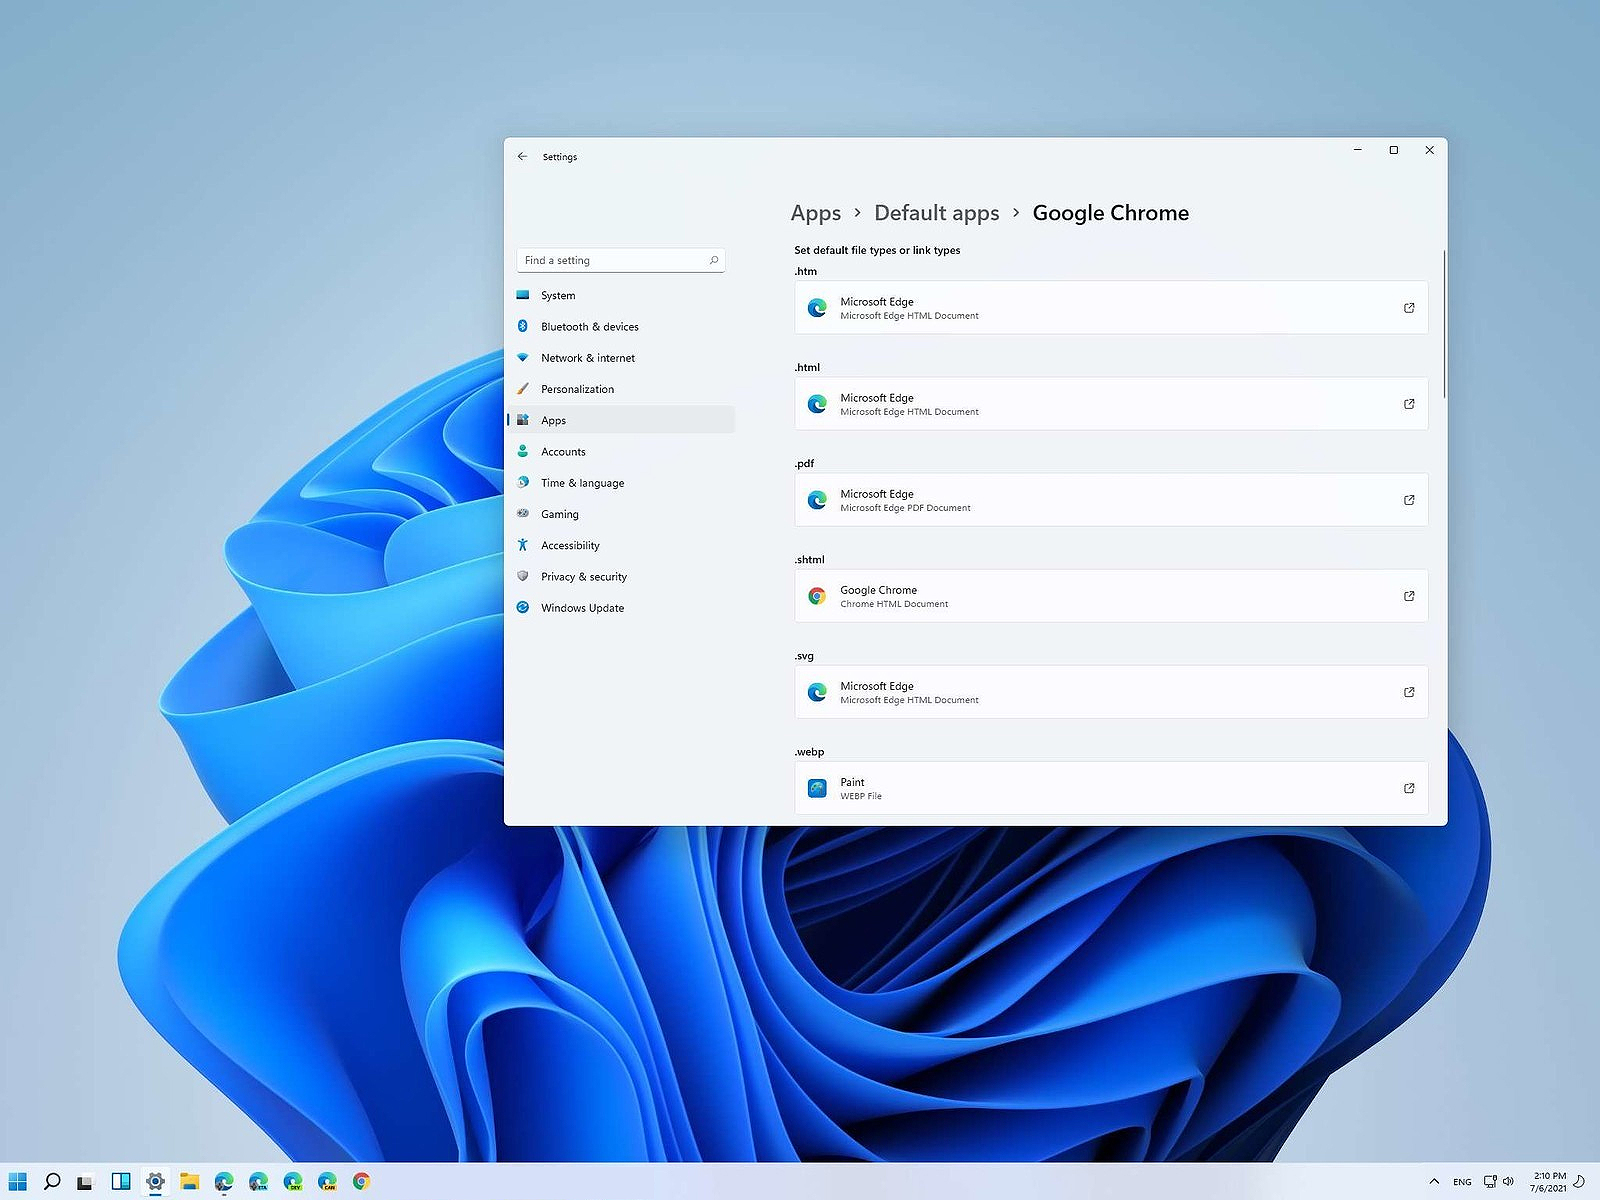
We can change the default application like in previous Windows versions but this time there are two ways and overall more control of this process. Windows 11 has settings for choosing default file type applications and default file extension applications giving you more control of this process.

The opening setting for apps

Whatever you wish to change default application or default extension application you will need to open settings for default application. Follow steps to quickly go into it.
  1. Press ⊞ WINDOWS + I to open settings
  2. Select Apps on left
  3. On the right part select Default Apps
Now you are in settings for choosing default applications

Choosing default application by file type extension

This is considering by Microsoft as a typical way to set default applications inside Windows 11. Once you are inside the settings app there is a box labeled Enter a file type or link type. Inside the search box, type in file extension that you wish to associate the application with like .JPG, .TXT, or other. If the file extension is not associated with any application you will be presented with a Choose a Default button, if however, the file extension is already associated with the app, you will need to click on the app box itself. In any case, a pop-up will appear and ask How do you want to open YOUR FILE EXTENSION files from now on? Choose Application from the list of presented ones and click on OK.

Choosing default file type

Another method is to select the default application by file type selecting application for it. In the settings screen, under the search box, you will have a list of installed applications. Choose the application that you would like to associate a file type with and click on it. On the next details screen scroll down and select the file type that you want to associate with the selected application and click on OK.

Other/third method

There is also the third method for choosing the default application for file type but it includes some surfing on your hard drive and it can be more time-consuming for first-time settings. But it is fairly quick when you need to only use it once on some new file type (for example you have a new application installed and want to switch just one file type extension to that application). Locate the file that you want to associate with the application and right-click on it. Select Open With from the menu and then Choose Another App. Pop up will appear, select the application that you would like to use, and check the box beside Always use this app to open CHOOSEN EXTENSION files followed by clicking on the OK button.
Read More
How To Fix Error 0x00000050

0x00000050 - What is it?

0x00000050 is a type of stop error code. It is also known as a Blue Screen of Death error. It usually occurs when you try to start your PC or load a program. It can also occur while running a program. This error may also pop up when you restart your PC after installing Windows XP Service Pack (SP1) on your computer. Unlike some PC related errors, 0x00000050 error code occurs without any warning. The stop 0x00000050 error is displayed in a blue screen and interrupts you from carrying your desired activities on your PC smoothly. This error message is prompted in the following format:

Stop 0X00000050 (parameter1, 0, parameter3, parameter4) PAGE_FAULT_IN_NONPAGED_AREA”

Solution

Restoro box imageError Causes

Stop 0x00000050 error code may pop up on your Windows computer screen due to multiple causes. The most common causes for this error code include:
  • Poor PC maintenance
  • Registry issues- Bad registry keys, invalid entries, corrupt and damaged registry
  • Incompatible DLL files
  • Corruption of system files- Pool corruption in the Srvnet.sys file
  • Spyware and viruses
  • Overheating of PC components
  • The conflict between Windows XP SP1 and the display adapter drivers that are currently installed on your PC.
It is advisable to resolve 0x00000050 error code on your PC right away. BSOD errors are fatal errors and can pose serious threats to your PC. If not fixed timely it can lead to system crash, failure and valuable data loss.

Further Information and Manual Repair

To prevent data loss and system failure, there are some effective methods to resolve Stop 0x00000050 error code on your PC.  To implement these solutions on your PC, you don’t need to be a technical whiz or a computer programmer.

Method One

If the error cause is the conflict between Windows XP SP1 and the display adapter drivers then here’s what you need to do to resolve it:
  1. First start Windows in safe mode. To do this, restart your computer and press F8. On the Windows Advanced Options Menu, use the arrow keys to select Safe Mode.
  2. Once you select it press enter. Now use the arrow keys to select the operating system, press enter to start your computer in safe mode.
  3. Go to Start, click Run and then type ’msinfo32’ in the open box and press OK to continue. Then under the System Summary option, expand Components and then click Display to note the information that corresponds to the INF File Item. And then simply quit the utility.
  4. After that, go to the start menu again and then the My Computer and Properties option.
  5. Press the Hardware Tab and then click the Device Manager tab. Go to the ‘Display Adapters’ option and press the option ‘Uninstall. To confirm action press OK.
  6. Once again, go to the start menu and run and then type the following commands as illustrated below and after each command press enter.
  • ren %systemroot%infINF file name from Step 5.inf *inf.old
  • ren %systemroot%infINF file name from Step 5.pnf *pnf.old
This procedure may look pretty lengthy but it is worth it. Once you insert the commands, close all open windows and then reboot your system. Now download the latest drivers for your display adapter and install them. This will hopefully resolve the 0x00000050 error code on your system.

Method Two

Sometimes 0x00000050 BSOD error may occur due to temporary issues like overheating PC components. In times like these, all you need to do to fix the issue is to switch off your computer and allow the components to cool down. Try starting your PC after a few hours.

Method Three

If the issue is triggered by malware, then it is advisable to download a powerful antivirus. Scan your entire PC to detect and remove viruses affecting your PC and generating BSOD errors on your system.

Method Four

However, if the error still persists after trying all the methods stated above, then this means the cause of the error is deep-rooted. It is related to the Windows registry. Registry stores all your system files and activities performed on your PC. It usually gets damaged and corrupt if it is not cleaned frequently. The registry loads with unnecessary and obsolete files like junk files, cookies, internet history, bad registry keys and invalid entries. These files if not removed, accumulate and damage the registry, DLL files, and system files too thereby generate BSoD errors like 0x00000050 error messages. You can clean and repair the registry manually but it requires a great deal of expertise. The ideal and easiest way to clean it is to download Restoro. This is highly functional and easy-to-use software. It is embedded with multiple powerful utilities including such as a registry cleaner, an antivirus and a system optimizer. The registry cleaning feature scans for all errors related to the registry. It removes obsolete files, invalid entries, restores damaged DLL and system files. The antivirus feature simultaneously detects and removes all kinds of malware. These include viruses, Trojans, spyware, and adware affecting your PC. While the system optimizer feature ensures that your PC functions at its optimum speed. It is a safe and powerful PC Fixer. It has a user-friendly interface and compatible with all Windows versions. Click here to download Restoro and Fix Error 0x00000050
Read More
Calculator is not working in Windows
As you know, one of the basic apps in the Windows 10 operating system is the calculator and it can even be extended to a scientific calculator which makes it really useful for users. However, there are instances when you might encounter some issues while using this app. One of the issues about the Calculator app that’s been reported recently is that the Calculator app is not working. If you encounter the same problem, then you’ve come to the right place as this post will guide you on what you can do to fix the problem. Based on the reports, users claimed that the issue with the Calculator app occurred right after they’ve installed a feature update, while other users claimed that the Calculator app never really worked on their computers and there are also cases where the app opens but it either freezes or crashes. According to researchers, the main causes of the problem include a feature update that could’ve altered the settings. It could also be due to problems with the login account or corrupted and missing files, or the problem could also with the calculate app itself. To resolve this problem, here are some suggestions you can follow.

Option 1 – Run the System File Checker Scan

System File Checker or SFC is a built-in command utility that helps in restoring corrupted files as well as missing files. It replaces bad and corrupted system files to good system files that might be the reason why the calculator app is not working properly. To run the SFC command, follow the steps given below.
  • Tap Win + R to launch Run.
  • Type in cmd in the field and tap Enter.
  • After opening Command Prompt, type in sfc /scannow
The command will start a system scan which will take a few whiles before it finishes. Once it’s done, you could get the following results:
  1. Windows Resource Protection did not find any integrity violations.
  2. Windows Resource Protection found corrupt files and successfully repaired them.
  3. Windows Resource Protection found corrupt files but was unable to fix some of them.
  • Reboot your computer.

Option 2 – Run the DISM tool

You can also run the DISM Tool as it helps in repairing the Windows System Image as well as the Windows Component Store in Windows 10. Using this built-in tool, you have various options such as the “/ScanHealth”, “/CheckHealth”, and “/RestoreHealth” that could help in fixing the Calculator app.
  • Open the Command Prompt with admin privileges.
  • Then type in the following commands and make sure to hit Enter right after you type each one of them:
    • Dism /Online /Cleanup-Image /CheckHealth
    • Dism /Online /Cleanup-Image /ScanHealth
    • Dism (.)exe /Online /Cleanup-image /Restorehealth
  • Do not close the window if the process takes a while as it will probably take a few minutes to finish.

Option 3 – Try logging into your computer using a different User Account

You might want to try logging into a different User Account since it is possible that the issue could have something to do with your log-in account. Thus, you can isolate this possibility by logging into a different user account. If you don’t have any other user account, simply create a new one by clicking on the Start icon and then go to Settings > Account > Family & other users. From there, go to the Other user's section and click on the Add someone else to this PC option, and then inputs all the needed information and restarts your computer. Once your computer has restarted, log into your computer using the newly created user account.

Option 4 – Try to reset or reinstall the Calculator app

If the first three given options didn’t work, you might want to reset or reinstall the Calculator app. To do that, follow these steps:
  • Click on the Start button and go to Settings > Apps > Apps and features.
  • Next, look for the Calculator app from the app list and click on it to see its other options.
  • After that, select the Advanced options and go to the Reset section and then click on the Reset button to reset the Calculator app.
Note: You also have the option to reinstall the Calculator app. All you have the option to visit Microsoft Store and from there, uninstall the Calculator app.
Read More
Fix SYSTEM_PTE_MISUSE Error in Windows
If you suddenly encounter the SYSTEM_PTE_MISUSE – 0x000000DA Blue Screen error while using your Windows 10 computer, read on as this post will provide you some potential fixes to resolve this kind of Blue Screen of Death (BSOD) error. There are many potential causes for the SYSTEM_PTE_MISUSE – 0x000000DA BSOD error. However, incompatible hardware detection and hardware recognition failure are some of the topmost culprits. Another thing that could trigger this kind of BSOD error is system file corruption which means that if a system driver for particular hardware ends up getting corrupted, it won’t be able to recognize the external device and will eventually crash the system with the SYSTEM_PTE_MISUSE – 0x000000DA Blue Screen error. The SYSTEM_PTE_MISUSE bug check has a value of 0x000000DA which indicates that a page table entry or PTE routine has been improperly used. To fix this error, here are some suggestions that might help but before you get started troubleshooting the problem, make sure that you create a System Restore Point first.

Option 1 – Try to disable PIT Security in the BIOS

If you are using a Dell computer and it throws up this kind of Blue Screen error, you need to go to the BIOS and uncheck the PIT Security and see if it helps in fixing the problem.
  • Tap the F2 key during the boot phase to enter the BIOS.
  • Once you’re in the BIOS, go to the Security tab and to the PIT Security section.
  • From there, uncheck the “PIT On” box to disable PIT Security.
  • Now restart your computer and check if the Blue Screen error is fixed or not.

Option 2 – Check for any incompatible devices

The next thing you can do to troubleshoot the SYSTEM_PTE_MISUSE Stop error is to plug in and out each one of the different hardware that is connected to your computer. Doing so will help you determine which one of the hardware is the one that’s triggering the error to pop up. You will also know what hardware drivers or anything else that could be causing this error which includes external devices like mouse, keyboard, printer, as well as internally attached components like the Graphics card and so on.

Option 3 – Try to update, rollback or disable device drivers

To fix the SYSTEM_PTE_MISUSE Stop error, you can also try to roll back, or update, or disable device drivers. It is most likely that after you updated your Windows computer that your driver also needs a refresh. On the other hand, if you have just updated your device drivers then you need to roll back the drivers to their previous versions. Whichever applies to you, refer to the steps below.
  • Open the Devices Manager from the Win X Menu.
  • Then locate the device drivers and right-click on them to open the Properties.
  • After that, switch to the Driver tab and click on the Uninstall Device button.
  • Follow the screen option to completely uninstall it.
  • Finally, restart your computer. It will just reinstall the device drivers automatically.
Note: You can install a dedicated driver on your computer in case you have it or you could also look for it directly from the website of the manufacturer.

Option 4 – Run the System File Checker Scan

System File Checker or SFC is a built-in command utility that helps in restoring corrupted files as well as missing files. It replaces bad and corrupted system files to good system files. Thus, you can try running it to resolve the SYSTEM_PTE_MISUSE Blue Screen error. To do so, follow the steps given below.
  • Tap Win + R to launch Run.
  • Type in cmd in the field and tap Enter.
  • After opening Command Prompt, type in sfc /scannow
The command will start a system scan which will take a few whiles before it finishes. Once it’s done, you could get the following results:
  1. Windows Resource Protection did not find any integrity violations.
  2. Windows Resource Protection found corrupt files and successfully repaired them.
  3. Windows Resource Protection found corrupt files but was unable to fix some of them.
 Restart your computer.

Option 5 – Run the Blue Screen Troubleshooter

The Blue Screen troubleshooter is a built-in tool in Windows 10 that helps users in fixing BSOD errors like SYSTEM_PTE_MISUSE – 0x000000DA. It can be found in the Settings Troubleshooters page. To use it, refer to these steps:
  • Tap the Win + I keys to open the Settings panel.
  • Then go to Update & Security > Troubleshoot.
  • From there, look for the option called “Blue Screen” on your right-hand side and then click the “Run the troubleshooter” button to run the Blue Screen Troubleshooter and then follow the next on-screen options. Note that you might have to boot your PC into Safe Mode.
Read More
There’s no Incognito Mode in Chrome
As you know, just like other web browsers, Google Chrome offers Incognito Mode or private browsing which you can use to make sure that your browsing activities are not being tracked by any websites you visit and it also keeps targeted ads at bay. On the other hand, signing in to a website, even when in Incognito Mode is a different thing since that website can track your browsing activities. Thus, Incognito Mode is still useful especially if you want to browse the web safely and without getting tracked except when you log in to some site. However, there have been reports recently that Incognito Mode is missing in Chrome and users are clueless as to how or why it happened. If you are one of them, worry not for this post will walk you through what you can do if there’s no Incognito Mode in Chrome on your Windows 10 computer. This is an unusual and strange issue since the Incognito Mode in Chrome is available by default and you don’t have to do anything to enable it. It is possible that there might be corruption in the Windows Registry which caused the disappearance of Incognito Mode, worry not though for there are some tweaks you can apply to restore the missing Incognito Mode. To apply these tweaks, you need to create first a System Restore point, and then once you’re done, follow the instructions provided below carefully. Step_1: Tap the Win + R keys to open the Run dialog box and type “Regedit” in the field and then hit Enter to open the Registry Editor. Step_2: Next, after opening the Registry Editor, navigate to this path – ComputerHKEY_LOCAL_MACHINESOFTWAREPolicies Step_3: From there, look for ChromePolicies and locate the DWORD named “IncognitoModeAvailability” and double click on it. Step_4: Edit the value of the “IncognitoModeAvailability” DWORD by changing its value from 1 to 0 so you can enable Incognito Mode in Chrome. Step_5: Once done, exit the Registry Editor and restart your computer and then check if you can now see Incognito Mode in Chrome. On the other hand, there is also another option that allows you to force open your Chrome browser in Incognito Mode. All you have to do is set the value of the “IncognitoModeAvailability” key to “2” instead of 0. This can be useful especially if you always browse the web in this mode. But you need to remember that you won’t be able to go back to the normal mode once you do this. Here are what the values of the IncognitoModeAvailability DWORD actually mean:
  • 0 – Incognito mode is enabled by default
  • 1 – Incognito mode is disabled
  • 2 – Chrome is forced to always open in Incognito mode
Read More
Customize Lock Screen in Windows 11
Same as in Windows 10, Windows 11 also features a lock screen. IN this lock screen by default, you will see a clock and date above the standard Windows 11 background. Not all users will be happy with this choice but do not worry, you can choose and customize your lock screen to better suit your idea of it.

Lock Screen in Windows 11
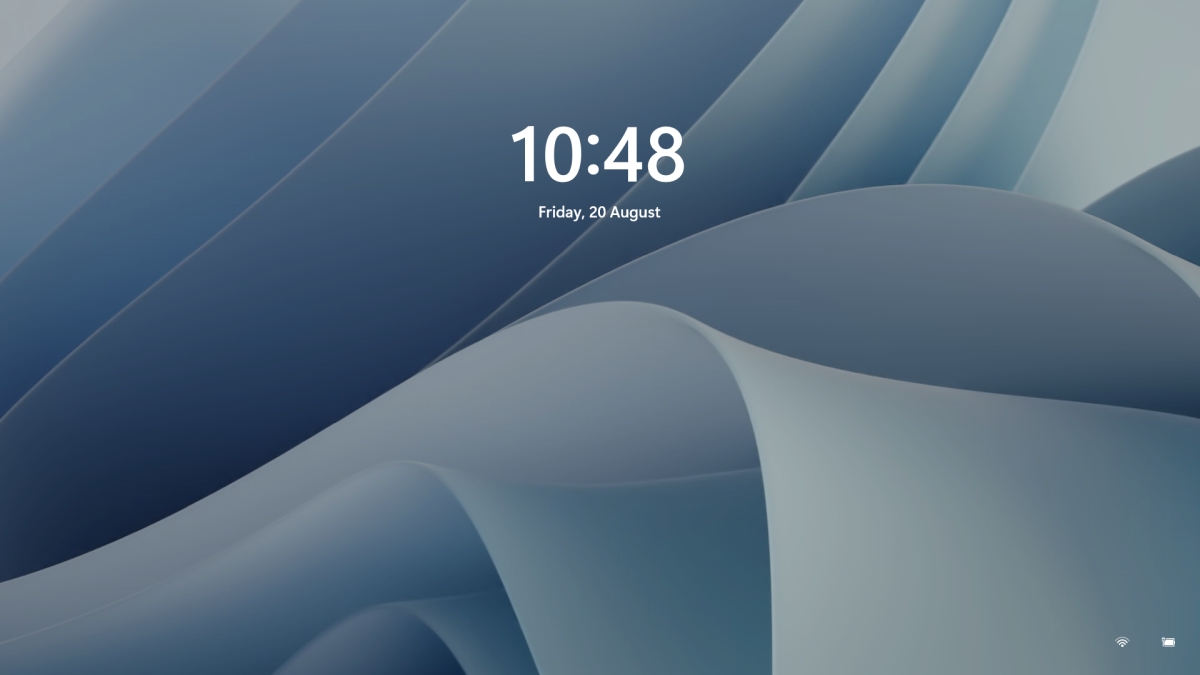
To personalize the lock screen do:

  1. Right-click on Desktop and select Personalize
  2. Click on the lock screen
  3. Choose one of three options and customize it
    • Personalize Your Lock Screen

      this option will let you set a custom image or slideshow for your lock screen. Choose either one that best suits you. Under selecting picture or pictures for the slide show you can uncheck the option to see tips, tricks, and facts on your lock screen.
    • Lock screen status

      when clicking on this option you can select the application widget that you wish to be shown on the lock screen like weather, mail, calendar, etc. Choose if you would like one by clicking on it.
    • Show the lock screen background picture on the sign-in screen

      as self-explanatory this switch will enable or disable chosen lock screen wallpaper on your login credentials screen.
  4. Close settings
All settings will be automatically saved and applied and when you wish to lock the screen easiest way is to press ⊞ WINDOWS + L shortcut on your keyboard.
Read More
Fix Windows defender 0x800700AA Error
Windows defender error 0x800700AA, service can not be started comes when the user is trying to run Windows defender scan on their system. This kind of behavior happens for two reasons mostly, third-party application conflict or corrupted system files. In this article, we will tackle both scenarios and provide you with solutions in both cases.

Third-party application conflict

In this rare scenario when Windows defender can not start scan due to conflict with installed service or application in the system solution is quite simple. Restart your PC into safe mode and run the scan from there. In a safe mode environment, minimum drivers and services are only loaded eliminating any conflicts that might occur when everything is booted. If Windows defender can not run the scan in safe mode and you get the same 0x800700AA error then you can eliminate application conflict as a reason and move to the next solution which will tackle corrupted system files. If you, however, managed to run a scan then you have a rare third-party application conflict, you can boot normally into windows and try to eliminate one by one to see which one is causing the issue. The safest bet would be to start with security software because most of the time that is what causes conflicts in running services and applications.

Corrupted system files

If the previous solution has not provided you with results then you have system file corruption that needs to be fixed. Move from one solution to another as presented below:
  1. Run SFC scan

    SFC scan is a built-in Windows tool for solving corrupted system files issues, it is fully automated and does not require from the user any kind of knowledge or information. To run it and scan the system do the following: Press ⊞ WINDOWS + X to open the secret menu Left-click on the command prompt (admin) In command prompt type SFC /SCANNOW and press ENTER Wait for the process to finish, do not interrupt it and once it is done, restart your computer
  2. Run DISM scan

    DISM scan is similar to SFC scan but it tackles different types of system file corruption and it is recommended to run it also after SFC has been completed. Please note that for DISM scan to be successful you will need a stable internet connection since DISM will replace corrupted files with new ones downloaded from Microsoft. To run it do the following: Press ⊞ WINDOWS + X to open the secret menu Left-click on the command prompt (admin) inside command prompt type: exe /online /cleanup-image /scanhealth followed by ENTER, then type: Dism.exe /online /cleanup-image /restorehealth also followed with ENTER. Leave scan to finish and reboot your PC
Read More
Advice when you have broken key on a keyboard
Having any kind of hardware malfunction is not a pleasant place to be. Even a minor malfunction like a broken key on a keyword can introduce certain bad feelings, frustration, and difficulty in working. So, what are your options when the dreaded key on the keyboard breaks? From my point of view, there are three options that could be accomplished in order to continue working.
  1. Replace broken keyboard with the new one

    Yes, the best and most expensive solution, just bite the bullet and buy a new working one.
  2. Replace key with another key

    So you broke some key, if you can replace it with another key which you do not use, this option will work only tho if the broken key is not Space bar, enter or similar with specific shape and size.
  3. Remap key

    use Windows power tools to remap key function to another working key
There you go, three options to continue working with a broken key on the keyboard.
Read More
Applications you should remove from Windows
ApplicationsOver time Applications change, some for the better some for worse. Some of them even stop receiving updates and are old and vulnerable. Sometimes standards change and some file types are not used anymore. Software evolves along with technology and that is good. Keeping old and useless applications inside your Windows is not so good. From various exploits to simply taking up space, maybe even slowing down OS it is always wise and good to clean your Windows from unwanted old applications. In this article, we will be mentioning some relics of old and providing you with an explanation of why you should remove them from your system if by any chance you still have them on it.

Silverlight

Silverlight was meant to be a competitor for Adobe Flash, it is a WEB framework that enables rich media content inside your WEB browser. The issue is that it is not developed anymore and today's browsers do not support it. The only browser that actually can support it is internet explorer which itself is not supported and how there is practically 0 content on today's modern WEB that will require Silverlight, it is safe and recommended to remove it.

Adobe Flash

Speaking of Adobe Flash, you should remove it as well. Flash has stopped receiving support as of January 2021 and browsers have dropped support for it and even blocked it due to security issues. However, there still might be some local installation of Flash itself inside Windows along with the old Shockwave player that stopped receiving support in 2019. You should remove them both.

JAVA

Now this one is tricky, by itself JAVA does not present any security issues since browsers do not support it anymore and the desktop version is not really slowing down your computer. This one has simply put just another media runtime that is not used and simply takes up space and resources. However if you have some applications that you do use that rely on it (I can really just think of JAVA Minecraft at this point) leave it of course but in any other case, it is just purely not needed.

Quicktime

While we are at media runtime and stuff that just simply is not needed, Quicktime is one of them. Now this Apple Video player and codec is still pretty developed and active in Apple’s iOS environment, Windows version has not been updated since 2016 and it was discovered that it contains some critical vulnerabilities. Uninstall it and if you need a player that could play MOV files, just use a VLC player that can play them without any separately installed codec.

uTorrent

This one, the same as CCleaner was once a good application, as a matter of fact, it was the best torrenting application. Sadly it has fallen from its grace very low, from getting tons of ads in its interface to findings in 2015 that code of torrent client was packed with a crypto miner that used system resources of an installed computer to mine crypto without user’s awareness. You should uninstall this torrent client if you would like to get your PC back and not provide it for cryptocurrency mining for the company that developed it. Use qBittorrent or TIxati, open-source and free ones that have everything needed for any torrenting needs.

Toolbars and Browser extensions

There are a lot of toolbars for browsers and extensions that are malicious in nature or simply not updated providing security issues. It is very advisable to remove this as soon as possible.

WinRAR

WinRAR has gained its large popularity solely for the reason that you could download it from the official site like shareware and use it forever. The license never expired and you could use it indefinitely. Sadly not much has been improved in the application itself and it is slowly falling out in its range of what it can do. There are better open source and free options today like 7zip, PeaZip, ZIPvare, and more that are working the same as WinRAR if not even better.

Windows and manufacturers Bloatware

Yes, applications that come bundled with Windows and with some laptops that include manufacturers made software for different tasks like its own specific media players, calculators, etc. It is known that these applications are not better than their open-source rivals and there are too many of them including some that you will probably never use. It is the same as buying a new phone bundled with tons of applications that you do not need, did not ask for, and do not use. Delete all of them. Considering Windows there are also some Store application like Candy Crush Saga demo and other are safe to remove if not needed. That’s it, our advice for old and not needed applications so you can keep your PC safe and fast.
Read More
1 2 3 171
Logo
Copyright © 2023, ErrorTools. All Rights Reserved
Trademark: Microsoft Windows logos are registered trademarks of Microsoft. Disclaimer: ErrorTools.com is not affiliated with Microsoft, nor claims direct affiliation.
The information on this page is provided for information purposes only.
DMCA.com Protection Status