Error Code 0x80070422 can be found on many versions of the Windows operating system including Windows 7, Windows 8, and 8.1, and Windows 10. The reason for its occurrence may vary, however, depending on the version of the operating system that you use.
In the case of error code 0x80070422 in Windows 8, it often occurs when users attempt to update their firewall or download apps from the Windows store. When this error occurs the user is unable to complete the updates and will need to apply different solutions to correct the issue.
Solution
Error Causes
Whenever error code 0x80070422 is encountered on Windows 8 or 8.1, it might be a result of various factors. These error codes include:
Registry errors – This occurs when new programs are installed over old ones
Malicious software such as adware, spyware, and or viruses
Further Information and Manual Repair
You do not need to be a Windows expert to attempt to solve errors like the 0x80070422 Windows 8 error code. Simply try the solutions below. If however, you feel you need a professional’s help, contact a certified Windows technician.
Check for any viruses or malicious software
Viruses and other malicious software are often the cause of various issues within the PC. For this reason, be sure to check your machine for a possible virus infestation. If you are unable to use your anti-virus software or if none is present you might need to download an automated tool that offers overall repair and other solutions.
Disable third-party security apps
Another step you can take is to disable third-party security apps. When these apps are downloaded onto your device, it can lead to the disabling of your Firewall and the inability of your device to download other apps. If this is the source of the 0x80070422 error code on your machine, the issue will be resolved after you disable the third-party apps and reboot your computer.
Disable Firewall
If error code 0x80070422 in Windows 8 or 8.1 occurred while you attempted to update Windows firewall, one of the best solutions you can try is to disable the firewall. Note however that disabling your firewall should be temporary as it protects your computer from worms as well as hackers that might infect or compromise your PC. Access the firewall by swiping right on the screen then searching for “firewall”. Click “Windows firewall” then select “Turn off Windows firewall”.
Performs a clean boot
Another option is for you to perform a clean boot. This simply refers to a reboot in Windows where only a minimum set of drivers and programs are used. A clean boot can help resolve issues related to software conflict which can occur when Windows users install programs or updates or simply run a program. Note that you must log on to the computer as an administrator. Otherwise, you will not be able to perform the clean boot.
Clean registry
The source of many errors related to Windows can lie within the registry. This is because the registry is involved in every aspect of a Windows computer’s operation. If there is an issue in the files of the registry or if it has been hacked, your computer will not function. For this reason, begin by cleaning the registry regularly. To clean our registry, use a powerful tool that is both reputable and user-friendly. Research your option before you make a selection as choosing the wrong tool could lead to even more errors or computer malfunctions.
Set Windows Update to Automatic
Another important method to solve issues related to error code 0x80070422 in Windows 8 or 8.1 is your Windows Update service. Though you may have never noticed this feature before now, the Windows Update services allow PC owners to access updates to their operating system automatically. This leads to a properly functioning PC as your machine will always have the latest features and tools available. However, if the setting is not correct, your computer may end up experiencing error code 0x80070422. Check if this is the source of your problems by verifying if your Windows Update settings are automatic. Once the settings are on automatic, reboot your machine to ensure your computer responds to the changes.
Download an Automate Tool
Always be prepared for the possibility of other errors. You can do this by downloading powerful software. This enables users to regularly check for issues that may cause errors on their Windows device.
As you know, Windows 10 supports a variety of peripherals which includes a long list of printers. However, a number of users reported that they encountered a glitch on their Windows 10 computers where they receive Can’t print a file and a prompt to save the Word, PDF file, and so on each time they try to print the file. This kind of issue is not common and could be due to various reasons like the malfunctioning of device drivers, misconfiguration of the printer’s settings, and so on.
There are several options you can check out to resolve the problem. You can try to run the built-in troubleshooter or check the configuration of the printer, as well as update or reinstall the driver for printers or reset the printer. For more details, refer to each one of the options provided below and make sure to follow them carefully.
Option 1 – Run the Printer Troubleshooter
One of the first basic troubleshooting you can perform to resolve the printer issue is running the Printer Troubleshooter. This built-in troubleshooter can detect and automatically fix the problem for you. To use it, follow these steps:
Tap the Win + R keys to open the Run dialog box.
Next, type “exe /id PrinterDiagnostic” in the field and click OK or hit Enter to open the Printer Troubleshooter.
Then click the Next button and follow the next on-screen instructions to fix the issue with the printer.
Option 2 – Try checking the printer’s configuration
The next thing you can do to fix the problem is to check the configuration of the printer since there are instances when there could be some misconfiguration with the settings of the printer that may result in several issues like this one.
First, you need to open Control Panel and from there, look for the option Devices and printers and open it.
After that, right-click on the entry of your printer that you want to use in printing documents and select the Set as a default printer option.
You could also try to open PDF and then go to the Print dialog box and uncheck the Print to file option.
Option 3 – Try to update or reinstall the printer driver
The problem with your printer might also be caused by corrupted or outdated drivers. Thus, you can try to either update or reinstall it. How? Follow the steps below.
First, click the Start button and type “device manager”.
Then click on the “Device Manager” from the search results to open it.
From there, look for the USB Composite Device option and right-click on it, and select the Update Driver from the options.
Restart your PC and then click the “Search automatically for updated driver software” option.
Now uninstall and remove the printer driver software and reinstall it then refresh.
Option 4 – Try to reset the settings of the Printer or reinstall it
If none of the three options given above worked, you can try to either reset the printer settings or reinstall the printer so that it can go back to its default state. However, if it doesn’t work, you can try to uninstall the printer as well as its related drivers. To do so, follow these steps:
First, go to Settings > Devices > Printer and Scanners.
After that, select the printer and select the Remove Device option.
Once done, restart your computer and check again and see if the error is now fixed.
Sadooma is a Browser Extension for Google Chrome. This extension offers users the ability to search for any trending news on the web.
This extension changes your default search engine to Yahoo, and while active it changes the displayed ads on your browser, allowing it to make revenue on every ad you click. While this is not inherently malicious, the extension redirects your search to its servers first before forwarding it to yahoo and displaying search results. The information that is sent back to the servers contains your browsing data & visited web pages. As this represents a security and privacy risk, Sadooma is classified as a browser hijacker for its potentially unwanted functions and poor user experience.
From the Author:
We’ve got what you need!If you are like us, addicted to interesting viral content, you’ve reached the best place for this.Sadooma will help you to find what is trending right now on the internet in an easy and immediate way.Privacy – We don’t share your information with others.Trending Content – New viral content every dayUp to Date – We update sources to keep things fresh.Made with Love – Our content is safe and suitable for all ages.
About Browser Hijackers
Browser hijacking is a type of unwanted software, commonly a browser add-on or extension, which then causes modifications in the web browser’s settings. Browser hijackers can do more than simply modifying home pages. It redirects you to the sponsored sites and inserts advertisements on the internet browser that helps its creator generate earnings. A lot of people think that these types of sites are legitimate and harmless but that is not true. Nearly all browser hijackers pose an existent threat to your online safety and it is vital to classify them under privacy dangers. In a much worst case, your web browser could be hijacked to download malicious software that will do a lot of damage to your computer.
Indications of browser hijack
There are many symptoms that point to a browser hijacking: you see unauthorized modifications to your web browser’s homepage; you get re-directed to sites you never intended to visit; default web engine is modified; you’re getting browser toolbars you haven’t noticed before; your internet browser will display constant pop-up windows; your web browser starts running slowly or presents frequent errors; You can’t access certain websites, particularly anti-virus websites.
How they get into your computer or laptop
Browser hijackers infect computers via malicious email attachments, downloaded infected computer files, or by visiting infected sites. Many web browser hijackings originate from add-on software, i.e., browser helper objects (BHO), toolbars, or extensions added to web browsers to give them extra features. Browser hijackers sneak to your computer along with free software application downloads that you unknowingly install alongside the original. An example of some well-known browser hijacker includes Conduit, Anyprotect, Babylon, SweetPage, DefaultTab, RocketTab, and Delta Search, but the names are regularly changing.
Removal
Certain browser hijacking could be quite easily stopped by finding and removing the corresponding malware application from your control panel. But, the majority of hijackers are really tenacious and require specialized applications to remove them. You should think about undertaking manual repairs only if you’re a tech-savvy individual, as potential risks are associated with fiddling with the system registry and HOSTS file.
You might opt for automatic browser hijacker removal methods by simply installing and running a reliable anti-malware application. One of the top tools for correcting browser hijacker malware is SafeBytes Anti-Malware. It can help you remove any pre-existing malware in your computer and gives you real-time monitoring and protection from the latest internet threats. Together with the anti-malware tool, a system optimizer will help you in removing all linked files and modifications in the computer registry automatically.
What To Do When You Cannot Install Any Antivirus?
All malware is inherently dangerous, but certain kinds of malware do a lot more damage to your computer than others. Some malware variants modify internet browser settings by including a proxy server or change the computer’s DNS configurations. In such cases, you’ll be unable to visit some or all websites, and thus unable to download or install the required security software to clear out the computer virus. If you are reading this, you may have infected by a virus that prevents you from downloading computer security software like Safebytes Anti-Malware. Although this sort of issue will be difficult to circumvent, there are some steps you can take.
Make use of Safe Mode to resolve the problem
In Safe Mode, you could adjust Windows settings, un-install or install some programs, and eliminate hard-to-delete malware. If the malicious software is set to load immediately when the computer starts, switching into this mode may well prevent it from doing so. In order to enter into Safe Mode or Safe Mode with Networking, press the F8 key while the computer is starting up or run MSCONFIG and locate the “Safe Boot” options under the “Boot” tab. Once you are in safe mode, you can try to download and install your anti-malware software program without the hindrance of malicious software. After installation, run the malware scanner to eliminate most standard infections.
Switch to some other browser
Malicious code may exploit vulnerabilities on a specific internet browser and block access to all anti-virus software websites. When you suspect that your Internet Explorer happens to be hijacked by a computer virus or otherwise compromised by hackers, the best plan of action is to switch to a different internet browser such as Google Chrome, Mozilla Firefox, or Apple Safari to download your chosen security application – Safebytes Anti-Malware.
Install and run anti-virus from your Thumb drive
Another solution is to save and run an antivirus program entirely from a USB drive. Try these simple actions to clear up your infected PC using a portable antivirus.
1) Make use of another virus-free PC to download Safebytes Anti-Malware.2) Plug the Flash drive into the clean computer.3) Double-click the Setup icon of the antivirus software to run the Installation Wizard.4) Select the drive letter of the flash drive as the location when the wizard asks you where you would like to install the anti-virus. Follow the on-screen instructions to finish the installation process.5) Remove the pen drive. You may now use this portable anti-malware on the infected computer.6) Double click the Safebytes Anti-malware icon on the flash drive to run the program.7) Run Full System Scan to identify and get rid of all kinds of malware.
Let's Talk About SafeBytes Anti-Malware!
If you are looking to download the anti-malware program for your computer, there are several tools in the market to consider however, you cannot trust blindly anyone, no matter whether it is paid or free program. Some of them do a great job in getting rid of malware threats while some will affect your PC themselves. You have to purchase a tool that has got a good reputation and detects not just viruses but other sorts of malware as well. One of the recommended tools by industry analysts is SafeBytes Anti-Malware, the safest program for Microsoft Windows.
SafeBytes anti-malware is a powerful, very effective protection software made to assist users of all levels of IT literacy in finding and removing malicious threats out of their personal computers. Using its cutting-edge technology, this application will help you get rid of several types of malware including computer viruses, PUPs, trojans, worms, ransomware, adware, and browser hijackers.
There are many great features you’ll get with this security product. Below are some of the highlighted features included in the tool.
Real-time Threat Response: SafeBytes provides round-the-clock protection for your PC restricting malware intrusions instantly. It will regularly monitor your laptop or computer for hacker activity and also provides users with advanced firewall protection.
World-class AntiMalware Protection: Safebytes is made on the best virus engine in the industry. These engines will find and get rid of threats even during the early phases of a malware outbreak.
Faster Scanning: This software has got one of the quickest and most effective virus scanning engines in the industry. The scans are very accurate and take a short amount of time to complete.
Safe Web Browsing: SafeBytes provides an instant safety rating on the web pages you are about to check out, automatically blocking unsafe sites and make sure that you’re certain of your online safety while browsing the net.
Lightweight Tool: SafeBytes is a lightweight and user-friendly anti-virus and antimalware solution. Since it uses minimal computer resources, this application leaves the computer’s power exactly where it belongs to: with you actually.
24/7 Online Technical Support: You could get high levels of support round the clock if you’re using their paid software.
To sum it up, SafeBytes Anti-Malware is pretty great for securing your laptop or computer against all sorts of malware threats. There is no doubt that your computer will be protected in real-time as soon as you put this software to use. So if you’re trying to find a comprehensive antivirus program that’s still simple enough to use, SafeBytes Anti-Malware is exactly what you will need!
Technical Details and Manual Removal (Advanced Users)
If you don’t want to use malware removal software and prefer to eliminate Sadooma manually, you could do so by going to the Add/Remove Programs menu in the Control Panel and removing the offending software; in cases of browser add-ons, you may uninstall it by visiting the browser’s Add-on/Extension manager. You might even want to reset your browser settings, as well as clear your web browser cache and cookies.
In order to ensure the complete removal, manually examine your hard disk and registry for all the following and eliminate or reset the values as needed. However, editing the Windows registry is actually a complicated job that only advanced users and professionals should try to fix it. In addition, certain malicious programs have the capability to defend against its deletion. You are encouraged to do this procedure in Safe Mode.
If you suddenly encounter the DRIVER_CORRUPTED_EXPOOL Blue Screen of Death error when using your computer, then there might be some issues with the device drivers on your Windows 10 computer. This kind of BSOD error can occur at any point while you are using your PC. Its main cause is due to some error in the System Pool where a driver becomes incompatible with the operating system or when the configuration files get corrupted for some reason.
If you are one of the users who are currently inconvenienced by the DRIVER_CORRUPTED_EXPOOL error, worry not, as this post will give you some potential fixes that might help resolve the problem.
Option 1 – Perform a System Restore
Performing System Restore might help you in fixing the DRIVER_CORRUPTED_EXPOOL Blue Screen error. You can do this option either by booting into Safe Mode or in System Restore. If you are already in the Advanced Startup Options, just directly select System Restore and proceed with the next steps. And if you have just booted your PC into Safe Mode, refer to the steps below.
Tap the Win + R keys to open the Run dialog box.
After that, type in “sysdm.cpl” in the field and tap Enter.
Next, go to the System Protection tab then click the System Restore button. This will open a new window where you have to select your preferred System Restore point.
After that, follow the on-screen instructions to finish the process and then restart your computer and check if the problem is fixed or not.
Option 2 – Run the Blue Screen Troubleshooter
The Blue Screen troubleshooter is a built-in tool in Windows 10 that helps users in fixing BSOD errors like DRIVER_CORRUPTED_EXPOOL error. It can be found on the Settings Troubleshooters page. To use it, refer to these steps:
Tap the Win + I keys to open the Settings panel.
Then go to Update & Security > Troubleshoot.
From there, look for the option called “Blue Screen” on your right-hand side and then click the “Run the troubleshooter” button to run the Blue Screen Troubleshooter and then follow the next on-screen options. Note that you might have to boot your PC into Safe Mode.
Option 3 – Update the Device drivers
The device driver installed in your computer might be incompatible with your operating system which is the reason why the DRIVER_CORRUPTED_EXPOOL Blue Screen error occurs. To fix that, you have to update your device drivers.
Tap the Win + R keys on your keyboard to open the Run dialog box.
After that, type “msc” in the field and hit Enter or click OK to open the Device Manager.
After opening the Device Manager, update all the outdated Device drivers on your computer.
Next, right-click on all the driver entries that are appropriately labeled, and then click the Update driver option.
Now restart your PC and check if the BSOD error is fixed or not.
Option 4 – Uninstall any faulty device drivers
Tap the Win + R keys on your keyboard to open the Run dialog box.
After that, type “msc” in the field and hit Enter or click OK to open the Device Manager.
From there, look for any device driver which has a yellow exclamation mark which indicates that something is wrong with them.
And then right-click on each one of them and click on Uninstall.
Once you’re done uninstalling the faulty drivers, restart your computer and allow your computer to reinstall the drivers you just uninstalled.
Option 5 – Try running the System File Checker
System File Checker or SFC is a built-in command utility that helps in restoring corrupted files as well as missing files. It replaces bad and corrupted system files with good system files that might be causing the Machine Check Exception BSOD error. To run the SFC command, follow the steps given below.
Tap Win + R to launch Run.
Type in cmd in the field and tap Enter.
After opening Command Prompt, type in sfc /scannow
The command will start a system scan which will take a few whiles before it finishes. Once it’s done, you could get the following results:
Windows Resource Protection did not find any integrity violations.
Windows Resource Protection found corrupt files and successfully repaired them.
Windows Resource Protection found corrupt files but was unable to fix some of them.
Option 6 – Try updating the BIOS
As you know, the BIOS is a sensitive part of a computer. Even though it is a software component, the functioning of the hardware depends on it largely. Thus, you must be careful when modifying something in the BIOS. So if you don’t know much about it, it’s best if you skip on this option and try the other ones instead. However, if you are well-versed in navigating the BIOS, then follow the steps below.
Tap the Win + R keys to open the Run dialog box.
Next, type “msinfo32” in the field and press Enter to open System Information.
From there, you should find a search field on the bottom where you have to search for the BIOS version and then press Enter.
After that, you should see the developer and version of the BIOS installed on your PC.
Go to your manufacturer’s website and then download the latest version of BIOS on your computer.
If you are using a laptop, make sure that you keep it plugged in until you have updated the BIOS.
Now double click on the downloaded file and install the new BIOS version in your computer.
Now restart your computer to apply the changes made.
Option 7 – Try resetting Windows 10
To fix this BSOD error, you can try resetting Windows 10. Doing so won’t get rid of any file in your system – instead of erasing all your media files and documents, this reset option resets all the system settings and files.
The Windows 10 operating system comes with a user-friendly interface as well as better security features compared to its previous versions. One of these new features is the “Recently Opened Files” feature which displays all the files you’ve opened recently in File Explorer. Although it might seem useful, some users see this as a privacy concern especially if there are other users that use the same computer. If you are one of these users, read on as this post will guide you on how you can disable the “Recently Opened Files” feature in Windows 10.
There are three ways you can disable the “Recently Opened Files” feature. You can manually clear the recent files, or disable the feature via Control Panel. You can also do it using the Group Policy Editor.
Option 1 – Manually clear the recent files
The first thing you can do is to clear the recent files manually. Since the information about the recently opened files is stored in the form of cached data, you can locate this data and delete it manually, from time to time. To do that, follow these steps:
Tap the Win + R keys to open the Run utility and copy this address in the field: %AppData%MicrosoftWindowsRecent
Next, tap the Ctrl + A keys to select all the items and then tap the Shift + Delete keys simultaneously.
After that, a prompt will appear where you have to click on Yes. This will delete all the recently opened files in the File Explorer the next time you open it.
Option 2 – Disable the feature via Control Panel
The next option you can try to disable the feature is via Control Panel. Refer to these steps to do so:
First, click on the Start Menu button and select the Settings icon.
After that, click on Personalization and then on Start located on the left pane.
Next, scroll down until you see the “Show recently opened items” in Jump Lists on the Start or the Taskbar and click on it and then toggle it off.
Option 3 – Disable the feature using the Group Policy Editor
If you are using the Windows 10 Pro version, then you have access to edit the functions in the Group Policy. The Group Policy function has the option that can disable all the default services of Windows 10. Note that in this step, you will permanently disable the “Recently Opened Files” feature. So before you proceed, make sure that you really want to disable this feature permanently and not in the meantime.
Tap the Win + R keys to open the Run dialog box and type “gpedit.msc” in the field and click OK or tap Enter to open the Group Policy Editor.
Next, on the left side pane, click on the “User Configuration” option and then click the “Administrative Templates” option.
After that, select the “Start Menu and Taskbar” option and select the “Don’t keep the history of recently opened documents” option in the right pane.
Now double click on this option and check the “Enabled” option and then click on Apply and OK buttons to save the changes made.
Started as an internal network and has slowly expanded since 1960 internet has taken over the world. In the beginning, it was a means of information change but in the modern age you can run applications and virtual machines over the internet, you can stream video and audio, and you can communicate in real-time with someone on the other side of Earth.
With the internet growing so fast in such a small amount of time it is only logical and wise to take a step back and take a good look at what it offers now, what are great things about it and what are some of the worst.
Good sides of the internet
Information
There are a lot of advantages of the internet, first and foremost is information. Internet was made as an information exchange service and even today you can find a lot of various information about various topics that interest you. A site like Wikipedia is a completely free online encyclopedia and a lot of news companies have their own internet sites where you can find free information and news.
On the other hand, there are also websites like udemy, edx, Coursera, and many others that will offer you the education, some for free, some for money but you can get a glimpse and part of university quality education for just a fraction of price.
Online shopping
Sites like Amazon have used the internet and launched themselves as today's multi-billion companies. In today's world, there is not a single thing you can not buy online. Many sites today are going from the large online marketplace where you can find everything to small niche specialized ones. Also every major brand in the world today has its own online store.
Other shops will offer you music, movies, games, etc. Services like steam, xbox pass, sony pass etc, will let you buy games online, other music, movies, and many more.
Streaming services
Days, when you had to buy movies in order to watch them at home, are gone, thanks to the internet we have plenty of streaming services for movies and tv shows as well as ones for music. If you do not want to spend money on actually purchasing things then a good idea is to have a streaming plan set up when you want it.
Email and messaging
Communication is a great thing and since the dawn of mankind people have been talking and sharing with each other, the internet has made it possible to send mail electronically and instantly and modern chat communication is everywhere. We can not just talk with our friends and family that can be on the other side of the world, we can also talk in real-time with the sales representative, with technical service, or attend online classes with a group of people.
Cloud storage services
Saving your pictures in this digital media age on the hard drive can be risky but thanks to modern technologies you can save most of your precious files on cloud servers for safekeeping. From pictures to documents and even other files that you need and want to save. There are some of them that will offer you a free amount and some basic free plans as well.
Bad sides of the internet
Malware, viruses, and phishing
We could not talk about the bad side of the internet if we do not mention its greatest threat. Bad sites, infected software, phishing emails, and many more malicious threats. Problem is that these kinds of tricks and attacks have become more and more sophisticated and harder to detect and avoid.
Pornography
Pornography is bad, having it freely available to children is even worse. Sadly the only way to regulate this is on a computer-by-computer basis by turning on parent control on each one. There are many studies that go into detail about why this is bad, sadly currently there are no effective ways to isolate this content.
No privacy
When we say there is no privacy we do not mean by using social media and not setting your privacy settings altho that also fits in this point, what we are talking about is data mining of your habits and things you do. It is well known that today lot of websites are using some form of AI recommender system in order to tailor your internet experience to suit your needs better. Most of these AI systems are trained by mining your data and analyzing your habits.
If you have 2 google accounts there is a high probability chance that for the same query you will get different results, depending on your so far browsing habits. The same goes for other services as well.
Dark webshops
There are some great things in dark and deep WEB-like sites with true news and information. Even some legit libraries where you can find and download rare books. Sadly as goes with the internet dark and deep WEB also has its well, dark sides, from disturbing content to shops that sell stolen items to straight stealing your money by parading as legit shops but only to steal your money.
Dating sites
We all try to find someone that is perfectly matched with us but using the online dating site has many proven bad effects on psychology. It also devaluates interaction between people and can lower self-esteem.
Bad habits
Since the internet has become wildly available and popular on various devices like tablets and mobile phones more and more people are spending an unhealthy amount of time on it. Harvesting the benefits of the internet is great but find some time for other people as well.
This is a type of Google Chrome update error code. It indicates a failure to communicate with Google update. The error code is displayed in the following format:
‘Update server not available (error: 3)’
Solution
Error Causes
Error 3 may be triggered by several reasons. These include:
You are running Vista/ 7 and you have configured Google Chrome to run as an administrator
Google Update is not registered properly
Registry issues
Further Information and Manual Repair
Here are some of the best and effective DIY methods to resolve error 3 on your PC without any professional help. You don’t need to be a technical whiz to try these methods.
Method 1
If the reason for the error cause is related to Google Chrome configured as administrator on your PC, then simply run it as a normal user. This is a common issue with Google Chrome auto-updating mechanism.
Method 2
If the problem still persists, then it is advisable to try re-installing Google Chrome.
To do this, first, uninstall Google Chrome. Go to the start menu, control panel, and then program and features. Choose Add and Remove Programs and uninstall Google Chrome.
To activate changes, reboot your system. Now reinstall Google Chrome by downloading it from Google Chrome’s official website.
Method 3
If error 3 is triggered because Google Chrome is not registered properly, then try this method to fix the issue.
First, verify that GoogleUpdate.exe exists in the location specified in the Windows Registry Editor. For this, go to the Start Menu and then type Regedit in the search bar.
Now click OK. The registry editor will appear. Now in the tree view on the left, navigate to the following directory:
Make sure the default value corresponds to the location of your GoogleUpdate.exe or GoogleUpdateOnDemand.exe file. Also, verify that these files are located in the given path.
For instance, if they are located in different locations, then right-click the default value and select Modify.
Enter the correct file path and use double quotation marks for example "C:\Documents and Settings%USERNAME%Local SettingsApplication DataGoogleUpdateGoogleUpdate.exe(or GoogleUpdateOnDemand.exe)"
Method 4
Error 3 may also pop up because of registry issues.
These issues occur when the registry gets overloaded with obsolete and unnecessary files like cookies, internet history, bad entries, and junk files. In such an event, it is advisable to download Restoro
This is a user-friendly and cutting-edge PC Fixer embedded with a registry cleaner. The registry cleaner removes all the obsolete files instantly and repairs the damaged registry thereby resolving all errors including error 3.
Click here to download Restoro and resolve error 3.
Recently, some users reported that they were unable to access a website and only got the Error 1005 Access Denied instead. Specifically, users experience this issue when trying to open the Crunchyroll website – one of the largest anime and manga websites. This particular error is encountered not just on Crunchyroll but on a variety of websites like blogs, video streaming, forums, and so on.
Here’s the full context of the error message:
“Error 1005 Access Denied – The owner of this website has banned the autonomous system number (ASN) your IP address from accessing this website.”
Usually, this error occurs when the website administrator decides to block an IP address or IP range. To fix this error, here are some suggestions you can try:
Option 1 – Uninstall the VPN service you are using or use a different provider
If you are using a VPN service, you might want to uninstall it. As mentioned, website administrator blocks IP ranges if they notice any malicious activities and because of this, your IP address might fall into the banned range even if you didn’t do anything at all. To uninstall the VPN service, follow the steps below.
Tap the Win + R keys to open the Run dialog box
Then type “appwiz.cpl” in the field and hit Enter to open the Programs and Features in Control Panel.
From there, look for the VPN service you are using, select it and then click on Uninstall to remove it.
After that, restart your computer and try to install the latest version of the program again. It should work now. If not, proceed to the next available option below.
Option 2 – Try disabling the Proxy server
There are some users who reported that they’ve fixed the problem after they’ve disabled the use of a proxy server using the built-in way. Follow the steps below to disable proxy server.
Tap the Win + R keys to open the Run dialog box.
Then type “inetcpl.cpl” in the field and hit Enter to pull up the Internet Properties.
After that, go to the Connections tab and select the LAN settings.
From there. Uncheck the “Use a Proxy Server” option for your LAN and then make sure that the “Automatically detect settings” option is checked.
Now click the OK and the Apply buttons.
Restart your PC.
Note: If you are using a third-party proxy service, you have to disable it.
Option 3 – Use the Google Public DNS
You might want to change your DNS to Google Public DNS as it could also help you in fixing the ERR_CERT_COMMON_NAME_INVALID error in Chrome. To do so, follow the steps below.
The first thing you have to do is right-click on the network icon in the Taskbar and select Network and Sharing Center.
Next, click on the “Change Adapter Settings” option.
After that, search for the network connection that you are using to connect to the internet. Note that the option might be “Wireless Connection” or “Local Area Connection”.
Right-click on your network connection and click on Properties.
Then select the new window to choose the “Internet Protocol 4 (TCP/IPv4)” option.
After that, click on the Properties button and click the checkbox in the new window for the option “Use the following DNS server addresses”.
Type in “8.8.8.8” and “8.8.4.4” and click OK and exit.
Option 4 – Try contacting the website administrator
If the first three given options didn’t work, you might want to consider contacting the website administrator especially if you’ve already determined that the issue does not occur due to a VPN or proxy server that you’re using. This option can be quite tricky since you won’t be able to submit a contact form since you’re banned from accessing the website but you can contact the admin via the form section if available.
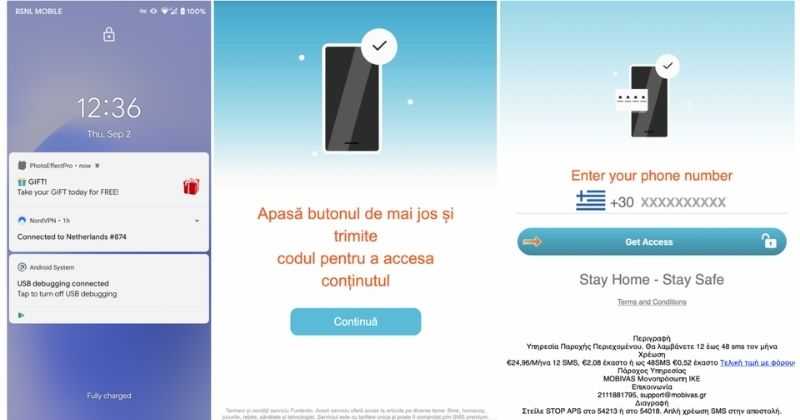
There has been recently discovered in the field of malware targeting Android devices. Affecting more than 10 million users of Android phones, the malware GriftHorse is doing its attacks via phishing and premium services scams. A lot of applications have been discovered that are hosts for this malware and many of them are inside the Google store and available for download.
According to Zimperium zLabs, this malware that was recently detected has been doing its scams and attacks even in November of 2020 and has thus far accumulated hundreds of thousands of dollars in its scam.
On the surface it looks very harmless, asking for typical permissions like internet access, calls, and other related needed functions, and then it waits. After few months the real attack happens when users get charged with premium service they never subscribed to in the first place.
List of Infected Applications that Carry GriftHorse Trojan
Zimperium zLabs listed out some of the apps with this malware. Users are advised to avoid installing them.
Amazing Video Editor
Bag X-Ray 100% Scanner
Bus – Metrolis 2021
Call Recoder Pro
Call Blocker-Spam Call Blocker
Cinema Hall: Free HD Movies
Coupons & Gifts: InstaShop
GPS Phone Tracker – Family Locator
Fingerprint Changer
Fitness Point
Free Calls WorldWide
Geospot: GPS Location Tracker
GPS Phone Tracker – Family Locator
Handy Translator Pro
Horoscope : Fortune
iCare – Find Location
iConnected Tracker
Instant Speech Translation
Lifeel – scan and test
My Chat Translator
My Locator Plus
Plant Camera Identifier
Racers Car Driver
Safe Lock
Screen Mirroring TV Cast
Slime Simulator
Smart Spot Locator
These are only some of the many infected apps available on the internet.
Zimperium zLabs also warned that GriftHorse Trojan exists in over 70 countries worldwide. The infected app quickly changes the language and displays content depending on the user’s IP address.
A very serious data breach has happened to the unfortunate GoDaddy hosting service placing a little over 1.2 million accounts affected. Security breaches sadly are not a rare occurrence but this time it is a little different.
Each time when the company is breached data is stolen and that places the company in a bad light usually because its user database has been compromised and people are concerned about their data being misused. This is very rational fear and concern but this time things are a little bit different than usual, why is that, you might ask?
Well, as before mentioned GoDaddy is a hosting company and the vector of attack was aimed at the part where it is hosting WordPress. Attackers were able to get their hands on the sFTP credentials of customers on that server meaning that all of the websites are also been relieved of their user base as well.
This potentially means that there is a high chance that all of the hosted web site's content is also compromised, meaning that your data could also be compromised even if you were not a GoDaddy customer, all you needed to do is to be a member of any site hosted on their platform.
GoDaddy has reset WordPress passwords and private keys, so it’s already taken the steps required to stock the attacker from exploiting anything with the passwords obtained. The company is in the process of generating new SSL certificates for customers.
Bad thing is that the attack used a compromised password to get into systems all the way back around September 6th, 2021, the breach was discovered on November 17th, 2021, which is more than a 2-month active time where the attacker could harvest tons of data. The outcome of this attack will be seen in the upcoming time, until then be safe, and Just in case change your passwords.
If you are running the Windows Update service but decided to stop it but you encountered an error message instead that says, “The Windows Update service could not be stopped”, read on as this post will help you fix the problem.
This kind of error appears when you use the Command Prompt to stop the Windows Update service, especially if you are using cmd without admin privileges. A lot of users reported that they were not able to disable the automatic Windows Update in Windows 10 using Command Prompt. The command used to stop the Windows Update service is the “net stop wuauserv” command. However, when some users executed this command, they got the error message. So if you are one of these users that can’t stop the Windows Update Service via Command Prompt, you can try to fix that using PID as well as checking the Service dependencies. For more details, follow the given options below.
Option 1 – Try to stop the Windows Update service via PID
In case you don’t know, each running service or process has its own unique ID or PID and you can find it in the Task Manager. You can use it to stop the Windows Update service. How? Refer to these steps:
Tap the Ctrl + Shift + Esc keys to open the Task Manager.
Next, go to the Services tab and look for the service named “wuauserv” and get its PID.
After that, type “cmd” in the Windows Start search and right-click on Command Prompt from the search results and then select the “Run as administrator” option.
After opening Command Prompt with admin privileges, execute this command: taskkill /f /pid <PID>
Note: You need to replace “<PID>” with the PID of the “wuauserv” service. For instance, the PID is 6676, then this is how the command should be “taskkill /f /pid 6676”.
After you execute the command, you will this message on your screen, “SUCCESS: The process with PID 6676 has been terminated” which indicates that you have stopped the Windows Update service successfully.
Option 2 – Try to check the Service dependencies
Dependencies of a Windows Service in Windows 10 are when windows services depend on other services. Such is the case with the Windows Update service – it also depends on three different services such as the Remote Procedure Call or RPC service, DCOM Server Process Launcher, and the RPC Endpoint Mapper. Meaning to say, if two of these services are not working as expected, then the dependant service will also be affected. This could be the reason why the Windows Update service could not start.
Tap the Win + R keys to open the Run dialog box.
Next, type “services.msc” in the field and hit Enter to open Windows Services.
From the list of Services, look for the following services:
Remote Procedure Call (RPC) Service
DCOM Server Process Launcher
RPC Endpoint Mapper
After you find these services, double click on each one of them and check whether the Startup type for all is set to Automatic and the Service status is set to Running or not.
If the service status is not running, then click the Start button. Afterward, check if you can now run the Windows Update service.


 According to Zimperium zLabs, this malware that was recently detected has been doing its scams and attacks even in November of 2020 and has thus far accumulated hundreds of thousands of dollars in its scam.
On the surface it looks very harmless, asking for typical permissions like internet access, calls, and other related needed functions, and then it waits. After few months the real attack happens when users get charged with premium service they never subscribed to in the first place.
According to Zimperium zLabs, this malware that was recently detected has been doing its scams and attacks even in November of 2020 and has thus far accumulated hundreds of thousands of dollars in its scam.
On the surface it looks very harmless, asking for typical permissions like internet access, calls, and other related needed functions, and then it waits. After few months the real attack happens when users get charged with premium service they never subscribed to in the first place.
 Each time when the company is breached data is stolen and that places the company in a bad light usually because its user database has been compromised and people are concerned about their data being misused. This is very rational fear and concern but this time things are a little bit different than usual, why is that, you might ask?
Well, as before mentioned GoDaddy is a hosting company and the vector of attack was aimed at the part where it is hosting WordPress. Attackers were able to get their hands on the sFTP credentials of customers on that server meaning that all of the websites are also been relieved of their user base as well.
This potentially means that there is a high chance that all of the hosted web site's content is also compromised, meaning that your data could also be compromised even if you were not a GoDaddy customer, all you needed to do is to be a member of any site hosted on their platform.
GoDaddy has reset WordPress passwords and private keys, so it’s already taken the steps required to stock the attacker from exploiting anything with the passwords obtained. The company is in the process of generating new SSL certificates for customers.
Bad thing is that the attack used a compromised password to get into systems all the way back around September 6th, 2021, the breach was discovered on November 17th, 2021, which is more than a 2-month active time where the attacker could harvest tons of data. The outcome of this attack will be seen in the upcoming time, until then be safe, and Just in case change your passwords.
Each time when the company is breached data is stolen and that places the company in a bad light usually because its user database has been compromised and people are concerned about their data being misused. This is very rational fear and concern but this time things are a little bit different than usual, why is that, you might ask?
Well, as before mentioned GoDaddy is a hosting company and the vector of attack was aimed at the part where it is hosting WordPress. Attackers were able to get their hands on the sFTP credentials of customers on that server meaning that all of the websites are also been relieved of their user base as well.
This potentially means that there is a high chance that all of the hosted web site's content is also compromised, meaning that your data could also be compromised even if you were not a GoDaddy customer, all you needed to do is to be a member of any site hosted on their platform.
GoDaddy has reset WordPress passwords and private keys, so it’s already taken the steps required to stock the attacker from exploiting anything with the passwords obtained. The company is in the process of generating new SSL certificates for customers.
Bad thing is that the attack used a compromised password to get into systems all the way back around September 6th, 2021, the breach was discovered on November 17th, 2021, which is more than a 2-month active time where the attacker could harvest tons of data. The outcome of this attack will be seen in the upcoming time, until then be safe, and Just in case change your passwords.