Logo

How to Fix 0x0000001A Error Code in Just a Few Clicks!

What is 0x0000001A Error Code?

The 0x0000001A is a severe memory management blue screen of death error code.

This is Windows error is also called a Stop code The system is automatically forced to reboot state which means any unsaved work is likely to be lost.

This error code pop-up locks you out of the program running on the screen and prevents you from working on it.

Solution

Restoro box imageError Causes

Experiencing error codes on your PC is an unusual activity that triggers that there is definitely something wrong with your system which should be repaired before it becomes a serious threat. The underlying causes of each error code are different.

When you come across a 0x0000001A error message this triggers several issues on your PC but largely it’s related to defective or mismatched RAM (Random Access Memory).

This could be due to disk De-fragmentation, cluttered registry, and overheating of PC hardware, or perhaps the power supply units that have been used to overcapacity which prompts your PC to show a 0x0000001A error message on your screen.

In addition to this, another reason could be a fault in the BIOS motherboard that could be outdated.

No matter what the underlying cause of the 0x000001A may be, it is imperative to get it resolved as it seriously damages your computer and leads to system failure.

Further Information and Manual Repair

Restoro is the best way to resolve almost all types of error codes including 0x0000001A in just a few clicks. It is a multi-functional PC registry cleaner that serves as a one-stop solution for all PC issues.

This tool can be used to resolve the blue screen of death errors like 0x0000001A in seconds and help you resume and get access to the program that you were working on before you experienced the error code.

With this helper, you don’t need to have the technical expertise or sound knowledge about the underlying cause of 0x0000001A.

This is an intuitive and advanced tool with built-in cutting edge technology that scans and identifies the cause of 0x00000001A and fixes it right away.

It has a neat design layout and a user-friendly interface that is easy to use for even novice users.

Restoro registry cleaner cleans up registry disk space, occupied by unnecessary files including junk files, invalid registry entries, temporary internet files, and entries of uninstalled programs that are still present in the registry.

It cleans and clears up disk space and wipes out clutter stored in the registry of your system which is likely to trigger RAM and memory mismanagement issues triggering an error code 0x0000001A pop-up message.

Restoro is feature-filled which makes it multi-functional.  It is safe, secure and efficient. For optimum data security during repair, it creates backup files. This helps recover data in the event of data loss during repair, which is quite rare.

So what are you waiting for? Download Restoro Registry Cleaner today and resolve the error pop-up 0x0000001A now!

Do You Need Help with Your Device?

Our Team of Experts May Help
Troubleshoot.Tech Experts are There for You!
Replace damaged files
Restore performance
Free disk space
Remove Malware
Protects WEB browser
Remove Viruses
Stop PC freezing
GET HELP
Troubleshoot.Tech experts work with all versions of Microsoft Windows including Windows 11, with Android, Mac, and more.

Share this article:

You might also like

The PrintNightmare vulnerability finally fixed
PrintNightmare vulnerability has been a struggling issue for Microsoft in the past weeks, each time it seems to be addressed and fixed something new popped up and it still had issues. Microsoft finally addressed the issue but with a price. The default behavior of Point and Print is changed. From this fix onward, the Point and Print driver installation and update behavior will require administrator privileges, which should prevent the exploit to the Windows Print Spooler that could be used by malicious individuals to gain administrative privileges in Windows. The drawback of this fix from Microsoft is that non-elevated users may have difficulty adding or updating printers. Microsoft feels that the security risks caused by PrintNightmare are worth the tradeoff, though. If you really want to let non-elevated users add printers, you can follow the instructions in this Microsoft Support article to disable this mitigation with a registry key. However, doing so will expose you to this known vulnerability and isn’t recommend.
Read More
Change Windows 10 Lock Screen Background
Hello everyone, I hope you are all doing well. Today we will be changing the Windows Lock Screen background. Changing the lock screen background is a very easy task and it can be done in a very short time. So let's jump right into it. The first thing you need to do is to press the Windows start button on the bottom left and then press settings. Windows 10 Star menu with marked settings iconOnce the settings screen appears, choose and click on Personalization. Windows 10 settings menu with marked Personalization groupInside personalization, click on the Lock Screen tab. Windows settings lock screenOn the right screen, under the picture, you will find Windows spotlight, click on it to bring a drop-down menu up. lock screen drop down menuYour choice is presented as a single picture for background or slideshow, a series of pictures that are going to be looped in a given time interval. If you would like just a single picture for your background, choose that and click on it. lock screen browse for picturesOnce you are in choose picture dialog, click on the browse button and navigate to the picture on your storage which you would like to have as a background. If however, you fancy slideshow as your lock screen background, click on the background drop-down menu and choose the slideshow. Next, click on add a folder and navigate to a folder where you have pictures that you would like to have as a slideshow for your Windows lock screen. lock screen add a folder option
Read More
Network License NotAvailable15.570.0 Autodesk
If when trying to start Autodesk applications you receive a Network license not available error then please keep on reading, this guide is for you:

Causes of the error:

  • The license on the License Server is invalid.
  • The port for Autodesk Network License Manager is blocked.
  • The client computer is configured with incorrect license server information.
  • The license request is timing out on the client's computer before the license is obtained.

Solutions for the error:


Verify that the Autodesk License Server is setup with the correct license file.

To set up a license server for Windows, perform the following:

  1. Download and install the Network License Manager for Windows:
  2. Open LMTools and access the System Settings tab. Make a note of the "hostname" and "ethernet address" of the license server.
  3. Generate a Network License File in Autodesk Account.
  4. On the Service/License tab, select Configuration Using Services and LMTOOLS ignores license file path environment variables.
  5. On the Config Services tab, enter a name for the new service in the Service Name field.
  6. Fill the following fields, using the Browse buttons:
    • Path to the lmgrd.exe - Navigate to this file: C:\Autodesk\Network License Manager.
    • Path to the License file - Navigate to the new Autodesk.lic file, typically placed in: C:\Autodesk\Network License Manager\Licenses.
    • Path to the Debug Log file: C:\Autodesk\Network License Manager.
    • If no file is present, create a TXT file in Notepad and rename it “Debug.log.”
  7. Make sure the "Start Server at Power Up" and the "Use Services" boxes are checked. Then click Save Services.
  8. On the Start/Stop/Reread tab, click Start Server.
  9. On the Server Status tab, click Perform Status Enquiry.
  10. Licenses should display as active.

How to set up the Autodesk Network License Manager on a Mac.

Note: The Autodesk License Server Manager (version 11.16.2.0) is supported only on the following Mac operating systems:
  • Apple macOS High Sierra 10.13
  • Apple macOS Sierra 10.12
  • Apple Mac OS X El Capitan 10.11
  1. Download Autodesk Network License Manager version 11.16.2.0 for Mac
    • ​​Download the nlm11.16.2.0_ipv4_ipv6_mac_universal.tar.gz file to the Desktop.
  2. To install the Autodesk Network License Manager:
    • Double click on nlm11.16.2.0_ipv4_ipv6_mac_universal.tar.gz to unpack the installer package.
    • After unpacking nlm11.16.2.0_ipv4_ipv6_mac_universal.pkg, will be /Downloads/adlm/FLEXnet folder.
    • Double click on nlm11.16.2.0_ipv4_ipv6_mac_universal.pkg to start installation and follow the installation wizard.
    • The license server will be installed in /usr/local/flexnetserver/ directory.
  3. Change permissions for /usr/local/flexnetserver/ directory to 777
  • Open Terminal (located in /Applications/Utilities/Terminal) and enter the following command:
sudo chmod -R 777 /usr/local/flexnetserver
  • Note: Administrator password may be asked. While typing no characters are shown, just type out the password and hit return key.
  • Note: To start the license server only with elevated permissions (using sudo command), change permissions to 755 instead of 777.
  1. Create /usr/local/flexnetserver/licenses directory for network license file location
sudo mkdir /usr/local/flexnetserver/licenses
  1. Find the license server Host Name and Host ID.
  2. Generate the Network License File in the Autodesk Account
    • Once the license file is generated, make sure it has a .lic extension (e.g. adsk_license.lic) and is in a plain text format and place it in /usr/local/flexnetserver/licenses directory
Note: In this article we will refer to  adsk_license.lic as network license file name. Feel free to change the actual name of the license file, but make sure to reflect the new name when using the commands below.
  1. Create a debug.log file in the /usr/local/flexnetserver/ directory using the following command:
touch debug.log
  1. To start the Network License Server use the following command:
/usr/local/flexnetserver/lmgrd -c /usr/local/flexnetserver/licenses/adsk_license.lic -l /usr/local/flexnetserver/debug.log
Note: If folder permissions for  /usr/local/flexnetserver/ are set to  775, then use sudo command to start the server. For example:
sudo /usr/local/flexnetserver/lmgrd -c /usr/local/flexnetserver/licenses/adsk_license.lic -l /usr/local/flexnetserver/debug.log
  1. To obtain license server status enquiry:
/usr/local/flexnetserver/lmutil lmstat -a -c /usr/local/flexnetserver/licenses/adsk_license.lic
  1. To stop the license server:
/usr/local/flexnetserver/lmutil lmdown -q -force
  • A​​lternatively, run ps command to obtain process ids for lmgrd and adskflex and then kill those processes:
ps -ax | grep lmgrd
ps -ax | grep adskflex
kill -9
  • (provide process ids obtained by previous commands individually)

How to set up the Autodesk Network License Manager on Linux.

Note: The Autodesk License Manager (11.16.2.0) is supported only on the following Linux distros:
  • Red Hat® Enterprise Linux® 7
  • Red Hat Enterprise Linux 6
  • SUSE Linux Enterprise 12
  • SUSE Linux Enterprise 11
To configure the license manager use the following steps:
  1. Download Autodesk Network License Manager v. 11.16.2 for Linux from this link
    • ​​Download the nlm11.16.2.0_ipv4_ipv6_linux64.tar.gz file to your desktop.
  2. To install the Autodesk Network License Manager run following command as root.
    • tar –zxvf nlm11.16.2.0_ipv4_ipv6_linux64.tar.gz
    • rpm -vhi nlm11.16.2.0_ipv4_ipv6_linux64.rpm
    • The license server will be installed in /opt/flexnetserver/ directory.
  3. Find the license server Host Name and Host ID
  • To obtain the license server system hostid run the following command
/opt/flexnetserver/lmutil lmhostid From the command output note the hostid in quotes, if the system has two active NIC cards, select the first MAC address. lmutil - Copyright (c) 1989-2018 Flexera. All Rights Reserved. The FlexNet host ID of this machine is "000c297949e0"
  • To obtain the license server system hostname run the following command
/opt/flexnetserver/lmutil lmhostid hostname From the command output note the hostname of the license server. mutil - Copyright (c) 1989-2018 Flexera. All Rights Reserved. The FlexNet host ID of this machine is "HOSTNAME=Centos7.localdomain"
  1. Generate your Network License File in Autodesk Account
    • Once the license file is generated, make sure it has .lic extension (e.g. adsk_license.lic) and place it in /opt/flexnetserver/licenses directory.  If the directory doesn't exits, create it with this command: sudo mkdir /opt/flexnetserver/licenses
Note: in this article we will refer by adsk_license.lic your network license file name.
  1. To start the Network License Server
    • /opt/flexnetserver/lmgrd -c /opt/flexnetserver/licenses/adsk_license.lic -l /opt/flexnetserver/server_log.log
  2. To obtain license server status enquiry
    • /opt/flexnetserver/lmutil lmstat -a -c /opt/flexnetserver/licenses/adsk_license.lic
  3. To stop your license server service
    • /opt/flexnetserver/lmutil lmdown -q -force
    • alternatively you can also run ps command to obtain process ids for lmgrd and adskflex and then kill those processes
      • ps -aw | grep lmgrd
      • ps -aw | grep adskflex
      • kill -9 (provide process ids obtained by previous commands individually)
  4. To start the license server automatically after the system reboot
    • Open /etc/rc.d/rc.local script as root and enter license server start up command in it.
touch /var/lock/subsys/local /opt/flexnetserver/lmgrd -c /opt/flexnetserver/licenses/adsk_license.lic -l /opt/flexnetserver/server_log.logNote: To ensure that the script will be executed during boot, run following command as root. chmod +x /etc/rc.d/rc.local
  1. Make sure that all necessary ports are open:
  • lmgrd.exe needs ports 27000 to 27009.
  • adskflex.exe needs port 2080.
Note: Errors may occur if the network license file is corrupt or in the case of a combined network license it has incorrectly combined licenses. To learn more about combining licenses, see Combining License Files for Multiple Autodesk Products. Use the License File Parser to verify that the license contains the appropriate products and FLEXnet feature codes and does not display an error

Verify that TCP ports (2080, 27000-27009) used by Autodesk Network License Manager are not blocked by Firewall.

The FLEXlm® based version uses the following incoming ports:
  • TCP ports 2080 (for the adskflex vendor daemon)
  • TCP ports 27000 to 27009 (for the lmgrd master daemon, which uses the first open port in the range)
Note: If these port addresses are restricted by a router or firewall software, users on the remote side of the router will not have access to licenses controlled by the Network License Manager.

Verify that the client computer is configured with the correct license server name or IP.

Windows:

Clear license server information from the system registry.

  1. Type regedit in the Windows Search box and hit Enter key.
  2. Select the following registry key
  • [HKEY_CURRENT_USER\SOFTWARE\FLEXlm License Manager]
  1. As the key is selected, in right panel ADSKFLEX_LICENSE_FILE will be visible.
  2. Right click on the key and delete it.

Specify the license server in ADSKFLEX_LICENSE_FILE system variable 

  1. Go to Start > Control Panel > System and Security > System.
  2. Select Advanced system settings.
  3. On the System Properties dialog, click Environment Variables.
  4. Under System Variables, click New.
  5. Enter ADSKFLEX_LICENSE_FILE for the variable name and 2080@SERVER_NAME _OR _IP for the variable value.
Note: the license server information most often is recorded in LICPATH.lic file and can be verified there too.  ADSKFLEX_LICENSE_FILE system variable supersedes LICPATH.lic.  Thus, setting the system variable is preferable when this error is seen.

If the license server is on a VPN or a remote network set the FLEXLM_TIMEOUT environment variable:

  1. Go to Start > Control Panel > System and Security > System.
  2. Select Advanced system settings.
  3. On the System Properties dialog, click Environment Variables.
  4. Under System Variables, click New.
  5. Enter FLEXLM_TIMEOUT for the variable name and 5000000 for the variable value.
  6. Click OK to save the setting.
Note: if needed the variable value can be increased to 10000000.

Mac/Linux:

Specify the Autodesk Network License server information in $HOME/.flexlmrc file.

Use a text editor to create a flexlmrc.txt file and save it in Plain text format (In TextEdit on Mac: Format - Make Plain Text) on desktop. The file content should look like this, except with the name or IP address of the license server.
  • ADSKFLEX_LICENSE_FILE=@SERVER_NAME _OR _IP
If the license server is on the same machine as the Autodesk software, use localhost as the license server name.  Thus, the content of flexlmrc file could look like this:
  • ADSKFLEX_LICENSE_FILE=@localhost
Note: On firewall restricted network or when accessing the license server via VPN, need to include TCP port/s (usually 27000 or 2080) into Autodesk License Server service as follows: ADSKFLEX_LICENSE_FILE=2080@SERVER_NAME _OR _IP

Once flexlmrc file is created move it to user's $HOME folder as follows:

  1. Open a Terminal window
  2. Type open ~ (Mac) or nautilus ~ (Linux) to open $HOME folder
  3. Drag and drop flexlmrc.txt file from Desktop to the home folder.
  4. To make the file a configuration file, rename it to .flexlmrc (please note . [DOT] in front of the file name) by running the following command:
  • mv flexlmrc.txt .flexlmrc (Mac)
  • mv flexlmrc .flexlmrc (Linux)

Verify that the license server information registered with the product is correct (versions 2020 and later only)

In versions 2020 and later, the license server information is registered with the AdskLicensing service running locally on the workstation. When changing to a new license server, the old server information may still be registered with AdskLicensing and result in the error above, if this is not appropriately updated. See the below steps to solve this:
  1. Click the Start menu and type cmd.
  2. Right-click on the Command prompt and choose "Run As Administrator."
  3. In the Command prompt, run the following command, followed by ENTER:

"C:\Program Files (x86)\Common Files\Autodesk Shared\AdskLicensing\Current\helper\AdskLicensingInstHelper.exe" change -pk PRODKEY -pv VER.0.0.F -lm "" -ls "" -lt""

Note:

  • Replace PRODKEY with the product key correspondent to your product(s). See Look Up Product Keys for the full list.
  • Replace VER with the version you are using. E.g. 2020 for AutoCAD 2020.
  • Repeat this step for each software you need to reset.
  1. Open Registry Editor (Start > type regedit > ENTER).
  2. Navigate to HKEY_CURRENT_USER\Software\FLEXlm License Manager.
  3. On the right-side, verify of the ADSKFLEX_LICENSE_FILE key exists. If yes, remove it (right-click > Delete).
  4. Run the software again.
  5. Select Multi-user in the Let's Get Started screen.
  6. Follow the steps to connect to your license server.
Read More
No Audio Device Error – Fix Tricks

What exactly is no audio device malfunction?

No audio device error is among the malfunctions that many Computer consumers run into. No sound or audio can be heard from the computer when the error occurs.

Solution

driverfix boxError Causes

There are numerous elements that may be the basis of this malfunction. Corrupted or broken sound card drivers, incorrect Device Manager Options for example, or even incorrect BIOS configurations.

Further Information and Manual Repair

How could you recover the standard production of audio by your personal computer and solve this malfunction? Like a number of additional malfunctions, the method of the repair depends on its trigger. To properly solve this dilemma, you are required to run through an evaluation of the pc system so that you can pinpoint the cause. This is because there are numerous variables, which alone, or concurrently may trigger this dilemma. These measures will allow you to work out the no sound device error in your personal computer programs, identify the trigger and fix it. Follow the directions in step 1 if your computer has an onboard audio device installed in it and assess the BIOS settings. You can jump step 1 and move to step two if you utilize a separate sound card.

STEP #1 - Assess the BIOS options.

No sound device error can be caused by incorrect BIOS configurations in your Personal Computer. By fixing these settings if they are the cause of the malfunction, you can easily solve it. Make Sure you restart the pc and immediately access the BIOS options. By locating the Sound card, which is usually known as the AC97 Audio, you should subsequently open the Integrated Peripherals. As soon as you locate it, set it to Allow or Auto. Finally, you should access the On-Board Audio AC97 Control and set it to Allow or Auto as well. If it doesn't solve the situation, proceed to Step Two.

STEP #2 - Analyze the Device Manager

No sound device malfunction can be additionally caused by malfunctions with the Device Manager. To solve this issue, go to My Computer, right-click it, select properties, click on the Hardware tab, then click on Device Manager. At this windowpane, analyze the movie, audio, and game controllers. If you learn that there is a cross on any of the sub things, right-click it subsequently and set it to Enable. The sound card driver may have not been correctly installed or may be damaged if there is Exclamatory Mark or Question Mark on the device manager menu. This does not mean that the sound card driver is ok. It may have malfunctioned even though you do not locate anything unusual. This is because the Device Manager doesn't always recognize errors in audio hardware. After this, you can proceed to step 3.

STEP #3 - Upgrade or reinstall the Sound Card Driver.

About 80% of "no sound system discovered/installed" malfunctions come from broken and/ or out-of-date card drivers. The sound card will not be detected by the Windows Operating System, when the audio card driver is corrupted, damaged, or out-of-date and therefore no sound will be produced by your computer. If this is the cause of the no sound device malfunction, you should reinstall the Audio Card Driver on your computer. Still, you can utilize driver upgrade applications on the web that will help you upgrade out-of-date drivers.
Read More
Fixing the Java Error Code 1603 in Windows 10
You might have experienced a situation where you’re trying to install or update your Java application on your Windows 10 computer but were not able to do so for some reason. One of the problems you can encounter while updating or installing Java is Error Code 1603. There are two ways you can install Java – you have the option to choose where to get Java either from the online download or offline download. There are times when before you can install Java, you might have to disable the firewall first as it may interrupt the Java online installation. And while doing so, if you are getting the “Java Update or Install did not complete – Error Code 1603” error message, read on as this post will show you what you can do to fix it. At the time of writing, the exact cause of this error is still unknown. On the other hand, you must still check if you have fulfilled all the system requirements needed to install Java. You have to make sure that your Windows 10 PC has sufficient disk space available for the Java installation or update. In addition, you also have to make sure that you meet all the hardware requirements and you are using a popular web browser for the installation, and that you have administrative privileges for download and installation. To fix the “Java Update or Install did not complete – Error Code 1603” error, here are some suggestions you can try.

Option 1 – Restart your computer before you install the new Java package

You might have to restart your computer if you got the error code 1603 while installing Java through an offline download.
  • Restart your computer.
  • Next, download and install the offline installer of the Java package from the official site of Java and not some third-party source.
  • In the prompt box that appears while downloading the Java package, select the option Save in and save the package in your preferred folder.
  • After that, navigate to the saved, downloaded package on your computer and then double click on the file to begin the installation process.
After that, if it didn’t fix the problem and you’re still getting the error code 1603, follow the next given option below.

Option 2 – Uninstall the old versions of Java before you install the new package

  • Open the Control Panel.
  • After that, click on Programs and features.
  • Then select the old Java package and click on Uninstall.
  • Restart your computer and then try installing the new Java package again from its official site.

Option 3 – Disable the Java content in the browser you’re using via Java Control Panel and reinstall Java

  • Open the Control Panel again.
  • And then click on the Java icon to open the Java Control Panel.
  • Next, navigate to the Security tab and then uncheck the “Enable Java content in the browser” option.
  • Then click on Apply and then Ok to save the changes made.
  • Now install the new Java package again after you download it from its official website.
  • Once the installation is completed, re-enable the “Enable Java content in the browser” option in the Java Control Panel as it is essential especially if you are running Java content in your browser.
Read More
Restore, Minimize and Close are not working
Recently, a number of users reported not being able to use the Restore, Minimize and Close buttons on their Windows 10 computers. This kind of issue can be quite annoying as you won’t be able to use your computer properly, especially when you navigate between programs and windows. In such cases, the buttons on the right side of the title bar won’t respond to any inputs which could be caused by a number of factors such as different input modes, corrupted system files, and many more. If you are one of the users who are currently facing this problem, worry not for this post will guide you on what you can do to resolve it. There are several potential fixes you can check out to fix the issue. You can try to check if Tablet Mode is enabled and if it is, you have to disable it. You could also boot your computer in a Clean Boot State to check if a third-party program is the one that’s causing the problem. In addition, you could also reinstall the program where you experience the problem or run built-in utilities like System File Checker and DISM tool.

Option 1 – Make sure that you are not in Tablet Mode

Since Windows 10 is designed to work on both desktop and mobile devices, it could be that your computer has slipped into Tablet Mode which explains why you’re not seeing the Taskbar. To check if your computer is really in Tablet Mode, follow these steps:
  • Go to the Start menu and select Settings.
  • Next, select the System setting and from the left pane select the Tablet Mode.
  • From there, make sure that the buttons next to the options given below are set to the off position:
    • Hide app icons on the taskbar in tablet mode
    • Automatically hide the taskbar in tablet mode

Option 2 – Put your computer in a Clean Boot State

As pointed out, it is possible that some third-party program or service is the one that’s behind the problem. To isolate this possibility and to identify the culprit, you have to put your computer into a Clean Boot State. To do so, follow the steps below.
  • Log onto your PC as an administrator.
  • Type in MSConfig in the Start Search to open the System Configuration utility.
  • From there, go to the General tab and click “Selective startup”.
  • Clear the “Load Startup items” check box and make sure that the “Load System Services” and “Use Original boot configuration” options are checked.
  • Next, click the Services tab and select the “Hide All Microsoft Services” check box.
  • Click Disable all.
  • Click on Apply/OK and restart your PC. (This will put your PC into a Clean Boot State. And configure Windows to use the usual startup, just simply undo the changes.)
  • Once your computer is in a Clean Boot State, try to open the program where the problem occurred.

Option 3 – Try reinstalling the program

If the first two options didn’t work, then you might want to consider uninstalling the program and then install it back with its latest version. This should resolve the problem.

Option 4 – Try to run System File Checker

System File Checker or SFC is a built-in command utility that helps in restoring corrupted files as well as missing files. It replaces bad and corrupted system files to good system files that might be the cause why the Restore, Minimize and Close buttons don’t work. To run the SFC command, follow the steps given below.
  • Type “cmd” in the Start search and then right-click on the appropriate search result.
  • Next, select “Run as administrator” to open Command Prompt with admin privileges.
  • After opening Command Prompt, type in sfc /scannow
The command will start a system scan which will take a few whiles before it finishes. Once it’s done, you could get the following results:
  1. Windows Resource Protection did not find any integrity violations.
  2. Windows Resource Protection found corrupt files and successfully repaired them.
  3. Windows Resource Protection found corrupt files but was unable to fix some of them.
  • Now restart your computer and see if the problem is fixed or not.

Option 5 – Run the DISM tool

You can try running the Deployment Imaging and Servicing Management or DISM tool to fix the problem. Using this built-in tool, you have various options such as the “/ScanHealth”, “/CheckHealth”, and “/RestoreHealth”.
  • Open the Command Prompt with admin privileges.
  • Then type in the following commands and make sure to hit Enter right after you type each one of them:
    • Dism /Online /Cleanup-Image /CheckHealth
    • Dism /Online /Cleanup-Image /ScanHealth
    • exe /Online /Cleanup-image /Restorehealth
  • Do not close the window if the process takes a while as it will probably take a few minutes to finish. Once it’s done, restart your computer.
Read More
A Quick Method To Fix Error Code 0x80070002

What is 0x80070002 Error Code?

0x80070002 error message triggers Windows update problems. This error code pop prevents you from successfully updating Windows operating system and its installed components. Windows update is necessary to keep the system up to date and efficient. It also helps you close security holes in your system and prevents your system from being infected by viruses or hacked.

Solution

Restoro box imageError Causes for 0x80070002

This error code pops up on the screen and results in an unsuccessful Windows update, when either your system has wrong date/time settings or when Windows update temporary folder is corrupted. The latter cause is the one to be worried about as it usually results from malware, viral infection, and registry corruption and damage. If this error code is not fixed timely it can lead to system crash and failure too.

Further Information and Manual Repair of 0x80070002

The best way to fix the 0x80070002 Windows update error code is to download Restoro on your system. Restoro is a new, powerful, intuitive, and cutting-edge PC fixer that serves as both a registry cleaner and a system optimizer. It is integrated with multiple performance-boosting and highly functional utilities. With this helper, you can resolve the maximum number and types of PC issues in a few seconds. This tool spares you from the hassle of finding and detecting the underlying cause of the error 0x80070002. Its intuitive built-in technology automatically detects and identifies the error and its causes and repairs it right away. Restoro includes utilities like registry cleaner, privacy issue detector, Active X and Class cleaner, and system stability scanner. The registry cleaner feature assists users to clean up registry clutter. This includes clearing junk files, temporary files, and invalid registry entries which take up all the disk space causing the registry to get corrupted and hampering Windows updates. It repairs the corrupt registry in no time allowing you to perform successful Windows updates.

Restoro Privacy Features

Nonetheless, if the error 0x80070002 occurs due to malware, Restoro will scan and repair it too. Its advanced privacy error anti-virus built-in feature scans for all types of malware, spyware, and viruses quickly and removes them from your PC. This ensures that your PC remains safe from malicious malware that can cause unsuccessful Windows updates and error codes like 0x80070002. Restoro is compatible with all Windows versions. It has a sophisticated and easy-to-use layout making it easier for users of all levels to use it without any complexity or hassle. It is safe and efficient.  It also helps boost the speed of your PC thus lowering boot time tremendously. For user safety, Restoro advises users to create backup files. This helps retrieve valuable data and files in the event of data loss during repair which rarely happens; but in case it does, you don’t have to suffer from a big loss.

Get Restoro

To get started, all you have to do is download and install Restoro on your system. After downloading, run it on your PC for a scan. Once the scanning is complete, a comprehensive scan report will be displayed on your screen showing you the errors affecting your system including 0x80070002 errors that you’ve been experiencing when performing Windows updates. To resolve issues on your PC right away, simply click on repair.  This will repair the error 0x80070002 issues on your PC in seconds. After your PC is repaired, you can then perform a Windows update again. It will be executed successfully. Click here to download Restoro today!
Read More
KVM switch and its usage

You probably heard about switches for LAN but not a lot of people heard about KVM switches. So what exactly is KVM switch?

KVM switch

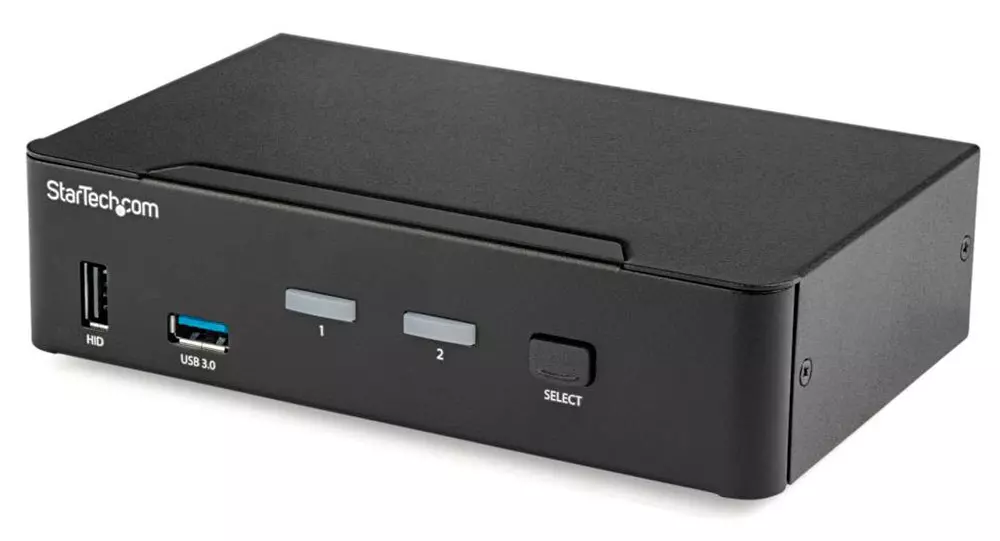
If we look at the name, it is a shortcut for Keyboard, Video & Mouse and the original idea was to have multiple computers but one keyboard, mouse, and monitor. These peripherals would be connected to the KVM switch and other computers could all use one set of these on the fly when needed.

The technology behind the switch is a little interesting since it will actively fake signals to other computers that are not using peripherals. Once they are switched to them the transition is smooth and not noticeable. In old days these switches were more important than today since on every mouse or keyboard disconnection you had to reboot the computer, and although today that is not the case CPU will still detect disconnection and on the next connection it will run through the ID of the device and try to use the existing driver and if peripheral was connected in other USB port, it will install the same driver but connect it to the new USB port.

This type of reconnection can slow down work and place unnecessary load on the CPU so that is why KVM will fake connection in order to make switching externals on the computer smooth and in nick of a time.

Modern KVM switch

These days modern KVM switches will offer you more options than just being able to switch between keyboard, mouse, and monitor. Modern switches now offer Lan, audio, and many more various options.

There are also different kinds of switches offering you only one option, like for example just a Video switch that will let you use one monitor on three computers and many more other specialized options.

Software switches

So far we talked about Hardware switches, a real device being able to take peripherals into it and switch computers on the fly. On the other line, we have software switch solutions that will have specific software installed on all computers and have it run at all times, and switching between them will be through specific software.

There are two very good and main advantages of using software solutions instead of a hardware one. First, of course, is the price, since the most popular Synergy is an open-source solution, completely free of charge. The second big advantage is that software switch is not limited to how many computers can you use. Hardware switches tend to go to a large number like 16 but if you have a large cluster of computers over a LAN, let's say 30 then the box solution might be difficult.

On the other hand software solution will switch only keyboard and mouse since each other computer will have to have some screen on it in order to work. Both solutions have their strong advantages and disadvantages and it is up to you to choose one that best suits you.

Conclusion

If you are multitasking with a lot of computers or just need your peripherals from time to time to connect to another machine then the KVM switch is something that you might find the use of. Just be aware that if you go for some cheap switch you might experience some lag on your peripherals, but if that is not a concern you can get hardware one for as low as $50 USD.

Read More
Fix Windows Error Code 0x80070017
If you suddenly encountered a Windows Error Code 0x80070017 during an Update, Installation or System Restore then it’s probably due to some missing or corrupted system files. This kind of error code can occur during an update, installation, or system restore and the only way out of it is to download the file once again and re-run the installation from the top. Before you start to troubleshoot the problem, you need to create a System Restore Point first. After you create a System Restore point, you can follow the troubleshooting options laid out below to fix the Windows Error Code 0x80070017. You just have to follow the troubleshooting option that applies to your situation and whether you got the error during an update, installation, or during System Restore. Whether you got the error 0x80070017 while updating Windows 10 or installing it or during a system restore, the first thing you must do is run the System File Checker. As pointed out early on, the Windows Error Code 0x80070017 might be caused by corrupted or missing system files so the first thing you can try is to run the System File Checker scan.
  • Tap Win + R to launch Run.
  • Type in cmd in the field and tap Enter.
  • After opening Command Prompt, type in sfc /scannow and hit Enter.
The command will start a system scan which will take a few whiles before it finishes. Once it’s done, you could get the following results:
  1. Windows Resource Protection did not find any integrity violations.
  2. Windows Resource Protection found corrupt files and successfully repaired them.
  3. Windows Resource Protection found corrupt files but was unable to fix some of them.
If you have encountered Windows Error Code 0x80070017 during an Update, then here are some options you need to try:

Option 1 – Delete the files/contents in the SoftwareDistribution Folder

The Software Distribution folder in the Windows operating system is a folder that can be found in the Windows directory and is used to store files temporarily which might be required to install the Windows Update on your PC. Thus, it is required by the Windows Update and maintained by WUAgent. A lot of users tried deleting the files in this folder to fix the problem and so far it has worked. Like them, you can try clearing the Windows Update cache by simply deleting the contents of the folder named “SoftwareDistribution” since Windows apparently can’t clear and re-download the update contents once they are corrupted. Thus, deleting the contents of this folder will make Windows download the contents again which will fix the problem. To do that, follow the steps below.
  • Open the WinX Menu.
  • From there, open Command Prompt as admin.
  • Then type in the following command – don’t forget to hit Enter right after typing each one of them.
net stop wuauserv net stop bits
  • After entering these commands, it will stop the Windows Update Service and the Background Intelligent Transfer Service.
  • Next, go to the C:/Windows/SoftwareDistribution folder and get rid of all the folders and files thereby tapping the Ctrl + A keys to select them all and then click on Delete. Note that if the files are in use, you won’t be able to delete them.
  • Once all the contents in the Software Distribution folder are deleted, restart your PC and then go back to Command Prompt and input the following commands again.
net start wuauserv net start bits
Since the folder has already been flushed, it will be populated afresh the instant your restart your computer and open Windows Update.

Option 2 – Run the Windows Update Troubleshooter

Running the built-in Windows Update troubleshooter could also help you resolve the Windows Update Error Code 0x80070017. To run it, go to Settings and then select Troubleshoot from the options. From there, click on Windows Update and then click the “Run the troubleshooter” button. After that, follow the next on-screen instructions and you should be good to go. On the other hand, if you got the error code 0x80070017 during a Windows 10 installation, then it’s because of bad media or corruption in ISO. Here are some troubleshooting steps for this kind of situation:

Option a – Try to create Windows 10 ISO media again

In this option, you will have to create a Windows 10 bootable media and use it to install the latest Windows 10 version. Most users reported that this option works and the reason why it does have something to do with the Windows Update client since the Windows Updates downloaded from the regular Windows Update client seem to create issues such as the error 0x80070017. However, issues like this one don’t occur when the very same Windows Updates are downloaded and installed via an ISO file. Take note that when using a Windows ISO file, you will be asked to choose what you want to do with the previous settings and apps. A lot of users opted for the “Not to keep the old Windows settings” option which has resolved the issue. So if you want to keep the previous settings then you must try to update Windows first while keeping the old settings. However, if it doesn’t work, you have to try installing the latest version of Windows without keeping the previous settings.
  • Click this link and then click the Download Tool Now button.
  • Next, click the “Use the tool to create installation media (USB flash drive, DVD, or ISO file)…” option and follow the next given instructions on the screen.
  • Now select the ISO file option in step 5.
  • After that, you should now have an ISO file.
  • Next, go to the location where you’ve downloaded the ISO file.
  • Then right-click on the Windows 10 ISO file and select the Open with the option and then select File Explorer.
  • Now click on “setup.exe” and follow the next instructions that appear on the screen. When asked, you have to select either Nothing (clean install) or Keep personal files only option. Take note that you must not select the “Keep personal files, apps, and Windows settings since it doesn’t really work.

Option b – Run Microsoft’s online troubleshooter

Running Microsoft’s online troubleshooter might also help you fix the Windows update error 0x80070017. This online troubleshooter is known to help in fixing Windows Update errors, it scans your computer for issues that might be causing the problem and then fixes them automatically. If you got the error during System Restore then this means that the files that are being copied from the disk are not making it to the hard drive. To resolve it, here’s what you can do:

Option 1 – Run System Restore in Safe Mode

You might want to run System Restore in Safe Mode and see if it works. Just reboot your PC into Safe Mode and then run System Restore.

Option 2 – Reset Repository

  • Boot your PC into Safe Mode.
  • Then open Command Prompt as admin.
  • Next, type the “net stop winmgmt” command and hit Enter to stop the Windows Management Instrumentation Service.
  • After that, go to C:/Windows/System32/wbem. From there, rename the repository folder to “repository-old”.
  • Restart your computer.
  • After your computer has restarted, open Command Prompt as admin again and then type the “net stop winmgmt” command and hit Enter.
  • Next, type the “winmgmt /resetRepository” and hit Enter to reset Repository.
  • Restart PC and check if System Restore now works.

Option 3 – Try resetting Windows 10

To fix the error 0x80070017, you can try resetting Windows 10. Doing so won’t get rid of any file in your system – instead of erasing all your media files and documents, it only resets all the system settings and files. Simply go to Settings > Recovery. From there click the Get started button under the Reset This PC section.
Read More
How to Remove MovieGoat - Malware Removal Guide

MovieGoat is a browser extension that allegedly lets you search for your favorite videos using its simple search engine. From the author:

Search for your favorite movies online, stay updated with the latest news and trends, and keep an eye on what’s up and coming in the world of cinema.

Simply type goat+ SpaceTab + query at the chrome search bar.
MovieGoat hijacks your browser, replacing your default search engine, displaying sponsored videos when you use its search and will display pop-up ads during your browsing experience. This extension has been detected as a Browser Hijacker by several anti-virus scanners and is not recommended to keep on your computer, especially because it serves no other purpose than to display pop-up ads and negatively impact your browsing experience.

About Browser Hijackers

Browser hijack is a common type of internet fraud where your internet browser configuration settings are modified to make it carry out things you never intend. There are numerous reasons why you may have an internet browser hijack; however commercial, advertising, and marketing are definitely the primary reasons for their creation. Usually, hijackers are made for the benefit of cyber hackers usually through income generation from forced ad clicks and site visits. Most people assume that these types of websites are legitimate and harmless but that is incorrect. Almost every browser hijacker poses an actual threat to your online safety and it’s important to categorize them under privacy risks. Some browser hijackers are designed to make particular modifications beyond the web browsers, like altering entries on the system registry and permitting other types of malware to further damage your PC.

How you can recognize a browser hijack

When your browser is hijacked, the following could happen: your homepage has been reset to some unfamiliar webpage; you find yourself regularly directed to some other site than the one you meant; The default search page of web browser is altered; you are finding new toolbars you have never witnessed before; you’ll notice random pop-ups start showing regularly; websites load very slowly and sometimes incomplete; Inability to navigate to particular websites, particularly anti-malware as well as other computer security software websites.

How it infects your computer

Browser hijackers can get into a computer in some way or other, for example via downloads, file sharing, and email too. They may also be deployed through the installation of a web browser toolbar, add-on, or extension. A browser hijacker can also come bundled up with some freeware which you unwittingly download and install the browser hijack, compromising your computer security. A good example of some infamous browser hijackers includes Anyprotect, Conduit, Babylon, SweetPage, DefaultTab, Delta Search, and RocketTab, however, the names are constantly changing. Browser hijacking can bring about severe privacy problems and even identity theft, affect your browsing experience by taking control over outbound traffic, substantially slows down your computer by consuming lots of resources, and cause system instability also.

Removal

One thing you could try to eliminate a browser hijacker is to locate the malicious software within the “Add or Remove Programs” list of the Windows Control Panel. It might or might not be there. If it is, uninstall it. But, most browser hijackers are hard to eliminate manually. Irrespective of how much you attempt to get rid of it, it could come back again and again. On top of that, manual removal demands you to carry out several time-consuming and complicated procedures which are very hard to complete for new computer users.

What you can do if Virus Prevents You From Downloading Or Installing Antivirus?

Malware can cause all sorts of damage if they invade your PC, ranging from stealing your personal information to erasing files on your computer. Some malware is created to restrict or block things that you want to do on your PC. It may not allow you to download anything from the net or it will prevent you from accessing a few or all of the internet sites, particularly the antivirus sites. If you’re reading this article, odds are you’re stuck with a virus infection that is preventing you to download or install Safebytes Anti-Malware software on your computer system. There are a few solutions you can attempt to get around with this particular obstacle.

Boot your computer in Safe Mode

If the malware is set to load automatically when Microsoft Windows starts, entering safe mode could block this attempt. Just the minimum required applications and services are loaded whenever you boot your computer or laptop in Safe Mode. Here are the steps you need to follow to boot into the Safe Mode of your Windows XP, Vista, or 7 computers (visit Microsoft site for directions on Windows 8 and 10 PCs). 1) At power on, hit the F8 key before the Windows splash screen begins to load. This would conjure up the Advanced Boot Options menu. 2) Select Safe Mode with Networking using arrow keys and hit Enter. 3) Once you get into this mode, you will have internet access once again. Now, obtain the malware removal program you want by using the internet browser. To install the software, follow the directions in the installation wizard. 4) Following installation, do a complete scan and allow the program to remove the threats it detects.

Use an alternate web browser to download security software

Malicious code could exploit vulnerabilities in a particular browser and block access to all antivirus software websites. If you are not able to download the anti-virus software program using Internet Explorer, it means malware may be targeting IE’s vulnerabilities. Here, you need to switch over to another web browser such as Chrome or Firefox to download Safebytes Anti-malware software.

Install and run anti-malware from a USB drive

Here’s yet another solution which is utilizing a portable USB antivirus software package that can check your computer for viruses without the need for installation. Follow these steps to use a USB flash drive to clean your corrupted computer system. 1) Download Safebytes Anti-Malware or Windows Defender Offline onto a clean PC. 2) Insert the USB drive into the clean computer. 3) Double-click the exe file to run the installation wizard. 4) When asked, choose the location of the USB drive as the place in which you would like to store the software files. Follow the on-screen instructions to complete the installation. 5) Disconnect the flash drive. You can now utilize this portable anti-malware on the affected computer system. 6) Double-click the antivirus program EXE file on the USB flash drive. 7) Hit the “Scan” button to run a full computer scan and remove viruses automatically.

Protect your PC from Malware With SafeBytes Security Suite

If you are looking to install anti-malware software for your computer, there are plenty of tools on the market to consider nonetheless, you should not trust blindly anyone, no matter whether it is a paid or free software. A few are good ones, some are ok types, and some are simply just bogus anti-malware applications that can damage your personal computer themselves! You need to pick one that is efficient, practical, and has a strong reputation for its malware protection. On the list of strongly recommended software by industry analysts is SafeBytes Anti-Malware, the safest program for Microsoft Windows. SafeBytes anti-malware is a trusted software that not only secures your computer permanently but is also very user-friendly for people of all ability levels. With its outstanding protection system, this tool will automatically detect and remove most of the security threats, including browser hijackers, viruses, adware, ransomware, PUPs, and trojans. SafeBytes possesses a plethora of amazing features that can help you protect your PC from malware attack and damage. Here are a few of the best ones: Most effective AntiMalware Protection: Using its enhanced and sophisticated algorithm, this malware removal tool can identify and eliminate the malware threats hiding within your computer system effectively. Active Protection: Malware programs trying to get into the system are identified and stopped as and when detected by the SafeBytes active protection shields. It will constantly monitor your laptop or computer for hacker activity and also gives users advanced firewall protection. Web Protection: SafeBytes checks and provides a unique safety rating to every single website you visit and block access to web pages considered to be phishing sites, thus safeguarding you against identity theft, or known to contain malware. High-Speed Malware Scanning Engine: This tool has got one of the fastest and most efficient virus scanning engines in the industry. The scans are very accurate and take a little time to complete. Lowest CPU and Memory Usage: SafeBytes is a lightweight tool. It consumes a very small amount of processing power as it operates in the background so you are free to use your Windows-based PC the way you really want. 24/7 Online Support: For any technical queries or product support, you can get 24/7 expert assistance through chat and e-mail.

Technical Details and Manual Removal (Advanced Users)

If you wish to manually remove MovieGoat without the use of an automated tool, it may be possible to do so by removing the program from the Windows Add/Remove Programs menu, or in cases of browser extensions, going to the browsers AddOn/Extension manager and removing it. You will likely also want to reset your browser. To ensure the complete removal, manually check your hard drive and registry for all of the following and remove or reset the values accordingly. Please note that this is for advanced users only and may be difficult, with incorrect file removal causing additional PC errors. In addition, some malware is capable of replicating or preventing deletion. Doing this in Safe Mode is advised.

The following files, folders, and registry entries are created or modified by MovieGoat

Files: %Documents and Settings%All UsersApplication DataMovie Goat virus %program files %internet explorer Movie Goat[random].mof %program files (x86)%common filesspeechengines %programData%suspicious folders %windows%system32drivermessy code.dll %AppData%[malware program name]toolbar uninstallStatIE.dat %app data% Movie Goat virus Registry: [HKEY_LOCAL_MACHINESOFTWAREMicrosoftMATSWindowsInstallerEAF386F0-7205-40F2-8DA6-1BABEEFCBE8914.07.30.07.52.18]”ProductName”=”Movie Goat” [HKEY_LOCAL_MACHINESOFTWAREWow6432NodeMicrosoftTracingMuvic_RASAPI32] [HKEY_LOCAL_MACHINESOFTWAREWow6432NodeMicrosoftTracingMuvic_RASMANCS] [HKEY_LOCAL_MACHINESOFTWAREWow6432NodeMicrosoftWindowsCurrentVersionUninstallEAF386F0-7205-40F2-8DA6-1BABEEFCBE89] “DisplayName”=”Movie Goat” [HKEY_USERSS-1-5-21-3825580999-3780825030-779906692-1001SoftwareMicrosoftWindowsCurrentVersionUninstall50f25211-852e-4d10-b6f5-50b1338a9271] “DisplayName”=”Movie Goat”
Read More
1 2 3 171
Logo
Copyright © 2023, ErrorTools. All Rights Reserved
Trademark: Microsoft Windows logos are registered trademarks of Microsoft. Disclaimer: ErrorTools.com is not affiliated with Microsoft, nor claims direct affiliation.
The information on this page is provided for information purposes only.
DMCA.com Protection Status