0x800ccc7d is an SSL (Secure Sockets Layer) error message code that occurs in applications like Microsoft Outlook or Outlook Express. The error message is displayed as: ‘ unknown error 0x800ccc7d- secure sockets layer ’.
Many offices use Microsoft Outlook for email communication and sending instant messages within the office. This is a highly functional application that enables users to interact with peers efficiently, manage contacts, journals, and reminders.
However, the error 0x800ccc7d may hamper your ability to send and receive emails efficiently. Therefore it is advisable to repair it right away.
Solution
Error Causes
The error 0x800ccc7d is triggered by the following causes:
Damaged profile in Outlook
Incorrect email account settings
The Outlook installation is corrupt and damaged. This usually happens due to issues in hard disk storage.
The outgoing SMTP server does not support secure connections
Further Information and Manual Repair
If you come across 0800ccc7d error code while using Microsoft Outlook or Outlook Express, then don’t you worry! This problem can be easily resolved. In fact, it is so easy to repair that you can do it by yourself even if you are not a technical expert.
Here are some ways to fix the 0800ccc7d SSL Outlook error:
Solution 1: Use Scanpst.exe
You may not know this but Microsoft offers an inbuilt Outlook Repair tool. This tool is technically known as Scanpst.exe. This tool is useful when you need to repair Basic header corruption. However, it may not be the best choice if the problem is big and complex.
Solution 2: Reset Your Outlook Settings
Sometimes this error message may occur when the STMP server requires authentication or does not recognize the senders' email addresses. In this scenario, you should check your Outlook settings to make sure that your STMP username and server are correct. For this follow this procedure:
Go to the Tools menu and then click on Accounts
Now click on your email account then check its properties
Click general and make sure that your email address is created in your account’s control panel. If not, then edit and create.
Next, click servers and see if the box next to the option that says My server requires authentication is checked or not. If not, then check it to resolve the error.
Solution 3: Disable any Anti-Virus
Another alternative to resolve this error is to disable any Anti-virus or Firewall you have installed on your PC. Once you disable it then try sending or receiving the email again. This usually works.
Solution 4: Download 0x800ccc7d Repair Tool
The fourth solution available to resolve this issue is by downloading the 0x800ccc7d repair tool. Though it is similar to Microsoft Outlook built-in scanpst.exe tool, but as compared to it the 0x800ccc7d repair tool is a highly functional tool.
There are many 0x800ccc7d repair tools available but we recommend you to Restoro.
This tool is a third-party tool that can deal, scan, and fix 0x800cc7d error in no time. What makes this repair tool an excellent choice is that it can repair all broken PST files and emails, recover Outlook items, retrieve deleted files, recover password-protected data, split files to recover oversize PST files, and more.
To access and install the 0x800ccc7d repair tool all you need to do is download it here and install it on your PC. Now run it to scan errors. Once the errors are scanned, hit the repair tab to resolve.
So, next time when you experience the error 0x800ccc7d, try using these solutions to fix the problem right away!
Anytime when a new folder is created in Windows name "New Folder" is offered and set as the default name. If by any chance you would like to change this and set your own default name instead of the standard one, follow this guide.
Please be aware that this guide will require you to change the registry of Windows, it is common practice to make a backup of your registry each time you want to manually change any values in it, just in case something goes wrong.
In order to change the default new folder name first press ⊞ WINDOWS + R to open the run dialog, type in it RegEdit, and press ENTER
Select the NamingTemplates key. If it is not present, you’ll need to create one.
Right-click the NamingTemplates key to add a String Value.
Assign it the following name: RenameNameTemplate.
Double-click on the RenameNameTemplate data value to open the Edit String dialog box.
In the Value Data field enter the new text you want to appear when you create a new folder. You have to make sure you are not using any of the following characters: \ / ? : * " > < |
Close the Registry Editor and Exit.
Now, when you create a new folder, it will be named Whatever you chose instead of the New folder.
And that is all to it, you now have your own personal new folder naming template.
Afraid of the growing threats online? As you should be. But we’re here to show you what kinds of malware are out there and what you can do to keep them at bay.
Malware definition
Malware comes from the term malicious software. It’s software designed to attack and exploit devices and networks to the advantage of the hacker who made it.
Malware can be transmitted in different ways. Most commonly this happens via infected USB drives, downloadable files or malicious websites. Depending on the type and ultimate goal, the consequences of a malware attack can range from negligible to catastrophic.
Credit: Ed Hardie on Unsplash
What kinds of malware are there?
1. Virus
A virus is typically spread via infected files, websites or links. It’s one of the oldest malware types and one of the most difficult to get rid of. That’s because, once activated, it replicates itself - hence the name.
It can perform different kinds of attacks, depending on what the creator wants to achieve. The main characteristic of a virus is that it really doesn’t show itself until you activate the host. So that’s a scary thought for sure.
2. Adware
Sometimes an ad blocker isn’t enough to fight off unwanted ads. And some of them can, unfortunately, be malicious. They may redirect you to infected sites or prompt downloads of risky files. Even just opening a malicious site can lead to data theft.
So, definitely be careful when clicking around. Even if an ad seems completely legitimate, you can never be too sure.
3. Ransomware
Through ransomware, cybercriminals gain access to a user’s data and use it to extort them for money. Basically, the user is threatened with data deletion or even exposure if a ransom isn’t paid by a specific deadline.
This is a particularly nerve-wracking type of malware. If it targets an individual, it preys upon their sense of anxiety, fear, guilt and even shame. If it targets a business (which is a lot more common), it preys upon not only that business’s profit but also every single one of their customers and their data.
4. Trojans
This type of malware disguises itself very well as a legitimate-looking program. Once you download it, hackers can get full access and control of your device, data and network. They can even be hidden in games, apps and attachments. They cannot self-replicate, though, so we guess that’s… good news?
5. Worms
Worms can replicate, just like viruses, but you don’t need to actually activate the infected program for them to get going. They can be used for various purposes, ranging from data deletion to file encryption to support a ransomware attack.
Credit: Growtika on Unsplash
6. Spyware
Spyware refers to malicious software that stays hidden on your computer and monitors your activity. The best-known type is keyloggers. This can be used to steal sensitive data like passwords and banking information.
7. Rootkits
Rootkits are among the most dangerous types of malware. They allow administrative access and full control of a device, which lets hackers continue hijacking all your data and monitoring your activity without your knowledge.
8. Botnets
Botnets are networks made up of bots - computers that cybercriminals have infected with malicious software. Bots and botnets give hackers remote access to users’ devices and allow them to spy on your camera, take screenshots, memorize passwords and launch Distributed Denial of Service attacks. This one truly makes your hair stand on end.
What can you do about it?
You know the old adage - better safe than sorry. And trust us, malware attacks are such a pain in the you-know-what that you really don’t want to be sorry.
Luckily, there are simple solutions that can shield you from most digital threats these days. What you want to be looking at is a solid antivirus program. Well, technically, you need an antimalware program, but since the latter evolved from the former, we still mostly refer to them as antivirus software. The majority of antimalware programs these days don’t just shield you from potential risks online, but include additional features as well. For example, some Bitdefender antivirus packages also include parental control and a VPN. And Bitdefender is not just for PCs either - it offers protection for your beloved iPhone or Android as well. You can throw in a password manager in there too, for an additional layer of security.
Credit: Dan Nelson on Unsplash
If you aren’t too concerned about all these various threats or feel like you don’t need extra security, you can at least take a step to protect your information from being exposed to lurking cybercriminals as you’re browsing. This can be done through a good VPN like Surfshark, which hides your identity in the digital space and prevents your data from being tracked.
Choosing the right protective software is especially important if you have children with access to the Internet, since they’re unfortunately even more vulnerable to malicious attacks. If you aren’t sure what the right kind of antimalware program is right for you, you can reach out to us and we’ll be happy to help keep your entire household or office digitally secure.
The bottom line
The truth is that there’s no way to be 100% protected in the online world. Hackers are constantly coming up with new ways to infiltrate our devices. But malware-battling software evolves along with them and there’s still plenty you can do to keep risks away. Stay safe!
In Windows 11 by default inside the Start menu, there is recommended section that contains recently opened folders, documents, and files. If you do not wish this section and do not want recent items in your Start menu there is an easy way to turn it off.
Press ⊞ WINDOWS + I to open settings
Click on Personalization
On the right side scroll down and click on Start
Click on the switch beside Show recently opened items in Start, Jump lists, and File Explorer
Close settings
Settings will be automatically applied and there will be no more recommended items inside your Start menu to create clutter, it will be nice and clean.
Do you come across this error message “Receiving’ reported error (0x800ccc92): “Your e-mail server rejected your login”? Verify your user name and password in your account properties. The server responded: - ERR invalid user names and password” when you try to send or open emails using your Outlook account?
If yes, then this article is a must-read for you as we explain why this error occurs and how you can resolve it.
To begin with, 0x800ccc92 is a common Microsoft Outlook error.
This error restricts your ability to send and receive emails on your Outlook email address. In other words, it locks you out and hampers your ability to use your account successfully causing a great deal of inconvenience especially if you use your Outlook account for communication in and across your office.
Solution
Error Causes
The 0x800ccc92 error message may occur due to numerous reasons so narrowing it down to one particular reason for occurrence is not easy. However, here we have listed down some of the most common causes of this error code:
Incorrect Outlook configuration settings
Invalid password or username
PST file crosses its fixed file size limit
Failure of POP3 and Protocol STMP in database server connection
Improper synchronization between Outlook and the server
Virus Infection
Invalid registry entries
Further Information and Manual Repair?
To fix the error code 0x800ccc92 on your system, here are some quick, effective, and easy DIY solutions that you can try:
Solution 1:
Sometimes the error code may occur due to an invalid password and usernames entry. Therefore, first, cross-check user ID and password. If you’ve entered the wrong password, try inserting the correct password to access your account.
Solution 2:
If the error still persists, then try installing the latest available Server Service Pack for Exchange. This solution works best if compatibility is the issue and the underlying reason for the error is improper synchronization between Outlook and the server.
Solution 3:
The presence of malware and viruses can also lead to such errors. Therefore, it is advisable to scan your entire PC for malware and viruses using a powerful antivirus.
Solution 4:
If the issue occurs due to bad and invalid registry entries, then it is important that you remove them right away. Due to such entries, you may experience the 0x800ccc92 error on your PC. To remove them, you need to download a registry cleaner.
Downloading two programs an antivirus and a registry cleaner separately may slow down the speed of your PC. Therefore, to ensure this does not happen it is recommended you install Restoro
Restoro is an advanced and multi-functional PC Fixer. This software is deployed with an intuitive algorithm and multiple powerful PC repair utilities including a registry cleaner, anti-virus, and a system optimizer. It is a one-stop solution for all PC-related issues.
Using this tool, you can scan your entire PC and remove all types of malicious software including malware, viruses, spyware, and Trojans corrupting your PC in seconds. Simultaneously, it also removes all bad registry keys and entries and files the damaged system file, thereby restoring the registry back to normal.
The system optimizer utility ensures your PC speed is not compromised due to the repair process.
This software is safe, bug-free, efficient, and user-friendly. It is compatible with all Windows versions.
Click here to download Restoro on your PC to instantly remove viruses and invalid registry entries to resolve the 0x800ccc92 error message on your system now!
If you are trying to connect to the internet using the Microsoft Edge browser but encountered an error message instead that says, “Can’t connect to the proxy server”, read on as this post will show you how you can fix this error. This kind of error in Microsoft Edge could be caused by incorrect proxy settings or worse, malware.
To fix this error, here are some suggestions you need to check out:
Option 1 – Try to check your internet connection
The first thing you can do to resolve the “Can’t connect to the proxy server” error in Microsoft Edge is to check your internet connection. There are times when your internet connection or Wi-Fi router can cause such problems. In such cases, you have to ensure that you have a valid internet source and if you are using a Wi-Fi router, you can try to use another connection and then see if the error is gone or not.
Option 2 – Try to disable the manual proxy set up from the Settings
In case you miss it, there is actually an option in the Settings panel that you can use to set up proxy in your Windows 10 computer. So if you encounter the “Can’t connect to the proxy server” error, you should disable manual proxy for the meantime and check if it fixed the error or not.
Tap the Win + I keys to open the Windows Settings.
Then go to Network & Internet > Proxy.
And on your right-hand side, ensure that the Automatically detect settings are enabled and that the Use a proxy server option under the Manual proxy setup is disabled.
Now try to open any website again and see if the problem’s fixed.
Option 3 – Try disabling the VPN
Like pointed out earlier, if you are using VPN, this could be the reason why you’re getting the “Can’t connect to the proxy server” error so the most obvious thing to do is for you to turn off the VPN and try to load a website in Edge again. And if you use a VPN software that works using their software, you can just completely exit or log-off from its account. On the other hand, if you are using a built-in Windows 10 VPN, you can simply turn it off or delete all the settings you have created there.
Option 4 – Disable the proxy server for your LAN
If your PC was just attacked by some adware or malware as of late, it is possible that it has changed the network settings in the system and might display spam advertisements. Thus, you have to disable the proxy server for your LAN. To do that, refer to these steps:
Tap the Win + R keys to open the Run dialog box.
Then type “inetcpl.cpl” in the field and hit Enter to pull up the Internet Properties.
After that, go to the Connections tab and select the LAN settings.
From there. Uncheck the “Use a Proxy Server” option for your LAN and then make sure that the “Automatically detect settings” option is checked.
Now click the OK and the Apply buttons.
Restart your PC.
Note: If you are using a third-party proxy service, you have to disable it.
Option 5 – Temporarily disable Firewall and third-party antivirus
Firewall and antivirus programs are known to block files the instant it detects a threat to the system. However, there are some cases when it can also block a file even when it’s a safe one. Thus, your antivirus or firewall programs might be the reason why you can’t download anything on your Windows 10 computer. To isolate the issue, you need to temporarily disable both the Firewall and antivirus programs and then check if you can now download anything from the internet. Do not forget to enable them again as disabling them can leave your computer vulnerable to cyber threats.
Option 6 – Clear the browsing data of Microsoft Edge
Open Microsoft Edge.
Then click on the three horizontal dots to open the menu.
From there, click on Settings. And under Settings, click the “Choose what to clear” button under the Clear browsing data section.
Next, check all the checkboxes and then click the Clear button to clear the browsing data in the Edge browser.
Restart Edge.
Option 7 – Try to reset, repair or reinstall Edge via Settings
You can reset, repair or reinstall the Edge browser through Settings.
If none of it helped, you can try the following:
Open File Explorer and then go to this path – C:/Users/YourUsername/AppData/Local/Packages
Note: Before you type in the path in the Address bar, make sure that you put your user account name in place with the “YourUsername”.
Tap Enter to proceed.
Next, look for the folder named “MicrosoftEdge_8wekyb3d8bbwe” then right-click on it.
Click on Properties and uncheck the option “Read-only” under the General tab in the Properties window.
Click on Apply and then OK to save the changes made.
After that, look for the MicrosoftEdge_8wekyb3d8bbwe folder again and delete it. And if a prompt stating “Folder Access Denied” appears on your screen, just click on the Continue button to proceed – doing so will delete most of the content inside the folder except for the folder named “AC”.
Restart your PC.
Now all you have to do is to re-register Microsoft Edge using PowerShell. In the Start Menu, search “Windows PowerShell”.
Right-click on Windows PowerShell from the search results and select the “Run as administrator” option.
Type in this command in the PowerShell windows and tap Enter – Cd C:/Users/YourUsername
Note: Once again, make sure that you key in your user account name in place of “YourUsername.
After that, type in this command and tap Enter – Get-AppXPackage -AllUsers -Name Microsoft.MicrosoftEdge | Foreach {Add-AppxPackage -DisableDevelopmentMode -Register "$($_.InstallLocation)AppXManifest.xml" -Verbose}
Restart your PC.
Option 8 – Scan your computer for malware using Windows Defender
Your computer could be infected with malware which might have triggered the “Can’t connect to the proxy server” error. To fix this, you need to scan your computer using a reliable program like Windows Defender.
Tap the Win + I keys to open Update & Security.
Then click on the Windows Security option and open Windows Defender Security Center.
Next, click on Virus & threat protection > Run a new advanced scan.
Now make sure that Full Scan is selected from the menu and then click the Scan Now button to get started.
Error Code 40 is a device driver error that users encounter on any Windows 2000 and later operating systems. It occurs when the peripheral device that you connect to your PC cannot be accessed due to a change in the system registry.
This is due to the presence of invalid sub-keys of the device driver in the system registry.
It is a common error that users come across and appears on your PC with either of the following messages:
“Information in the registry entry for this driver is invalid”
OR
"Windows cannot access this hardware because its service key information in the registry is missing or recorded incorrectly. (Code 40)"
Solution
Error Causes
As mentioned above, the error code is triggered when the device driver’s invalid sub-keys appear in the registry, effectively changing it. This happens when the windows system files get damaged due to the following factors:
An incomplete program uninstallation
An incomplete program installation
Hardware is not removed properly
System recovery from viruses
An improper system shut down
Factors such as incomplete installations or uninstallations or an improper system shut down can cause files to become damaged that threaten the health of your computer.
Removing viruses from the computer is also another factor as it removes the entries in the Windows system files which contain the viruses including spyware or malware
Further Information and Manual Repair
Fixing Error Code 40 is similar to fixing other device manager error codes. Here are a few methods you can try.
Method 1 – Use System Restore
You can use system restore to eliminate the problem. Here is how you can use it:
Log in using an Administrator account
Click ‘Start’ button and select All Programs > Accessories > System Tools > System Restore
Click ‘Restore my computer to an earlier time’ and click ‘Next’
Select the last Windows restore point from the ‘On this list, click a restore point’ list, and click ‘Next’
Click ‘Next’ on the confirmation window to proceed
Restart your PC after restoration is complete
By restoring the system via a last saved system checkpoint, you can obtain undamaged Windows system registry files that can help avert the error code.
Method 2 – Manually uninstall then reinstall the device driver
If using system restore also does not work in removing the error code, you may have to resort to manually uninstalling and then reinstalling the device driver causing the problem.
This would be necessary since the remaining incomplete files due to a partial removal or installation of programs is what contributes to the error code. By uninstall and reinstalling the device driver program, it would lead to the completion of the files.
You can do this by firstly logging in as Administrator and open Device Manager. Select the device that is causing the problem and double click it and make sure that the peripheral is connected properly to the PC. Upon opening, click on the ‘Driver’ tab and then select ‘Update Driver’.
Make sure to refer to the system documentation that you received with your PC or computer to check for the motherboard details and driver specifics.
Method 3 – Use software to automatically download the driver
Manually uninstalling and reinstalling the driver will do the trick, however, it may be time-consuming especially when you would have to resort to your hardware user manual.
Therefore, using a program such as DriverFIX can save you a lot of time and frustration in having your device work properly on your computer.
DriverFIX, with its user-friendly approach to help you fix your PC issues, comes with an integrated database that detects which drivers you need to reconfigure within just a few seconds and downloads it automatically.
It further ensures that your drivers are installed in their entirety leaving no room for any incomplete files to remain that create Error Code 40.
It also has the added advantage of being able to backup and restores your files should there be the slightest possibility of system file damage.
Thus, registry damage can be averted by letting the software roll back the system files to an earlier healthy checkpoint. Driver Assist is the answer to fixing your PC error codes accurately and quickly.
Click here to download DriverFIX to fix Error Code 40 quickly and effectively!
When Microsoft held Windows 11 presentation it took special time to present the upcoming new Windows 11 store as kind of a big deal.
It was openly stated that with new Windows we will get a new store with a different attitude and new look.
New Microsoft store
Microsoft has stated that both customer and developer feedback over time has contributed to their redesign and rethinking of the store itself.
They want to be sure that policies for developers are more straightforward and clear so more developers will decide to bring their product to Windows. As for customers, they want more safety and more security so they feel protected when making a purchase.
The new store will come in Windows 11 but also in Windows 10 as well via update.
Stories and collections
Introducing the new store will be curated stories. Microsoft believes that stores should be focused on user experience so stories from customers themselves will play a big role here. They are rich editorial content to keep you informed about the best apps and inspire you to achieve more with your device.
This approach to information is aimed at bringing unknown applications to users via presenting them in a professional manner.
Android apps in the store
As stated in Windows 11 unveiling and presentation, Android apps will work inside Windows 11. Microsoft has teamed up with Amazon to bring you Android apps directly inside Windows via the new Microsoft store.
Pop up store from within a browser
When you are surfing on a certain webpage and want to save and install the application from there, a new pop-up store window will show allowing you to install the app directly.
Microsoft has not said will this feature work outside their Edge browser so we will have to wait and see about that.
Support for multiple types of applications
Since now developers were tied to certain formats if they wanted to publish their application in any kind of environment. Microsoft wants to bridge this.
Windows developers can publish any kind of app, regardless of app framework and packaging technology – such as Win32, .NET, UWP, Xamarin, Electron, React Native, Java, and even Progressive Web Apps.
For Progressive Web Apps Microsoft has made open-source tool PWABuilder 3.
Flexibility and choice of commerce platform
Starting July 28, app developers will also have an option to bring their own or a third-party commerce platform in their apps, and if they do so they don’t need to pay Microsoft any fee. They can keep 100% of their revenue.
Bttray.exe is basically a Bluetooth Tray Application. Bluetooth Tray Application is developed by WIDCOMM.
It provides a system tray icon that allows users to see the status of their Bluetooth connections at a glance. It allows you to easily access the configuration and settings for the Bluetooth products enabling you to change the configuration of the Bluetooth devices.
The bttray.exe application error may pop up on your computer screen due to some issue with the Bluetooth software. The process fails to initialize and therefore stops working.
Bttray.exe application error code is displayed in the following format:
“BTTray.exe can’t initialize (0xc0150004).”
“BTTray.exe – System Error”
Though this is not a fatal or critical computer error it is advisable to resolve it otherwise it will hamper your access to Bluetooth software and cause you a great deal of inconvenience.
Solution
Error Causes
Bttray.exe application error code may be triggered due to one of the reasons stated below:
Bttray.exe application is damaged
Bttray.exe is accidentally removed from your PC
The Bluetooth software or driver becomes problematic.
Some modules that run by the process are corrupt
Malware infection
Invalid registry entries
Further Information and Manual Repair
If you experience a bttray.exe application error code on your system, it is recommended to fix it right away.
To resolve this error you don’t have to be a computer programmer or a technical whiz or have to hire a professional and spend hundreds of dollars in repair. It is easy to fix, simply follow the manual methods given below:
Method 1- Reinstall Bluetooth Software
If the Bluetooth Software is damaged or outdated, the bttray.exe will also not work. If this is the cause of the error code, then simply reinstall Bluetooth software on your system.
To do this, first, uninstall the current software and then download the latest version of the Bluetooth Software on your PC. To uninstall click start, go to the control panel, and then programs. Now select Bluetooth software and click uninstall to remove it.
After that, install the latest version and update it. To activate changes
Method 2: Scan for Malware
Sometimes the bttray.exe application error code may pop up due to malware and viral infection. To fix it, download a powerful antivirus. Scan and remove malware to resolve.
Method 3: Clean Registry
The registry basically saves all the activities being performed on the PC including junk and obsolete files. If the registry is not clean frequently, unnecessary files like cookies, junk files, temporary files, and internet history can take up a lot of space and cause the registry to damage.
Due to this error code like the bttray.exe application can also pop up. To resolve, clean the registry. You can do it manually but that may be difficult and time-consuming if you are not a computer programmer. However, a good alternative would be to download Restoro.
This is a user-friendly and next-generation PC Fixer deployed with multiple utilities like a registry cleaner and an antivirus. Simply run it to remove viruses and clean the registry.
Click here to download Restoro and resolve the bttray.exe application error now!
Page Fault in Non-Paged Area is a blue screen error usually happening with faulty drivers but it can come from different issues like faulty RAM.
In this short article, we will cover usual ways on how to approach and solve this error.
Solving Page fault in Non-Paged Area
Rollback using system restore
Simple and easy solution, roll back to the previous system restore point where Windows was stable and working.
Fix Page Fault in Non-Paged Area using device manager
Press ⊞ WINDOWS + X to open the hidden menu
Click on device manager
Find a device with a question mark and right-click on it
Click on the rollback driver button
Fix via command prompt
Press ⊞ WINDOWS + X to open the hidden menu
Click on command prompt (admin)
Inside command prompt type in SFC / scannow and press ENTER
Wait for the process to be finished and then reboot the PC
Fix via DISM tool
Press ⊞ WINDOWS + X to open the hidden menu
Click on command prompt (admin)
Inside command prompt type in DISM /Online /Cleanup-image /Restorehealth and press ENTER
Wait for the process to be finished and then reboot the PC
Page fault in Non-Paged Area via a dedicated tool
Sometimes manual and provided solutions just simply cannot cut it because the issue is triggered also with something else and not just a single issue.
Use DRIVERFIX to fix this specific issue with a single click.
USB storage devices are used to store small and even big files, depending on their sizes. Usually, the sizes of the USB vary from 2GB up to 16GB. And as time passes, they have advanced quite a bit and now it’s common to find USB sticks with a capacity of 32GB, 64GB, or even 128GB. And since they now have large capacities, USB storage devices are often used for storing backups of system data as well as creating an image. However, there are times when you might encounter an error message while trying to create a backup or image on your USB device. The error message states:
“The drive is not a valid backup location.”
One of the causes of this problem is that Windows was not able to recognize the USB drives as a valid backup location since USB storage devices weren’t previously large enough to store system images. To fix this error, here are some possible solutions that might help.
Option 1 – Try creating a sub-folder in the USB drive and backup all the images there
The first thing you can try to do is to create a sub-folder on your USB device. This is one good way you can bypass the USB drive limitation. How? Refer to the steps below.
First, right-click on the USB storage device and select Format.
Next, select NTFS as the File System and check the box next to Quick Format.
After that, click on Start to initiate the formatting process.
Once the formatting process is completed, open the USB drive and right-click anywhere inside its main drive window, and then select New > Folder.
Then name the folder to be created as “Image (or anything you please)”.
Afterward, right-click on the folder and select Properties.
From there, go to the Sharing tab and click on Share.
Now check if the Permission level on the System owner which should be your username is labeled as “Owner”.
Then try to back up your files again using your USB drive while keeping the sub-folder as the backup location.
Option 2 – Update the USB Controller Drivers
First, click the Start button and type “device manager”.
Then click on the “Device Manager” from the search results to open it.
From there, look for the “Universal Serial Bus controllers” option and then right-click on each one of the USB drivers and select the Update Driver from the menu.
Restart your PC and then click the “Search automatically for updated driver software” option.
You also have the option to update the motherboard and the USB driver from the manufacturer’s official website.
Option 3 – Run CHKDSK utility to check the drive for errors
When it comes to some issues concerning the hard drive or removable devices, there is a utility in Windows that might help which is called “chkdsk”. To use it, follow the steps below.
Tap the Win + S keys to open the Search box.
Then type “command prompt” in the field and from the search results that appear, right-click on Command Prompt and select “Run as administrator”.
After opening an elevated command prompt, copy and paste the following command and hit Enter:
Note: In the command given above, “[/F]” will try to fix the system errors while “[/R]” will be the one to fix the bad sectors.
Now if you are prompted to run CHKDSK after your reboot your PC, just tap Y and reboot your PC.
If CHKDSK is not able to find any errors, tap the Win + E keys and navigate the access window. From there, right-click on the concerned drive and click on Properties.
After opening Properties, click on the tab Tools and then click on the “Check” button under the Error-checking section.
Wait until the process is completed and then restart your computer.


 In Windows 11 by default inside the Start menu, there is recommended section that contains recently opened folders, documents, and files. If you do not wish this section and do not want recent items in your Start menu there is an easy way to turn it off.

 New Microsoft store
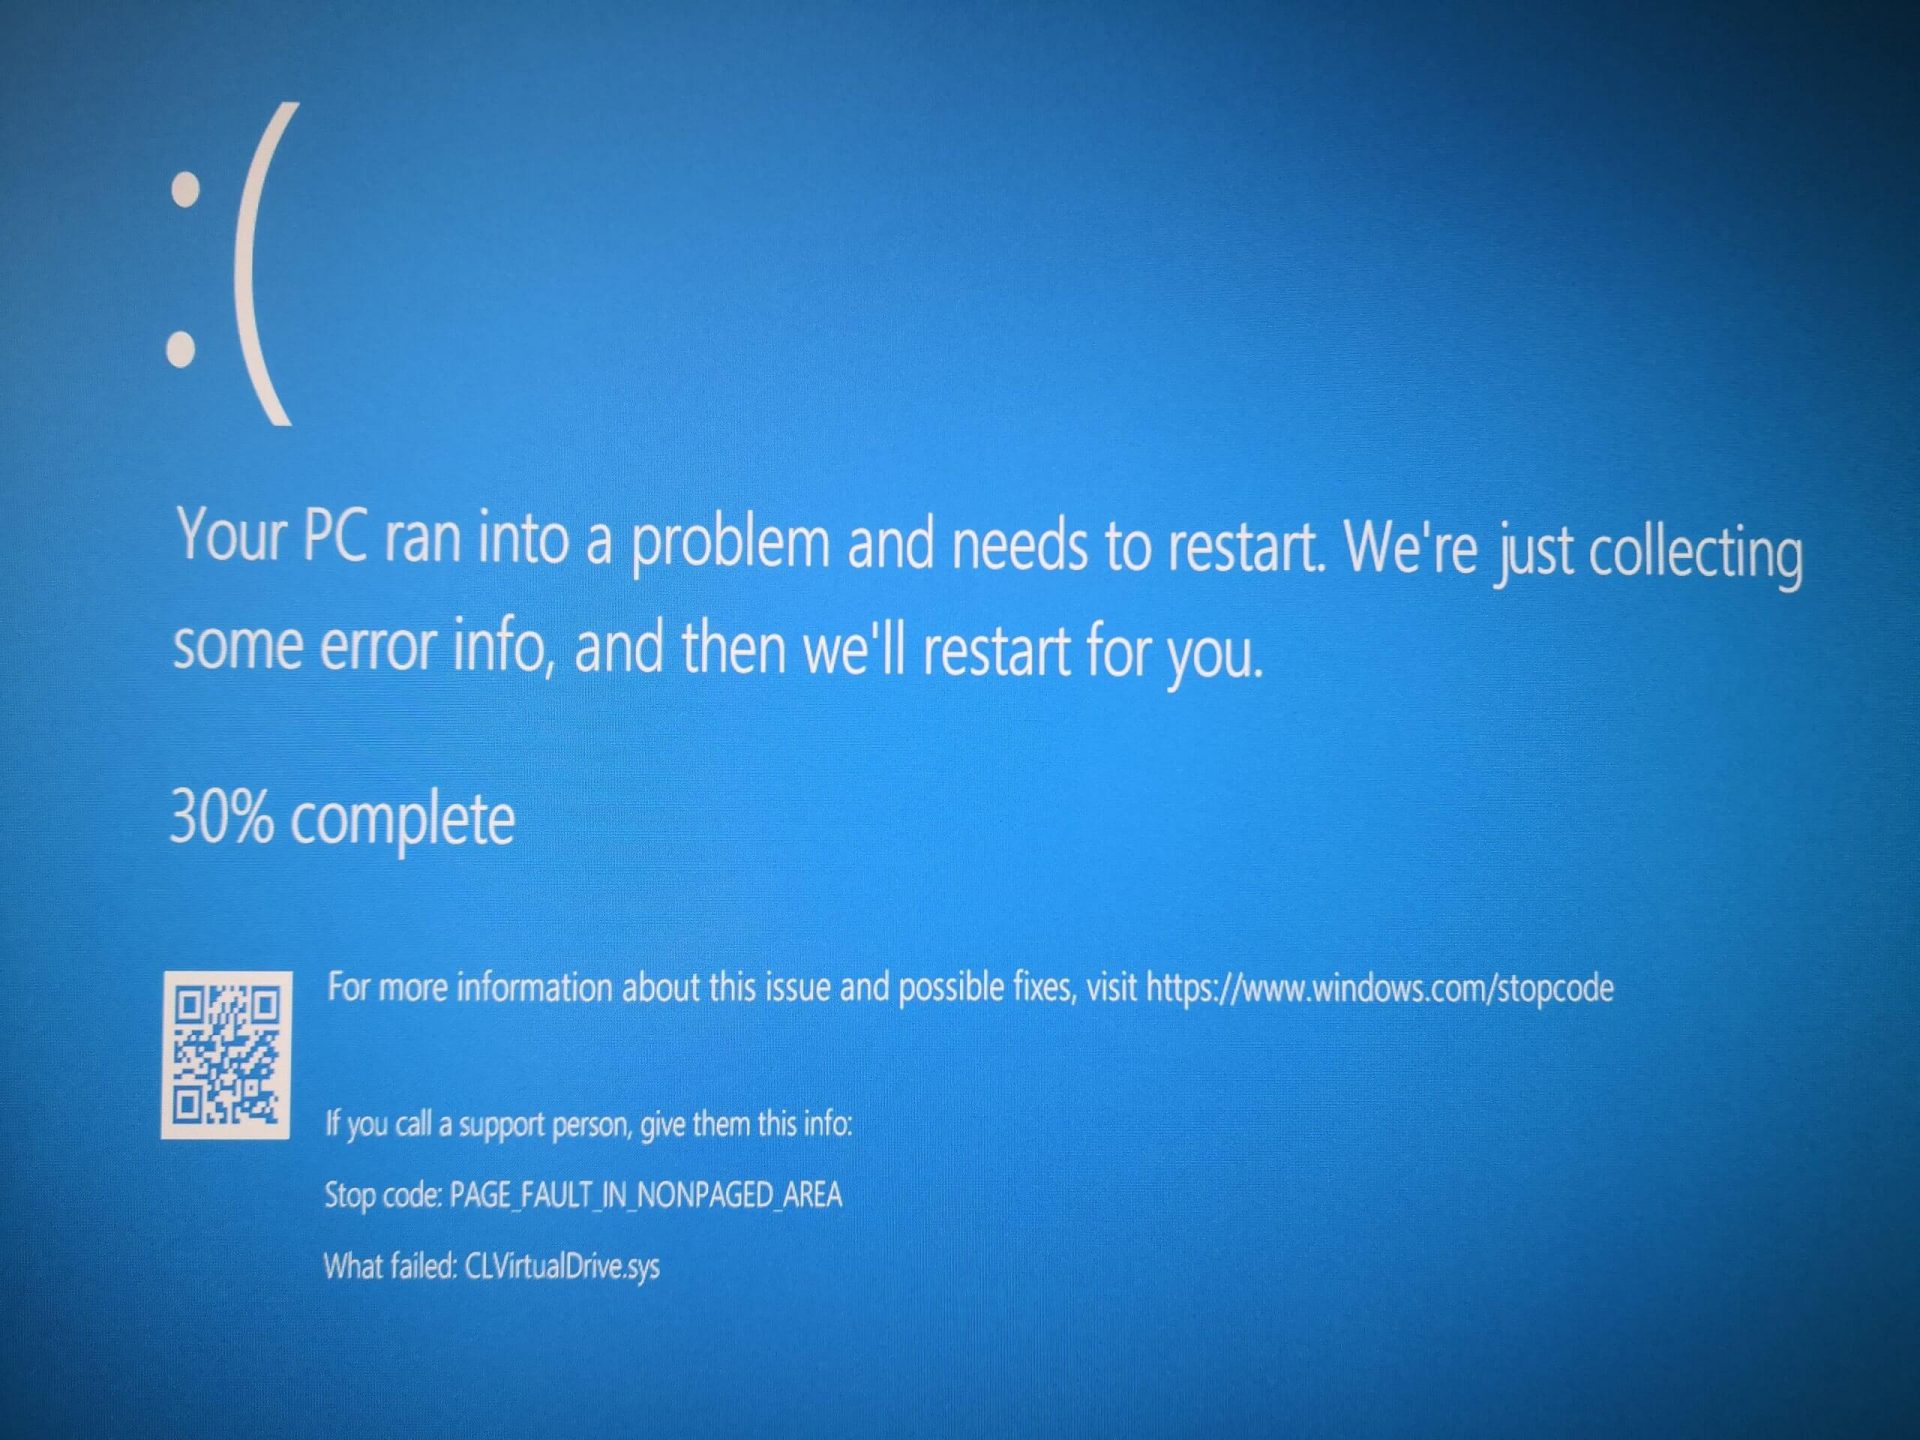 Rollback using system restore