Logo

Runtime Error How to Fix

A runtime error is commonly an error that's created after the PC is operating software and encounters a problem of some form. For instance, a runtime error like run-time error code 7 reveals an "out of memory" dilemma.

Solution

Error Cause

Run-time errors are normally brought on by clashes with TSR (Terminate and Stay Resident) applications or additional operating applications, software problems, storage problems, or pc viruses.

Troubleshooting a Run-time Error

First, enter the run-time error signal into a search engine to see what info you will get about the precise runtime issue you are receiving. Next, end - job all running applications and TSRs to make sure these aren't the origin of the issue. You can certainly do so by obtaining the job manager by striking Control Alt Delete.

In case your issue is regularly occurring with a unique program, go to that system programmer's site and obtain any upgrades and patches. If unavailable, try uninstalling the application involved and reinstalling it.

In the event the issue is occurring with the os, you may consider reinstalling it although it is a huge commitment. A much better idea would be to try a fix for both Windows XP or Windows 2,000. It is possible to fix and scan files by typing : sfc / scannow, heading to the Begin switch, Run, and then pushing enter. Make certain to put an area between sfc and the reduce.

You might have an equipment or storage dilemma if these measures have not resolved your run-time errors. If that is the situation, contact the support of the application under consideration for potential support accompanied by the pc or motherboard manufacturer.

Many run-time problems can be solved by upgrading the application that's creating the problem. This is only because the programmer's frequently releasing patches and improvements for their applications as insects are found and repaired.

Storage problems may frequently be fixed by rebooting the pc. Consider a reboot a short-term repair. Rebooting clears the memory but in case your COMPUTER does not have adequate memory for your applications you're operating, or sufficient hard-drive space you'll immediately run out of memory again. Something less than this sum may cause memory issues since the computer's swap file isn't in a position to expand in dimension as required.

To assess the quantity of free area, available My Computer and right-click on the HDD, generally the D: drive. Select Attributes in the menu and see the disc's ability. Perform the disk clean-up function by following prompts and pressing the Disk Clean-up button, if the room is reduced.

You may be getting run-time errors, in case your storage chip is really failing. Eliminating and changing the awful memory chip will solve the difficulty. If you're encountering other runtime-related errors, like an install runtime issue, try cleaning away the portions of the registry with some software solution. 

Do You Need Help with Your Device?

Our Team of Experts May Help
Troubleshoot.Tech Experts are There for You!
Replace damaged files
Restore performance
Free disk space
Remove Malware
Protects WEB browser
Remove Viruses
Stop PC freezing
GET HELP
Troubleshoot.Tech experts work with all versions of Microsoft Windows including Windows 11, with Android, Mac, and more.

Share this article:

You might also like

Outlook 2013 Preview
Hello and welcome to our Outlook 2013 Preview. Everyone has heard of sneak peeks when it comes to new movies and games that are coming out soon. That is what advertisements and test reels are for to get the audience interested and excited before the piece of media even comes out. It serves to entertain the target audience in the months, maybe even years, up until the release date of this thing they want to play or see and it keeps it in the public mind. It is also great for the viewers because it is a hint to what they will expect when it comes out and it keeps them wanting more excitedly. However, did you know that sometimes computer software releases previews and sneak peeks too?

Outlook 2013

Well, they do and Microsoft has released some sneak peeks and previews of their new Outlook, Outlook 2013! This is probably to get consumers ready for when it comes out next year; people are going to be getting excited about this new makeover that Microsoft Office, with Outlook, has given itself, people from Microsoft even saying it is ‘the most ambitious’ version of Office yet! The new orange color scheme and logo design look promising enough for the consumer without even checking the new features and special things that have been revealed about it yet!

Outlook 2013 Features

The best part of this new Outlook is that you can move widgets around in it. If you don’t like the fact that your inbox is placed over your outbox, you can move it- simple as that! It will be really handy for people who like messing around with layouts and will also be handy for people who tend to overlook things at the bottom of the pile like spam and trash if they can move them to a more noticeable location for themselves. Another great thing is that the new Microsoft Office that Outlook comes with has a cool new stylus option, allowing you to personalize things with your own handwriting or even drawings. This can then be used as your email signature on Outlook which can give a really nice and personal feel to the emails you are sending. Another new thing is their labeling of drafts. Like Gmail, Google’s own email service, a red-lettered ‘draft’ will now appear over composing messages you have not yet sent.

Handy Email Tools in Outlook 2013

This is handy because you know where your message has been saved as opposed to how it could be saved in your outbox or be sent to the trash. Also, there are new links with Facebook that allow you to see what your friends are doing through Outlook. You can also converse with Facebook friends through Outlook now, which is a big step forward in this age of social media. You can get an email from a person and, at a click of a button, also read all their Facebook posts. However, there is not an option for Twitter or Tumblr or even Myspace, which is a shame I suppose, but maybe in the next update. So, I think Outlook 2013 will be worth looking at, don’t you?
Read More
Reset Windows computer without Settings app
As you know, the Settings app is a vital part of Windows 10 as it helps in fixing issues in the system and offers users access to various Troubleshooters, as well as the Reset function and many more. So if you want to Reset this PC or a Windows Store app, you need to use the Settings app to do so. However, one of the most annoying errors you can encounter when using the Settings app is that it crashes or sometimes does not open at all. Thus, if you are having issues with this app, worry not for there are alternative ways you can try to reset your Windows 10 PC. For you to reset your Windows 10 PC without using the Settings app, the main option you have is to use the Advanced Startup options and there are different methods by which it can be accessed. It can be accessed via Lockscreen, Command Prompt window, or via Start Menu.

Option 1 – Reset Windows 10 via Lockscreen

  • You need to first boot into the Advanced Startup options from the lock screen. If you’re already logged in to your account, you have to hit the Win + L keys to get on the lock screen.
  • Next, click on the Power button located at the bottom right corner of the screen.
  • After that, hold the Shift key and click on Restart to restart your computer into the Advanced Setup option mode. And from there, you can reset your Windows 10 computer.

Option 2 – Reset Windows 10 via Command Prompt

  • Search for “cmd” in the Cortana search box or hit the Win + R keys to open the Run box and type “cmd” in the field and hit Enter to open Command Prompt.
  • If a User Account Control or UAC prompt appears, click Yes to proceed in opening Command Prompt.
  • After that, type the following command and hit Enter to execute it:
shutdown /r /o /f /t 00
  • After you execute the command, it will restart your computer into the Advanced Startup options where you can reset your Windows 10 computer.

Option 3 – Reset Windows 10 via Start Menu

  • Tap the Win key or click on the Start button located in the Taskbar.
  • Then click on the Power button at the bottom right portion of the screen.
  • Next, press and hold the Shift key on your keyboard and then click on Restart. This will restart your Pc into the Advanced Startup options.
Note: Once you have access to the Advanced Startup options, you have to go to the setting which allows you to Reset your Windows 10 PC. All you have to do is select Troubleshoot > Reset this PC to reach the following screen Afterward, select either the “Keep my files” option or the “Remove everything” option depending on your preference, and then proceed to the next on-screen instructions that follow to reset your Windows 10 computer.
Read More
Fix 0X800F080C Error in Windows 10
Error 0X800F080C is tied to corrupted system files and .NET framework issues. In this article, we will focus on how to fix it starting first with .NET fixes and then moving to system-related ones. Follow the guide step by step so you can fix this error fast and easily.

.NET issues

As previously stated 0X800F080C error can occur due to issues with .NET framework, 3.5 framework to be more precise and there are two ways we can fix this error. Follow the guide below as presented:
  1. Install .NET 3.5 framework from Windows features

    First thing is to try and install the framework from Window features itself. Sometimes installation and activation of .NET 3.5 in other ways can result in this error. To install it do the following: Press ⊞ WINDOWS + R to open the run dialog Inside run type in appwiz.cpl and press ENTER to open up the Programs and Features menu Inside the Programs and Features menu click on Turn Windows features on or off. Check the box associated with .NET Framework 3.5 (this package includes .NET 2.0 and 3.0) Press OK Click on YES and wait for the package to be installed then reboot your PC
  2. Run the .NET Repair Tool

    If the previous step was not successful or you already had .NET 3.5 installed then run the troubleshooter in order to fix issues. Go to the official Microsoft .NET framework repair tool website here and download it. Once downloaded install the tool and follow onscreen instructions.

Corrupted system files

If the previous solution has not provided you with results then you have system file corruption that needs to be fixed. Move from one solution to another as presented below:
  1. Run SFC scan

    SFC scan is a built-in Windows tool for solving corrupted system files issues, it is fully automated and does not require from the user any kind of knowledge or information. To run it and scan the system do the following: Press ⊞ WINDOWS + X to open the secret menu Left-click on the command prompt (admin) In command prompt type SFC /SCANNOW and press ENTER Wait for the process to finish, do not interrupt it and once it is done, restart your computer
  2. Run DISM scan

    DISM scan is similar to SFC scan but it tackles different types of system file corruption and it is recommended to run it also after SFC has been completed. Please note that for DISM scan to be successful you will need a stable internet connection since DISM will replace corrupted files with new ones downloaded from Microsoft. To run it do the following: Press ⊞ WINDOWS + X to open the secret menu Left-click on the command prompt (admin) inside command prompt type: exe /online /cleanup-image /scanhealth followed by ENTER, then type: Dism.exe /online /cleanup-image /restorehealth also followed with ENTER. Leave scan to finish and reboot your PC
Read More
Fix Windows Update Install Error 0x80070005
If you are checking for an update on your Windows 10 PC and you got the error 0x80070005 due to some ACCESS DENIED permissions issue, then read on as this post will show you what you can do to fix the problem. For some reason, the Windows Update does not have enough rights or permissions to continue further which is why you’re getting an error instead. Thus, the first thing you can do before you troubleshoot further is to make sure that you’re logged in as admin. However, if you’re already logged in as one, then here are some suggestions that might help you fix the Windows Update Install Error 0x80070005.

Option 1 – Restart your computer and try installing the Updates again

You can restart your computer and then try installing the updates once again. There are instances when a simple restart resolves Windows Update errors. Thus, after you restart your computer, check for updates once again and see if you’re still getting the error or not.

Option 2 – Delete the contents in the Software Distribution folder and Catroot2 folder

  • Open the WinX Menu.
  • From there, open Command Prompt as admin.
  • Then type in the following command – don’t forget to hit Enter right after typing each one of them.
net stop wuauserv net start cryptSvc net start bits net start msiserver
  • After entering these commands, it will stop the Windows Update Service, Background Intelligent Transfer Service (BITS), Cryptographic, and the MSI Installer
  • Next, go to the C:/Windows/SoftwareDistribution folder and get rid of all the folders and files thereby tapping the Ctrl + A keys to select them all and then click on Delete. Note that if the files are in use, you won’t be able to delete them.
After resetting the SoftwareDistribution folder, you need to reset the Catroot2 folder to restart the services you just stopped. To do that, follow these steps:
  • Type each one of the following commands.
net start wuauserv net start cryptSvc net start bits net start msiserver
  • After that, exit Command Prompt and restart your computer, and then try to run Windows Update once more.

Option 3 – Try running the Windows Update Troubleshooter

Running the built-in Windows Update troubleshooter is one of the things you can first check out as it is known to automatically resolve any Windows Update errors like error 0x80070005. To run it, go to Settings and then select Troubleshoot from the options. From there, click on Windows Update and then click the “Run the troubleshooter” button. After that, follow the next on-screen instructions and you should be good to go.

Option 4 – Take control of the User App Data

There are times when permission to access the files is not configured correctly. As a result, it blocks the downloading of the updates. Thus, you have to take full control of the User App Data which is placed at C:/Users/USERNAME/AppData.
  • First, go to C:/Users/USERNAME/AppData and right-click on it then select Properties.
  • Next, click on the Edit button in the Properties window and click OK to confirm if you got a User Account Control elevation request.
  • After that, select user/group from the permission windows or click on the Add button to add another user or group. It would be best if you add “Everyone” to give permission.
  • Then check “Full Control” under the “Allow” column to assign full access rights control permissions.
  • Now edit the permission to Full Control for “Everyone”.
  • Click OK to save the changes made and then exit.

Option 5 – Try to update Windows after a couple of minutes or an hour

There are times when the issue is from Microsoft’s end. It could be that there’s some issue with Microsoft’s server so it would be better if you give it a couple of minutes or an hour or so before trying to run Windows Update again.
Read More
What to do if Windows 10 PC turns on by itself
A PC that turns on by itself every so often can get quite annoying. Many users have faced this problem countless times. There are lots of possible reasons why your Windows 10 PC turns on by itself, wakes up from sleep, standby, or even when it’s shut down. To find out what exactly woke your computer, simply open Command Prompt as admin and type the following command:
powercfg –lastwake
Once you enter the command given above, it will show you the last device that woke your PC up. After that, you need to type in the next command:
powercfg –devicequery wake_armed
After entering the command, it will show you a list of all the devices that could wake your PC up. The goal in running these commands is to understand the reason what’s really causing your PC to turn on and see the reason is on the hardware level or not. Here are a couple of options you can try if your Windows 10 PC turns on by itself.

Option 1 – Try disabling Fast Startup

As you know, Windows 10 comes with a mode called Fast Startup which does not turn off the computer in the usual manner. This mode keeps your computer in a mixed state so that when you turn it on again, it will be a lot faster. However, as useful as this feature appear to be, some security experts find this an issue, for numerous reasons – for one, it can turn on your Windows 10 PC by itself. Thus, you need to disable this feature to fix the problem.

Option 2 – You need to stop the Task Scheduler from waking up your computer

There are times when the issue has something more to do with the software than hardware. It could be that you are using a Scheduled Task to get some work done on your computer at a particular time of the day or many times a day. That’s why if you really are using Task Scheduler, you need to change the Power settings of Windows to make sure that it ignores those tasks rather than deleting them instead when your computer is either on Hybrid or Standby mode.
  • Open the Power Options and then click on “Change Plan Settings”.
  • After that, make sure to choose the correct power plan and then select the “Change advanced power settings” option.
  • Next, look for the Sleep tree and expand it to view the “Allow Wake Timers” option and then disable it. Disabling this option will make sure that none of the program that could wake your PC up when it’s either on shutdown or sleep mode. However, this only applies to laptops.

Option 3 – Try to disable Automatic Restart

There are instances when the computer crashes and the system restarts itself. This is actually by design – when your computer has been left on standby, the computer will restart and if the program repeats, it will keep on waking your PC up.
  • In the Search bar, type in “system”.
  • Once it appears from the search results, click on it.
  • Next, select Advanced system settings on the left side and then go to the Advanced tab.
  • From there, click on Settings under Startup and Recovery.
  • Then unmark “Automatically Restart” and click on OK.

Option 4 – Adjust the Power Management option of both the Keyboard and Mouse

As you know, two of the culprits in waking your PC up are the keyboard and the mouse. If they’re slightly moved or hit, your PC turns on. To prevent these two from waking your computer up, you need to make some adjustments to their power management option since they have one. You can disable this option to ensure that they won’t wake your PC up unless you really want it to.
  • Tap the Win + X keys and then tap M to open the Device Manager and list all the hardware on your computer. From there, select your keyboard or mouse.
  • Next, right-click and then go to Properties and go to the Power Management tab.
  • In this tab, uncheck the “Allow this device to wake the computer” box.
Note: Aside from the keyboard and mouse, if you are also using any gaming rig to play games on your computer, then you might have to disable their power options as well as they could also wake your computer. Just make sure that either the keyboard or the mouse has the ability to wake your computer up at the very least as it can be quite inconvenient to tap the Power button every time you want to turn on your computer.

Option 5 – Modify Wake On Lan

The Wake On Lan feature can bring back your computer online if it is connected to a network. This feature is useful especially when a computer wants to communicate or to send data or files to a network computer which should come online only when it’s requested. Wake On Lan is built into the hardware, i.e. network adapter so it is one of the possible reasons why your PC turns on by itself.
  • Tap the Win + x keys then hit M to open the Device Manager and then under the Network adapters, look for the one that was listed above. Take note that you must not change anything with the ones that are listed as Miniport.
  • Next, right-click and select Properties and then go to Power management and from there, uncheck the “Allow this device to wake up the computer” option. This will ensure that no PC on the network can ever wake your computer up.

Option 6 – Prevent any scheduled Windows Update and Automatic maintenance

It is also possible that the Windows Update has restarted your PC to complete the update. This depends on your active hours or a predefined schedule. AS you know Windows has a built-in Automatic Maintenance mode which wakes the computer up at the scheduled time and performs the system update. This could be one of the possible reasons why your computer turns on by itself. so to prevent any scheduled updates and maintenance, you can simply change the time for Automatic maintenance. How? Follow these steps:
  • Open Settings then go to Windows Update and Security >Windows Update and select Active Hours.
  • After that, type in “Automatic maintenance” in the search bar to change the time for Automatic maintenance.
  • From there, you can adjust the timing or just uncheck the “Allow scheduled maintenance to wake up my computer at the scheduled time” box.
Read More
Fix Windows Update Error 0x80072EE2
If you got an error code of 0x80072EE2 while trying to download a Windows 10 update then it could be that something is blocking the Windows Update service on your Windows 10 PC and is preventing it from connecting to the Microsoft server. In addition, the error code 0x80072EE2 also indicates “ERROR_INTERNET_TIMEOUT” and together with this message, you might also see a message as Windows Update encountered an unknown error or you might also find it hard to search for new updates. So in this post, you will be guided on how you can fix the Windows Update error code 0x80072EE2. Make sure to follow the steps below carefully.

Option 1 – Restart your computer and try installing the Updates again

You can restart your computer and then try installing the updates once again. There are instances when a simple restart resolves Windows Update errors. Aside from that, it would also be better if you make sure that your internet connection is working and that it’s stable. And so after you restart your computer, check for updates once again and see if you’re still getting the error or not.

Option 2 – Run the Windows Update Troubleshooter

Running the built-in Windows Update troubleshooter is one of the things you can first check out as it is known to automatically resolve any Windows Update errors like error code 0x80072EE2. To run it, go to Settings and then select Troubleshoot from the options. From there, click on Windows Update and then click the “Run the troubleshooter” button. After that, follow the next on-screen instructions and you should be good to go.

Option 3 – Try to disable your antivirus program

Disabling the antivirus program or any security software installed in your computer is always a good idea you can try when the Windows Update process does not go smoothly. So before you try updating your computer again, make sure to disable the antivirus or security program and once the Windows Update is done, don’t forget to enable the antivirus program back again.

Option 4 – Try to restart the Background Intelligent Transfer Service

The Background Intelligent Transfer Service or BITS is a part of the Windows Update service and is the one that manages the background download of Windows Update, as well as scans for new updates and so on. And if Windows Update is experiencing some problems, you can try restarting BITS but make sure that you have admin privileges to do so.
  • Tap the Win + R keys to open the Run dialog box.
  • Next, type “services.msc” in the field and hit Enter to open Windows Services.
  • From the list of Services, look for the Background Intelligent Transfer Service and double-click on it to open Properties.
  • After that, you need to set the Startup type to “Automatic (Delayed Start) and click on Apply.
  • Now click the Stop button to stop BITS and then click the Start button to restart the service.
  • Click OK to save the changes made and then restart your PC.

Option 5 – Try installing the updates in a Clean Boot State

It could be that some third-party application is the one that’s causing the problem so it’s best if you put your computer in a Clean Boot state. During this state, you can start the system with a minimum number of drivers and startup programs that will surely help you in isolating the root cause of the issue.
  • Log onto your PC as an administrator.
  • Type in MSConfig in the Start Search to open the System Configuration utility.
  • From there, go to the General tab and click “Selective startup”.
  • Clear the “Load Startup items” check box and make sure that the “Load System Services” and “Use Original boot configuration” options are checked.
  • Next, click the Services tab and select the “Hide All Microsoft Services” check box.
  • Click Disable all.
  • Click on Apply/OK and restart your PC. (This will put your PC into a Clean Boot State. And configure Windows to use the usual startup, just simply undo the changes.)
  • After that, try to install the Windows app again.
Note: If you are able to install the app without any trouble at all then it means that the error is caused by some third-party application on your computer. You need to look for the culprit and uninstall it once you found it.

Option 6 – Run Microsoft’s online troubleshooter

Running Microsoft’s online troubleshooter might also help you fix the Windows update error code 0x80072EE2. This online troubleshooter is known to help in fixing Windows Update errors, it scans your computer for issues that might be causing the problem and then fixes them automatically.
Read More
How to remove Easy Home Decorating (easyhomedecorating.com) toolbar

Easy Home Decorating is a Browser Extension for Google Chrome. It offers users tips and tricks on how to manage your home decoration, you can find ideas for certain rooms, combine and plan. This might seem useful at the start, however, all this extension does is add a toolbar that links you to the most popular Home Decor Websites that you can find on any Search engine within seconds.

When installed it changes your default search engine and new tab page to MyWay.com or Ask.com (depending on the extension version). It monitors user browsing activity in the background, allowing it to gather visited websites, clicked links, search queries, and other user information. This data is later sent/sold to better target ads.

While using this extension you will see additional ads and sponsored content displaying throughout your browsing sessions. Several anti-virus applications have marked this extension as a Browser Hijacker and a potential security flaw and are therefore not recommended to keep on your computer.

About Browser Hijackers

Browser hijackers (sometimes referred to as hijackware) are a type of malware that modifies web browser configurations without the user’s knowledge or approval. These hijacks happen to be increasing at an alarming rate worldwide, and it could be actually nefarious and sometimes harmful too. Browser hijacker malware is developed for many different reasons. These are generally used to force visitors to a particular website, manipulating web traffic to earn ad revenue. It might seem naive, but the majority of these websites are not legitimate and can present a serious risk to your online safety. Moreover, hijackers could make the whole infected system vulnerable – other destructive malware and viruses would use these opportunities to get into your computer effortlessly.

How one can know if your browser has been hijacked

Here are some signs and symptoms that suggest you’ve been hijacked: your web browser’s home page is suddenly different; if you enter a URL, you find yourself regularly directed to a different site than the one you meant; the default online search engine is modified; unsolicited new toolbars are added to your web browser; you see a lot of pop-up ads on your computer screen; your web browser gets slow, buggy, crashes frequently; you can’t visit specific websites like home pages of security software.

How does a computer get infected with a browser hijacker?

Browser hijackers infect computer systems in numerous ways, including through a drive-by download, a file-share, or an infected email. They can also come from any BHO, extension, add-on, toolbar, or plug-in with malicious purpose. Other times you might have inadvertently accepted a browser hijacker as part of a software bundle (generally freeware or shareware). Examples of well-known browser hijackers are Fireball, GoSave, Ask Toolbar, CoolWebSearch, Babylon Toolbar, and RocketTab. Browser hijackers could affect the user’s web browsing experience significantly, monitor the websites visited by users and steal private information, cause difficulty in connecting to the web, and finally create stability problems, causing programs and systems to freeze.

How you can fix a browser hijack

Certain kinds of browser hijackers can be effortlessly removed from your PC by deleting malicious software applications or any other recently installed shareware. But, many hijackers are very hard to identify or eliminate as they might get themselves associated with some important computer files which allow it to operate as a necessary operating system process. Rookie computer users should never try the manual form of removal methods since it requires comprehensive computer knowledge to carry out repairs on the computer registry and HOSTS file. Anti-malware application is really efficient with regards to picking up and removing browser hijackers that normal anti-virus application has overlooked. To eradicate any kind of browser hijacker from your PC, you can download this certified malware removal program – SafeBytes Anti-Malware. Employ a system optimizer (like Total System Care) together with your antivirus software to solve various registry issues, remove system vulnerabilities, and improve your computer's overall performance.

How To Install Safebytes Anti-Malware On An Infected PC

All malware is bad, but certain kinds of malware do much more damage to your PC than others. Some malware is designed to restrict or prevent things that you wish to do on your personal computer. It may well not permit you to download anything from the net or prevent you from accessing some or all of the websites, especially the anti-virus sites. If you’re reading this article, you probably have got infected by a virus that prevents you from downloading a computer security program such as Safebytes Antimalware on your PC. There are some steps you can take to get around this issue.

Install in Safe Mode

The Windows OS has got a special mode known as “Safe Mode” in which just the bare minimum required programs and services are loaded. If the malware is blocking access to the internet and affecting your PC, running it in Safe Mode allows you to download antivirus and run a scan while limiting possible damage. In order to get into Safe Mode or Safe Mode with Networking, press the F8 key while the computer is starting up or run MSCONFIG and locate the “Safe Boot” options in the “Boot” tab. Once you are in Safe Mode, you can attempt to download and install your antivirus program without the hindrance of the malicious software. Now, you can run the antivirus scan to eliminate viruses and malware without any interference from another application.

Switch to an alternate internet browser

Web-based malware could be environment-specific, aiming for a particular web browser or attacking specific versions of the browser. In case you suspect that your Internet Explorer has been hijacked by a computer virus or otherwise compromised by cybercriminals, the most effective course of action is to switch to a different internet browser such as Chrome, Firefox, or Safari to download your favorite computer security software – Safebytes Anti-Malware.

Run anti-virus from a USB drive

Another solution is to save and operate an antivirus software program entirely from a Thumb drive. To run antivirus using a thumb drive, follow these simple steps: 1) On a clean PC, download and install Safebytes Anti-Malware. 2) Put the USB drive into the uninfected PC. 3) Double-click the Setup icon of the anti-malware program to run the Installation Wizard. 4) When asked, choose the location of the USB drive as the place in which you would like to store the software files. Follow the instructions to finish the installation process. 5) Now, insert the pen drive into the infected PC. 6) Double-click the EXE file to open the Safebytes program right from the flash drive. 7) Click “Scan Now” to run a complete scan on the affected computer for viruses.

SafeBytes Anti-Malware Overview

To help protect your laptop or computer from various internet-based threats, it’s very important to install an anti-malware program on your PC. But with countless numbers of antimalware companies out there, these days it’s challenging to decide which one you should buy for your PC. Some of them are good, some are ok types, while some will harm your PC themselves! You must pick a company that builds industry-best anti-malware and has gained a reputation as reliable. Amongst few good programs, SafeBytes Anti-Malware is the highly recommended software program for the security-conscious user. SafeBytes is a powerful, real-time anti-spyware application that is designed to assist the everyday computer end user in safeguarding their computer from malicious internet threats. With its cutting-edge technology, this application will allow you to remove several types of malware including viruses, trojans, PUPs, worms, ransomware, adware, and browser hijackers.

There are plenty of great features you’ll get with this particular security product. Listed here are a few of the great ones:

Real-time Threat Response: SafeBytes offers real-time active checking and protection from all known viruses and malware. It’ll monitor your PC for suspicious activity continuously and its unparalleled firewall shields your PC from illegal access by the outside world. Antimalware Protection: Built upon a greatly acclaimed anti-virus engine, this malware removal tool can find and get rid of many obstinate malware threats such as browser hijackers, PUPs, and ransomware that other typical anti-virus software will miss. Website Filtering: SafeBytes checks and gives a unique safety rating to every website you visit and block access to webpages known to be phishing sites, thus protecting you against identity theft, or known to contain malicious software. Lowest CPU and RAM Usage: SafeBytes provides complete protection from internet threats at a fraction of the CPU load due to its advanced detection engine and algorithms. Premium Support: For any technical questions or product support, you could get 24/7 expert assistance through chat and email. Overall, SafeBytes Anti-Malware is a solid program as it has lots of features and could detect and remove any potential threats. You can be sure that your PC will be protected in real-time once you put this software program to use. You will get the very best all-around protection for the money you pay on SafeBytes Anti-Malware subscription, there’s no question about it.

Technical Details and Manual Removal (Advanced Users)

If you don’t wish to use an automated tool and prefer to get rid of Easy Home Decorating manually, you might accomplish this by going to the Windows Add/Remove Programs menu in the control panel and removing the offending software; in cases of web browser add-ons, you could remove it by visiting the browser’s Add-on/Extension manager. Additionally, it is suggested to factory reset your web browser settings to their default state. To make sure of complete removal, find the following Windows registry entries on your computer and delete it or reset the values appropriately. Please remember that this is for experienced users only and might be challenging, with incorrect file removal causing additional PC errors. Also, certain malware is capable of replicating itself or preventing deletion. Completing this task in Safe Mode is suggested.
Files: Search and Delete: 73Bar.dll 73bar.dll 73highin.exe 73medint.exe 73regfft.dll 73regiet.dll 73hkstub.dll 73reghk.dll 73barsvc.exe 73bprtct.dll 73datact.dll 73dlghk.dll 73dlghk64.dll 73feedmg.dll 73htmlmu.dll 73httpct.dll 73idle.dll 73mlbtn.dll 73Plugin.dll 73script.dll 73skin.dll 73skplay.exe 73SrcAs.dll APPINTEGRATOR.EXE AppIntegrator64.exe APPINTEGRATORSTUB.DLL AppIntegratorStub64.dll ASSISTMONITOR.DLL ASSISTMONITOR64.DLL CREXT.DLL CrExtP73.exe DPNMNGR.DLL HKFXMGR.DLL HKFXMGR64.DLL HPG.DLL Hpg64.dll T8EPMSUP.DLL T8EXTEX.DLL T8EXTPEX.DLL T8HTML.DLL 73SrchMn.exe 73srchmr.dll NP73Stub.dll 73auxstb.dll 73auxstb64.dll 73ieovr.dll 73radio.dll 73brmon.exe 73brstub.dll
Read More
Enable Touch Keyboard in Windows 11
Touch Keyboard
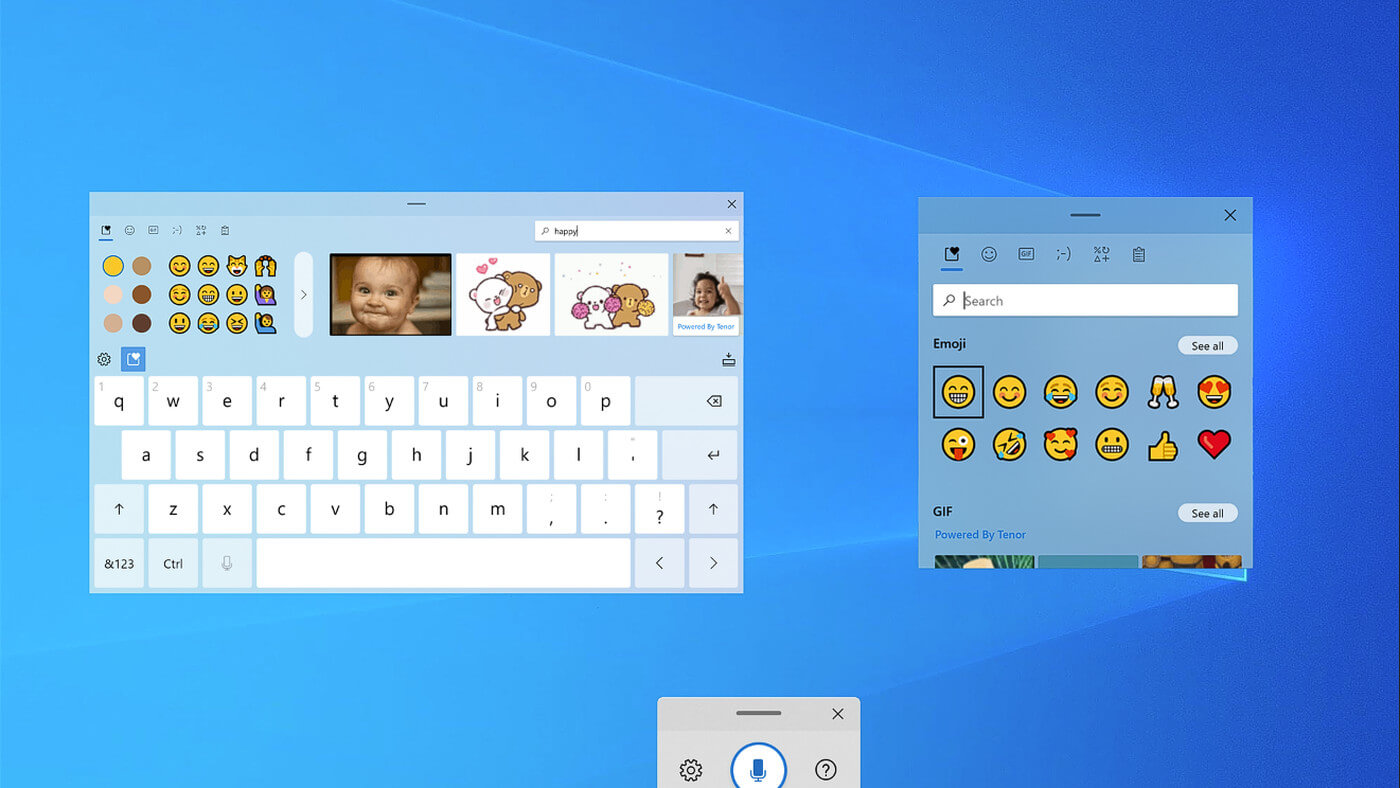
If by any chance you are working on a touchscreen PC, tablet, or any similar device and have no access to a hardware keyboard there is a way to place Touch Keyboard on your screen for easy typing, and you can enable icon on the taskbar for easy access.

Enabling the Touch Keyboard

  1. Right-click on the Taskbar
  2. Select Taskbar Settings
  3. Go to Personalization > Taskbar
  4. Click on Taskbar Corner Icons to expand it
  5. Click on the switch next to Touch Keyboard to turn it ON
  6. Close settings
The icon will immediately appear on the Taskbar in the lower right corner. Clicking the icon virtual keyboard will appear on the lower part of the screen. You can use this keyboard to type in applications the same as you were typing on hardware one. By taping on X in the upper right corner, you will hide the keyboard. Tap on the icon in Taskbar to bring it up again.

Hide the Taskbar icon

If you do not want to use Touch Keyboard anymore you can easily hide the icon:
  1. Right-click on the Taskbar
  2. Select Taskbar Settings
  3. Go to Personalization > Taskbar
  4. Click on Taskbar Corner Icons to expand it
  5. Click on the switch next to Touch Keyboard to turn it OFF
  6. Close settings
Read More
A Quick Guide to Fix Error 0x0000001e
Error 0x0000001e is when you start the Windows XP Setup and you see a message which says something like: STOP: 0x0000001E (0x80000003, 0xBFC0304, 0x0000000, 0x0000001)

Solution

Restoro box imageError Causes

You are most likely to face this error if you restart your PC while the Windows Setup is still under process and yet to complete. Other causes of this error include any of the following conditions:
  1. The drive on which you are installing Windows has insufficient disk space to accommodate the installation.
  2. An incompatible or outdated third-party driver (or more) is installed on your PC which is conflicting with the installation. For instance, this could be a problematic video driver.
  3. The system BIOS has incompatibilities with the installation.

Further Information and Manual Repair

This error is also called the “Bug check code”. The STOP 0x1E signifies that there was an unknown or illegal processor instruction detected by the Windows XP kernel. You will see the exception address which shows up to indicate the root of the problem which is usually a driver or faulty hardware. You should note this address down as well as the link date of the faulty driver or image which includes it. If at any point it becomes impossible for you to handle and you end up contacting the Windows support center to help you out with the process then this information will help you out in making things a lot easier while the support team tries to troubleshoot the problem. The parameters included in the STOP 0x1E error message are the following:
  1. is the exception code which couldn’t be handled.
  2. shows the module’s address where the exception took place.
  3. signifies the exception’s parameter 0.
  4. represents the exception’s parameter 1.
You can use this information which usually is provided in error 0x0000001e message to pinpoint the root cause of the problem and troubleshoot it. In order to fix this error, you need to follow either one of the following procedures as needed according to your situation.

Clean Up Your Disk

local disk propertiesIf your disk doesn’t have ample space to accommodate the installation then you should free up some of the space on your disk to make sure the Windows can be installed on it. You can also reinstall the Windows on another disk that has sufficient space.

Get Rid of the Third Party Driver

If the error 0x0000001e message gives you the name of the driver due to which the installation process is being halted, then get rid of that driver by disabling it or removing it. If the problem is resolved by this then you should contact the manufacturer of the third-party driver and ask them about any newer versions of the driver that wouldn’t conflict with the installation of Windows.

Upgrade System BIOS

Upgrading your system BIOS is something that you can’t do on your own. You will need to find out more about how you can upgrade. For this, you should contact either your PC’s manufacturer or your motherboard’s manufacturer. If nothing else works, you can always make use of the Microsoft Debugging Tools which will provide you ample information about the error message. You will find the Debugging Tools and further information about them including the downloading and installation process on Microsoft’s website.
Read More
Apple M2 Chip review

Direct replacement for Apple M1 Chip is near. There were some M1 Chips versions like M1 MAX and M1 ULTRA that were upgrades of the existing M1 chip, but the new and upcoming M2 is something different and it is aiming to replace M1 completely.

apple m2 chip

Made in a 5-nanometer design, with 20 billion transistors and 100GB/s of unified memory bandwidth is meant to increase performance over M1. It has the same M1 8 core design with 4 high-efficiency cores and 4 high-performance ones.

All CPU and GPU cores are faster than their M1 equivalents and Apple states that when running M1 and M2 at the same power level M2 will perform 25% faster. The first version of the chip will place focus on power efficiency so if you are more on side of being a power user wait for the MAX or ULTRA version of M2.

Tech details of M2

M2 system on a chip like its predecessor M1 combines both CPU and GPU on a single chip with shared memory in order to increase performance compared to systems that have separate CPU and GPU. M2 so far has been only announced for MacBook Air and the 13-inch MacBook Pro that suppose to hit the market somewhere around July this year. Of course, we expect that M2 is included in future iPad series or Mac Mini series as well.

  • CPU Cores: 8
  • GPU Cores: Up to 10
  • Unified Memory: Up to 24 GB
  • Neural Engine Cores: 16
  • Number of Transistors: 20 billion
  • Process: Second Generation 5nm
Read More
1 2 3 171
Logo
Copyright © 2023, ErrorTools. All Rights Reserved
Trademark: Microsoft Windows logos are registered trademarks of Microsoft. Disclaimer: ErrorTools.com is not affiliated with Microsoft, nor claims direct affiliation.
The information on this page is provided for information purposes only.
DMCA.com Protection Status