In 27 European countries for some time it has been considered for introducing a law that would force phones, tablets, laptops, and other mobile devices to use a single USB Type-C connector.
The European Parlament announced that a provisional agreement has been reached and that it was voted that a single charging solution is USB Type-C. The current agreement applies and covers the next devices: phones, tablets, Readers, earbuds, digital cameras, headphones, headsets, handheld consoles, and portable speakers. All currently existing devices can still be sold without issues but starting in the fall of 2024 all-new products must support USB Type-C charging.
The agreement will also hit Laptops but not on the same date, How is USB Type-C currently not enough for charging laptops, all new laptops that will have to use it are scheduled for fall of 2025.
Although the agreement is reached the EU Parliament and Council still have to formally approve everything.
Apple targeted the most
Apple has been targeted as the main target for rules since their iPhones are still using Apple's proprietary Lightning charging port. Apple sells a lot of iPhones in Europe and even though iPad Pro and iPad Air along with all MacBooks have moved to USB Type-C, iPhones are still struggling with the Lightning port.
Apple criticized the EU’s charger rules when they were first proposed in 2021, telling the BBC, “We remain concerned that strict regulation mandating just one type of connector stifles innovation rather than encouraging it, which in turn will harm consumers in Europe and around the world.” The European Union has said in response that it will update its rules as new technology arrives.
Why was this proposed?
The main problem in Europe that led to this proposition was electronic waste which reached 11 000 metric tons in 2018. European union is afraid that this will keep rising as chargers become larger and heavier in order to accommodate faster-charging speeds. More electronic waste means more hardware slowly decomposing in landfills that will contribute to climate change affecting everyone on the planet, not just the people living in Europe.
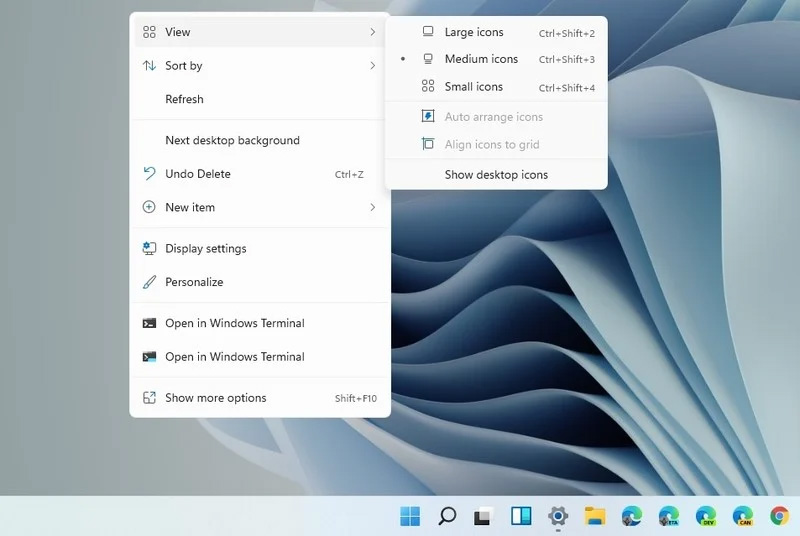
Windows 11 brought with it a simplified right-click menu that has limited options. If you would like to bring the old Windows 10 right-click menu you will have to do some registry tweaking but it is doable.
Since this requires registry tweak, please follow given solution step by step
Press Start and type RegEdit
Click on Registry Editor
Inside registry editor find next key:
Computer\H_KEY_CURRENT_USER\SOFTWARE\CLASSES\CLSID\
Right click in the right part of editor window and select New > Key
Type in as a name: {86ca1aa0-34aa-4e8b-a509-50c905bae2a2}
Right click on {86ca1aa0-34aa-4e8b-a509-50c905bae2a2} key and select New > Key again to create new key inside this one
Name inside key InprocServer32
Double click the “(Default)” key in InprocServer32 to open it
When the Default key opens close it without making any changes by clicking on OK. This will make its value property Blank instead of value not set
Close Registry Editor
Restart your PC
Once the system is up if the followed solution is applied you will now have an old school menu once right-click is used.
Hello everyone and welcome to another quick tutorial for your Windows error, this time we will wrestle with error 0x8007000d.
Let's begin:
1. Browse to "C:\Windows\SoftwareDistribution\Download" and delete the contents of the folder.
2. Press ⊞ WINDOWS + X > Click Command Prompt (Admin) then type "wuauclt.exe /updatenow".
Hit Enter
3. Open Control Panel > Windows Update and Windows 10 should begin downloading.
Press ⊞ WINDOWS + X
Click Command Prompt (Admin)
Type in at the prompt OR Copy and Paste these one at a time : (Hit ENTER after each)
What is Windows Update Error 0xC1900209? Before you can install any updates on your Windows 10 computer, there are a lot of conditions that have to be fulfilled and one of these conditions is software compatibility. It is one of the important factors in installing Windows Updates. So if one of the software in your computer is not compatible with the new Windows Update for your OS, then the Windows 10 setup will not proceed and will block the installation of the new update. This both applies to the cumulative updates and feature updates. In such cases, you will get the following error message when you run Windows Update:
“0xC1900209, Incompatible software is blocking the upgrade process. Uninstall the application and try the upgrade again.”
This error message comes under the umbrella of the Windows 10 pre-upgrade validation using Setup.exe. And for you to identify the incompatible app, you need to grab a Windows 10 install image using the Windows Media Creation tool to download the suitable Windows 10 version and mount it. After that, execute the setup.exe file that’s located in the root folder of the Windows 10 install image. Once you execute the setup file, the upgrade wizard will give you a list of incompatible apps.
Once you have determined which software is not compatible with the Windows Update, there are two options you can try to resolve the Windows Update error 0xC1900209 – you can either try to update the conflicting software or uninstall it. For more details, follow the given options below.
Option 1 – Try to update the conflicting software
If you are using an older version of the software that’s in conflict with the Windows Update, you might want to update it to its latest version and then try to apply the updates again to your Windows 10 computer. You can update the concerned software by visiting the official website of the software or any of its distribution sources. On the other hand, you can also use the Check for updates feature of that particular software if it’s available.
Option 2 – Try to uninstall the conflicting software
If updating the problematic program didn’t work, the next option you can try is to uninstall it. All you have to do is follow these steps to uninstall it successfully:
Tap the Win + R keys to open the Run dialog box.
Then type “appwiz.cpl” in the field and tap Enter to open the Programs and Features in Control Panel.
Next, arrange the list of installed programs in the order of the installation date.
After that, look for the problematic program and right-click on it, and then select Uninstall.
Once the uninstallation process is done, restart your computer and see if the Windows Update error 0xC1900209 is fixed or not.
One of the most common Blue Screen of Death errors you can encounter on your Windows 10 computer is the Tcpip.sys Blue Screen error. The Tcpip.sys file is a driver file that is associated with the Transmission Control Protocol over Internet Protocol. When you see this kind of BSOD error, you may see any of the following error descriptions:
IRQL_NOT_LESS_EQUAL
KMODE_EXCEPTION_NOT_HANDLED
PAGE_FAULT_IN_NONPAGED_AREA
Whichever error description you got, you need to do use the following instructions below as a reference to obliterate the Tcpip.sys Blue Screen error.
Option 1 – Run the Blue Screen Troubleshooter
The Blue Screen troubleshooter is a built-in tool in Windows 10 that helps users in fixing BSOD errors like Tcpip.sys Blue Screen error. It can be found on the Settings Troubleshooters page. To use it, refer to these steps:
Tap the Win + I keys to open the Settings panel.
Then go to Update & Security > Troubleshoot.
From there, look for the option called “Blue Screen” on your right-hand side and then click the “Run the troubleshooter” button to run the Blue Screen Troubleshooter and then follow the next on-screen options. Note that you might have to boot your PC into Safe Mode.
Option 2 – Try resetting TCP/IP
In case you didn’t notice, the Tcpip.sys file is associated with the TCP/IP protocols in your computer system which is why resetting TCP/IP can help in resolving the Tcpip.sys Blue Screen of Death error especially when the TCP/IP has been modified.
First, you need to type “command prompt” in the Windows Search bar and then right-click on the related search result and select the “Run as administrator” option to open Command Prompt.
After that, type the following command in the elevated cmd window and hit Enter:
netsh int ip reset
Now reboot your computer after the command has been executed and check if it helped to fix the Blue Screen error.
Option 3 – Try to rollback your Network driver
If you have updated the driver software as of late and you suddenly got this BSOD error, you might have to roll back the device driver – in other words, switch back to the previous working version. To do that, follow these steps:
Tap the Win + R keys to launch the Run window and then type in the “devmgmt.msc” command and hit Enter to open the Device Manager window.
Under the Device Manager, you will see a list of drivers. From there, look for the Network Adapters and expand it.
Next, select the driver entries that are labeled appropriately other than anything in the context of the WAN Miniport.
Then select each one of them and double click to open a new mini window.
After that, make sure that you’re on the Driver tab and if you are not, just navigate to it then click the Roll Back Driver button to switch back to the previous version of your Network adapters.
Now restart your computer to successfully apply the changes made.
Option 4 – Try to update the Network drivers
You might also want to try updating all your network drivers in order to fix the Tcpip.sys Blue Screen error. To do so, here’s what you have to do:
Tap the Win + R keys to launch the Run window and then type in the “MSC” command and hit Enter to open the Device Manager window.
Under the Device Manager, you will see a list of drivers. From there, look for the Network Adapters and expand it.
Then right-click on each one of the Network drivers and update them all.
Restart your PC and see if it helped in fixing the BSOD error.
Note: If updating the network drivers didn’t help in fixing the problem, you can also try to uninstall the very same drivers and restart your Windows 10 PC. After that, the system itself will reinstall the drivers you just uninstalled. Alternatively, you can also download and install the drivers from the manufacturer’s website directly.
Option 5 – Try to disable both the Antivirus program and Firewall temporarily
There are times when antivirus programs and the firewall blocks a website that they consider to be malicious or even because of false-positive effects which is why you have to disable these programs temporarily as it might be the reason why you’ve encountered the error when trying to browse the internet.
Bluetooth troubleshooting, I believe firmly that each one of us who has Bluetooth sooner or later had some issues with it, after all, it seems that it is in nature of radio transmitters to from time to time due to nature of signal and nature of Windows loose communication between them and can cause device which seems to work properly but can not establish the connection.
Most of the time Bluetooth issues are like that, the signal gets lost, the connection is broken, and establishing it again can be sometimes real pain, luckily for you, we have experience in this field and are here to help you and provide you with tips how to solve Bluetooth connection issues based on our own struggles.
Check if BlueTooth is ON
Yes, this seems stupid and sounds a lot like is it plugged in but here me out. Due to lost connections and different power plans setting inside your Windows, your Bluetooth receiver might be actually turned OFF thus preventing your other device to find your computer. Checking to see if Bluetooth has been by some accident turned OFF and switching it back ON should be the first thing to do and this could be a simple solution for your problem.
Restart the BlueTooth device.
Yup, another of these have you tried turning it OFF and turn it back ON advice which seems like tech cliche but in the case of Bluetooth, this can actually solve your problem. Radio signals and radio connections are not the same kinds of beasts like cable ones and sometimes Bluetooth device remembers certain information and can cause conflict. Turning it OFF and then back ON will clear its memory and cache and you will be ready for a new start hopefully solving your issue along the way.
Check power supply
If your Bluetooth device does not have a battery indicator, it would be wise to check on the battery status of the device. Sometimes we forget to charge batteries, sometimes someones have drained them. Checking the battery or just checking if the power supply is working properly should not be overlooked and it definitely should be on your to-do list of quick solutions.
Restart PC
Sometimes most simple solutions work and if restarting your Bluetooth device did not work, maybe restarting your PC will. When you restart the PC, you clear the cache and many other things that could potentially be the reason for connection issues.
Checks BlueTooth device distance from computer or interference from obstacles
The Bluetooth device operates via radio waves, and like wi-fi, if the distance from the computer is too large or you have some thick walls in between signal will degrade and be almost useless. Be aware that your PC might catch device waves and detect them but the signal itself could be too weak for the connection to work properly. Take the device and move it closer to the PC to see if the problem will go away, if it does issue was in distance or walls.
Reinstall or update device drivers.
Sometimes the issue could be in Windows update and old drivers, make sure that all of your drivers are updated with the latest version and that Windows itself has the most recent update in it. Trying to reinstall device cold also solve some the issue.
Remove and Pair deice again
if you tried all previous steps, try removing the device from Windows and then pairing it again. This could solve the issue since Windows itself could have mistakenly saved it like something else and can not recognize it.
Use Windows troubleshooter
If everything else failed, right-click and go to troubleshoot. Windows troubleshooter will try to find the issue and direct you to a solution.
If sadly none of these things do work, you should contact the device manufacturer since it is a very good chance that the problem is one of a hardware nature.
A solid reason to switch to Mac from Windows PC is Mac OS. Based on Linux, offers more stability and better security than Windows but you will not be able to find a vast array of applications on it.
Even when Mac OS X (the first big one) was first introduced, it looked and felt like ages beyond Windows (Microsoft just recently made a slick and modern design with Windows 11). Under the hood, it turned out that the operating system itself is stable and incredibly fast & responsive. If you value stability and easiness of use, Mac OS is the Operating system for you.
Apple ecosystem
This one is easy, if you are already invested in apple devices like iPhone and iPad, having an apple computer is one step forward into the apple ecosystem and one more step into easy sharing of documents and data between devices.
Calendars, emails, photos, videos, documents, and many more can easily be shared and synched between devices with a single apple ID making workflows much easier than on other operating systems.
Development
Developers all around the world say that developing on Mac is much better and smoother than on PC, this has probably to do something with OS being based on Linux but whatever the case is, it is much smoother and it just feels better. Apple laptops are often the go-to choice of developers for a reason.
Also if you are in the development business for applications and services aimed at iPhone or iPod then there is no really another way than to be into the apple ecosystem and own apple hardware.
Professional software
A lot of professional-grade software exists for both the Windows platform and Mac OS but there is some software that exists exclusively for Apple hardware like Final Cut Pro or Logic Pro. Both applications are used by professionals and are industry-standard software.
Logic pro is used by industrial audio specialists all around the world and is used in professional studios. Final Cut Pro is also used worldwide by video editors and if you are specializing in any of these two fields Mac seems like a very reasonable platform since the software can not be found on Windows. These two are examples, there are other similar applications that are only available on Mac OS
Longevity
Apple hardware is made of high-quality materials and components and it is proven over time that it lasts longer than usual. There are iPhones out there that have 13 years and they are still working, G3 and G4 Macs that are still functional.
When buying Apple products they will outlive other ones if treated properly so in the end you could be saving money by purchasing them.
As you know, Windows 10 comes with the option to create Mobile Hotspot for other devices. This allows you to share your Ethernet connection. However, there are times when one of your devices might fail to reconnect to the mobile hotspot again. For instance, you moved out of the Wi-Fi range because you have somewhere to be and whatnot and when you’re back you find that you are now unable to reconnect to the Windows 10 Hotspot or the shared network. Although you can always restart the mobile hotspot to resolve the problem, however, it might only be a temporary fix. So in this post, you will be given options for a much better solution to the problem.
This kind of problem seems unusual and does not occur that often. To fix it, you can try to set up DNS on your Windows 10 device and then configure the settings on the mobile device. It seems that what’s happening here is that the mobile device is unable to lock on to the Mobile Hotspot when the IP address changes for some reason.
Option 1 – Try changing the DNS settings on your laptop
In this option, you need to make sure that IPv4 and IPv6 are selected on your Ethernet connection. You also have to change the Preferred DNS server as well as the Alternate DNS server to 8.8.8.8 and 8.8.4.4, respectively. You also have to validate the settings before you exit just to ensure that you’ve entered everything correctly. After that, open Command Prompt and run the ipconfig command and then take note of the IP address, Gateway DNS 1 and DNS 2.
Option 2 – Try changing the Wi-Fi settings on your mobile device
This option should be mostly the same on all your mobile devices. And given that OEMs build their customization and skin, you might have to fiddle around a little to get the settings. Refer to the steps below to change the Wi-Fi settings:
Go to the Settings of your mobile device and tap on Wi-Fi.
Then click the Mobile Hotspot connection that you’ve created on your laptop.
After that, input the password and tap the Advanced options.
From there, tap on IP settings and select the Static option instead of DHCP.
Now you have to enter the IP address, Gateway, DNS 1, and DNS 2 of the laptop you’ve taken note of earlier and that’s it.
Note: If you are already connected to the Mobile Hotspot, long press on the Wi-Fi network and select the Modify Network option and then follow the steps given above to change from DHCP to static. Once you’re done, your mobile device should now be able to connect to the Windows 10 Mobile Hotspot all the time.
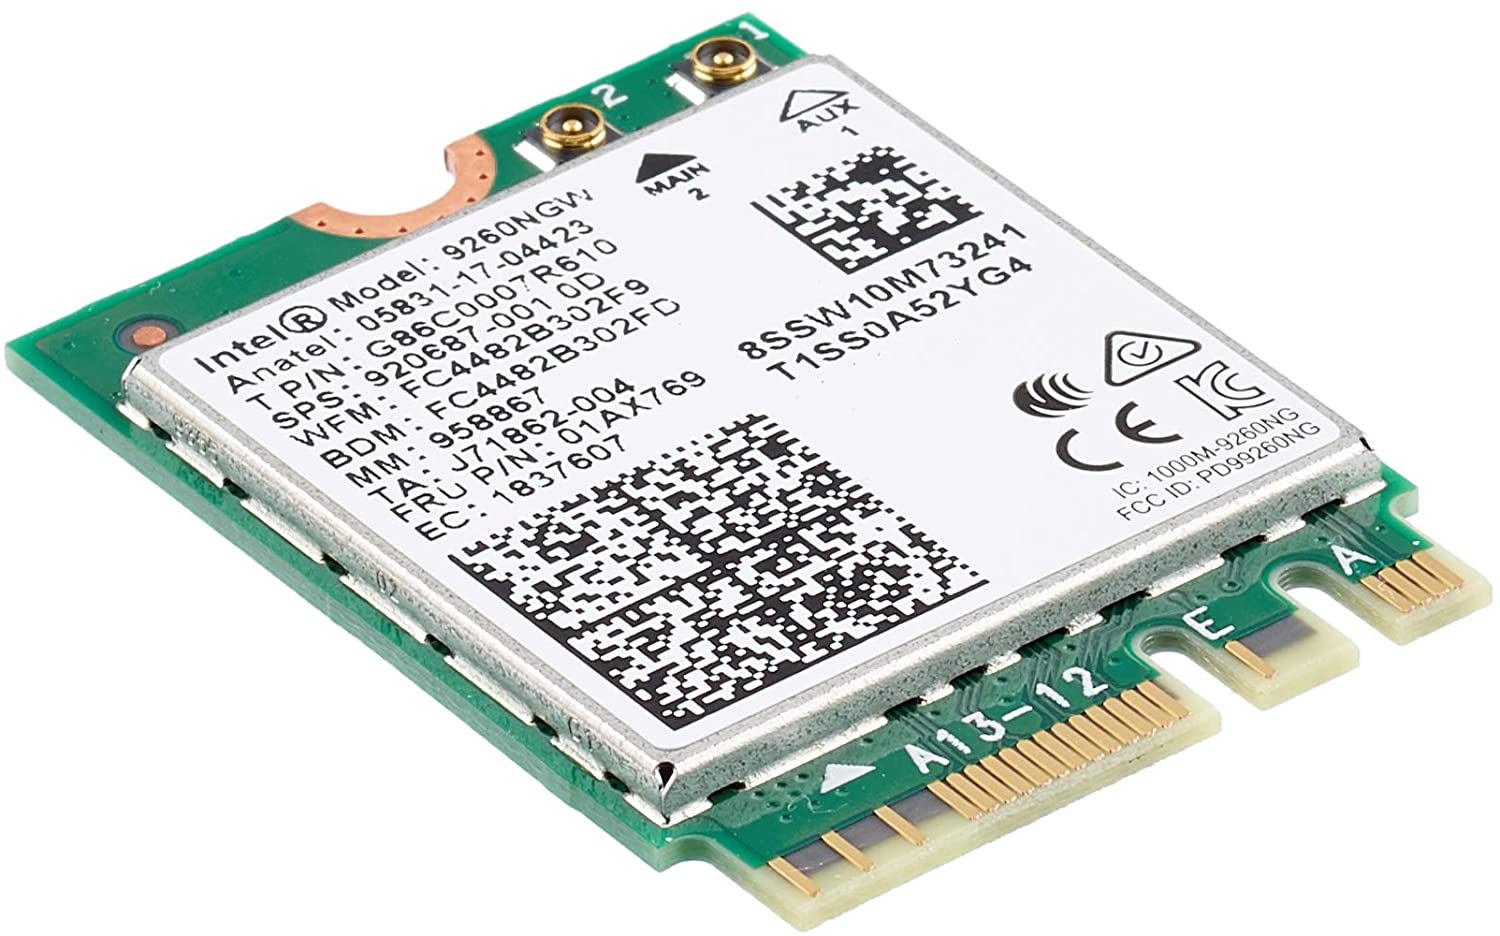
Error code 10, device manager code occurs when Bluetooth or Wi-Fi cannot be enabled. Inside device manager beside device would be yellow exclamation sign and if you go into device properties status would be: This device cannot start.
Following are proven solutions that will resolve the issue and provide you with a working device.
Reboot PC, check for switch
This simple solution can usually work in most cases, first thing is to check if by any chance hardware switch for Wi-Fi or Bluetooth is OFF (laptops have a small switch that can turn the device On or OFF), then if you do not have a switch or you made sure it is ON, reboot your system.
Run Network Adapter Troubleshooter
If previous simple step solutions have not proven to be effective run Network Adapter Troubleshooter
Press WINDOWS + I to open settings
Go to System > Troubleshoot > Other troubleshooters
Inside Find Network Adapter
Click on Run to start the troubleshooters
Disable and then re-enable Adapter
If the previous solution has not fixed the issue try disabling the adapter and then re-enabling it back.
Update network adapter
Go to the intel website and download the latest driver package. After the download is finished install the latest driver.
Turn ON the WLAN AutoConfig service
Press Windows key + R to invoke the Run dialog.
In the Run dialog box, type services.MSC and hit Enter to open Services.
In the Services window, scroll and locate the WLAN AutoConfig service.
Double-click on the entry to edit its properties.
In the properties window, click the drop-down on the Startup type and select Automatic.
Next, make sure the Service status is started and running.
A lot of users complain about low storage space each time a Windows Feature update is released as well as to complain about not being able to download the updates, slow update experience, and many other complaints. The main issue is that many users do not have enough storage space available on their PCs. And now to make sure that none of the updates gets stuck because of low storage space, Microsoft presented the Reserved Storage feature which comes preinstalled with v1903 or those where v1903 was clean installed. This guide will be showing you how you can enable or disable the Reserved Storage in your Windows 10 computer.
As you know, the Windows Update process should have enough space so that it can download, extract and apply the update on the computer. Usually, the size of the Reserved Storage is around 7GB which gives enough space for the update, temporary files, system caches, apps, and many more. And according to Microsoft, the size of the Reserved Storage space will vary from time to time and will depend on how you use your computer.
Explanation
The Reserved Storage space feature is enabled by default on devices that come preinstalled with the May 2019 update or after performing a clean installation of the Windows 10 OS. To check if your computer has this feature, you need to go to Settings > System > Storage and from there click on the “Show more categories” link and then click on the “System & reserved” option. However, if you can’t find the Reserved Storage from the list, then it’s probably because your computer has limited space on the hard disk or it is not a fresh or new install. On the other hand, if you have this feature but have no use for it and want to disable it instead, then read on as this post will also show you how it’s done.
Solution
Keep in mind that when you disable the Reserved Storage feature, chances are, you might be unable to enable it back so you need to make sure that it’s really what you want to do before you disable it permanently. So if you really want to disable Reserved Storage, you can do so using the Registry Editor. Before you proceed, you have to create a System Restore point first and then carry out the following steps.
Tap the Win + R keys to launch the Run utility and type “Regedit” in the field and then tap Enter to open the Registry Editor.
Next, navigate to this registry path: ComputerHKEY_LOCAL_MACHINESOFTWAREMicrosoftWindowsCurrentVersionReserveManager
From there, double click on the DWORD named “ShippedWithReserves” and set its value to “1”.
Once you’re done, restart your computer and see if the Reserved Storage feature is now gone.
On the other hand, if you want to reduce the Reserved Storage space, there are two ways you can do that. First, you can go to Settings > Apps > Apps & features > Manage optional features and from there, uninstall the optional features that you do not use. The second one is you have to go to Settings > Time & Language > Language and then uninstall the languages and their add-on which you don’t use.
Note: The Reserved Storage feature is also used by system processes and apps to create temporary files and once the Reserved Storage space fills up, Windows 10 will delete them automatically. It is undeniable a useful feature so disabling it is not recommended but if you are running on low storage space and don’t have much choice, then you may disable it at your own risk.
Internal error 2753 is associated with Windows Installer failure. The Windows Installer is basically an in-built software program in Windows 7 and 8.
It installs all programs on the system smoothly, saves the program in the computer program files and in the Windows Registry.
Though this can be carried manually Windows Installer makes the installation process much easier.
However, internal error 2753 can cause a great deal of distress and frustration during program installation. This error prevents you from installing your desired program successfully.
Solution
Error Causes
The 2 known causes for Internal Error 2753 are:
Viral infection
Windows Installer not properly registered
Further Information and Manual Repair
To resolve internal error 2753 on your system, try the methods discussed below. These methods are easy and require no technical expertise.
Let’s get started:
Method 1 - Remove All Malicious Programs
Malicious programs like viruses, malware, adware, Trojan and spyware can corrupt programs on your PC like Windows Installer.
If this is the underlying cause of error code 2753, then simply download a powerful antivirus on your system. Run it to scan for all such malicious programs and remove them.
Once your PC is clean, try installing your desired program. This will hopefully resolve the issue. If the error still pops up then try method 2.
Method 2 - Register Windows Installer Properly
To do this, go to the start menu and then open Run and type ‘cmd’ in the box, and press OK. This will open the DOS command window.
In the command prompt type "regsvr32 vbscript.dll" and then press Enter to proceed. After that, you will see a message that will read as "DllRegisterServer in vbscript.dll succeeded."
This means Window Installer files have been successfully registered on your PC. Now you can try installing your desired program again.
If the installation begins and completes successfully, then the error is resolved.
Method 3 - Undo Recent Changes
If nothing works, then use the Windows System Restore Utility tool to undo recent changes. This will bring back your PC in the former state before you experienced the error 2753 on your PC.
To access System Restore Utility, press Start and type System Restore in the search box. Now follow the steps in the Wizard to choose a restore point. Once you select the point, reboot your system to activate changes.


 Since this requires registry tweak, please follow given solution step by step

 Following are proven solutions that will resolve the issue and provide you with a working device.
