Logo

Quick Workarounds to Repair Error 126

What Is Error 126?

Error 126 is a very commonly occurring error that is often the result of damaged system files of Windows. They usually occur during the installation of some Windows program or application. When Error 126 is generated, it terminates the installation process almost instantly.

It is important to take corrective measures immediately to ensure that no such problems are encountered again in the future.

Solution

Restoro box imageError Causes

There are a variety of conditions that may trigger Error 126. These conditions are listed below as follows.

  • Corruption of the service-related DLL file
  • Missing or damage service-related DLL file
  • Corrupt, damaged, or Misconfigured system files
  • Improper hardware or application installations or uninstallations
  • Existence of viruses, malware, adware, or spyware in the system
  • Corrupt or incorrect registry entries in the system files

When any of the above-listed conditions occur, the corrupt system files will go to the improper links or missing information.

Eventually, the problems with the files will keep the applications or programs from responding in the usual manner. Whatever are the reasons for error generation, it is of utmost importance that the error is removed to ensure smooth functioning of the system.

Further Information and Manual Repair

There are many different ways this error can be rectified. However, the two most effective solutions are listed below as follows.

  • This solution is for the advanced user. Turn on the system and log on to it as the Administrator. Now click on the Start button. Now click on All programs -> Accessories -> System Tools. Here you will come across the option for System Restore. Click on it. A new window will appear. Select 'restore my computer to an earlier time' point. Now clock on Next. A list of restore points will now appear in front of you. Choose the latest restore point you come across from this list and click on ‘Next’. In the next window that opens, click on ‘Next’ again. This is the confirmation window. Once the restoration finishes, restart your computer.
  • This solution is for novice users. Download an Error 126 repair utility program. Install it on your system. Now use it to scan your system for errors. Find out if there is an option to fix/repair error. When you come across it, click on it as soon as the scan is complete. Restart your computer. Your system is now free of Error 126.

Do You Need Help with Your Device?

Our Team of Experts May Help
Troubleshoot.Tech Experts are There for You!
Replace damaged files
Restore performance
Free disk space
Remove Malware
Protects WEB browser
Remove Viruses
Stop PC freezing
GET HELP
Troubleshoot.Tech experts work with all versions of Microsoft Windows including Windows 11, with Android, Mac, and more.

Share this article:

You might also like

Edge and Store apps are not connecting
If your Microsoft Edge browser and Windows Store apps are now unable to connect to the internet after you have just installed the newly released Windows 10 v1809 October 2018 update, then this post might help. As you know, Microsoft has made a change recently and because of this, some users are getting the “Hmm, we can’t reach this page” error when they try to open Microsoft Edge as well as other pre-installed apps like News, Mail, and so on. Aside from that, you also won’t be able to connect the Microsoft Store apps to the internet. What’s strange is that you can connect to the internet using other programs like Google Chrome, Internet Explorer, and many more. Apart from checking your internet connection, there are other things you can to resolve the problem. If your Windows Store apps are not able to connect to the internet and you’re only getting the Error 80072EFD, then you might have to enable IPv6 as the new Windows 10 v1809 requires IPv6 to be enabled so that you can use the UWP apps. And so you have to enable IPv6 in the network card along with IPv4. To do so, follow the steps below. Step 1: Tap the Win + R keys to open the Run dialog box. Step 2: After that, type “ncpa.cpl” and hit Enter or click OK to open Network Connections. From there, you will see your currently connected network profile. Step 3: Right-click on your network profile and select Properties and then go to the Networking tab and look for the “Internet Protocol Version 6 (TCP/IPv6)” and select its corresponding checkbox. Step 4: Now click the OK button to save the changes made and restart your computer.
Read More
Change the Taskbar Size in Windows 11
Default Taskbar inside Windows 11 is pretty good if we are talking about its height. Sitting at 48 pixels it is a pretty decent size considering functionality and size ratio but if you want to make it a little larger or smaller know that you can do that as well in order to customize it for your personal needs. Sadly in order to actually change height size, you will have to do it inside the registry editor, but worry not, we are here with you to guide you all the way, one step at a time. Also, note that you can only change Taskbar from normal size of 48px to either small of 32px or large gapping at 72px. Icons will also be scaled proportionally with the taskbar.

windows 11 TaskbarGuide

  1. Press ⊞ WINDOWS + R to open the run dialog
  2. Inside run dialog type in RegEdit and press ENTER
  3. In registry editor locate and find HKEY_CURRENT_USER\Software\Microsoft\Windows\CurrentVersion\Explorer\Advanced
  4. Right Click on it to select it and create a new DWORD (32-bit) value
  5. Name the value TaskbarSi
  6. Inside TaskbarSi double click in order to set the value to 0 if you want a small size Taskbar, 1 is if you want to revert back to medium (standard one), or type in 2 if you want a large Taskbar.
  7. Save and close the Registry editor
  8. Reboot PC
And there you go, you have successfully changed Taskbar size inside Windows 11. If you want to revert back to standard size just repeat steps and place 1 as a value in point 6.
Read More
2 Proven Methods to Fix Regsvr32 Error

What is Regsvr32 Error? - What Is It?

Regsvr32 is basically a command-line utility.

This command is used to register and unregister OLE controls for example the digital link library files and ActiveX controls in the Windows Registry. This command appears as the Regsvr32.exe file and is installed in the Microsoft Windows system file in the %systemroot%System32 folder.

The Regsvr32 command loads the library and tries to call the DllRegister Server and DllUnregister Server. In other words, it helps to register COM-based digital link library files to run different programs on your PC.

However, when the Regsvr32.exe file gets corrupt, you get the Regsvr32 to troubleshoot the error message on your computer screen. It can be displayed in various ways including the following:

“To register a module, you must provide a binary name.”

Error Causes

Generally, Regsvr32.exe becomes corrupt because either the load library, DllRegister Server or DllUnregister Server function fails. This indicates that the dll specified path was missing, incorrect, or couldn’t be found.

Here’s how the error messages are often displayed while registering a dll using Regsvr32.exe:

  • “The command-flag "%1" is not valid. Please review the command usage and try again.”

If this error message is displayed, it typically means that you entered an invalid combination of command-line arguments or switches when calling upon the Regsvr32.exe application.

  • “To register a module, you must provide a binary name.”

The cause of this error message is that you called the Regsvr32.exe function with no modules to register located in the command line arguments.

  • “The module "%1" failed to load.nn Make sure the binary is stored at the specified path or debug it to check for problems with the binary or dependent .DLL files.nn%2.”
This Regsvr32 error message indicates that Windows had problems with loading the modules that you have identified in the command line.

Further Information and Manual Repair

Here are 2 recommended solutions to fix the Regsvr32 error on your PC:
  1. Re-run the command

    You must re-run the Regsvr32 command from an elevated command prompt. For this, go to the start menu and type Command Prompt in the search box.

    Now right-click the Command Prompt and click the option that says Run as Administrator to run the command on your PC. If it prompts you to enter an administrator password, type the password and then click Allow to run the command.

  2. Register a 32-bit Dll using a 32-bit version of Regsvr32 on a 64-bit version of Windows

    This may sound tricky but it is even simpler than the first solution discussed above. To register a 32-bit DLL using a 32-bit version of Regsvr32 on a 64-bit version of Windows, open an elevated command prompt.

    After it’s opened, if you see the 32-bit DLL is located in the following path: %systemroot%System32 folder, move it to %systemroot%SysWoW64 folder. Once you change paths, run this command: %systemroot%SysWoW64regsvr32 <full path of the DLL>

Try following these 2 recommended solutions to immediately fix and repair this error on your computer.

The solutions should eliminate the occurrence of error messages such as “To register a module, you must provide a binary name.” It is so easy and effective and you can do it on your own without calling over a professional.

Congratulations, you have just fixed the Regsvr32 Error in Windows 10 all by yourself. If you would like to read more helpful articles and tips about various software and hardware visit errortools.com daily. Now that’s how you fix Regsvr32 Error in Windows 10 on a computer. On the other hand, if your computer is going through some system-related issues that have to get fixed, there is a one-click solution known as Restoro you could check out to resolve them. This program is a useful tool that could repair corrupted registries and optimize your PC’s overall performance. Aside from that, it also cleans out your computer for any junk or corrupted files that help you eliminate any unwanted files from your system. This is basically a solution that’s within your grasp with just a click. It’s easy to use as it is user-friendly. For a complete set of instructions in downloading and using it, refer to the steps below Perform a full system scan using Restoro. To do so, follow the instructions below.
      1. Download and install Restoro from the official site.
      2. Once the installation process is completed, run Restoro to perform a full system scan.
      3. After the scan is completed click the “Start Repair” button.
Read More
Setting default applications in Windows 11
Setting default applications in Windows 11
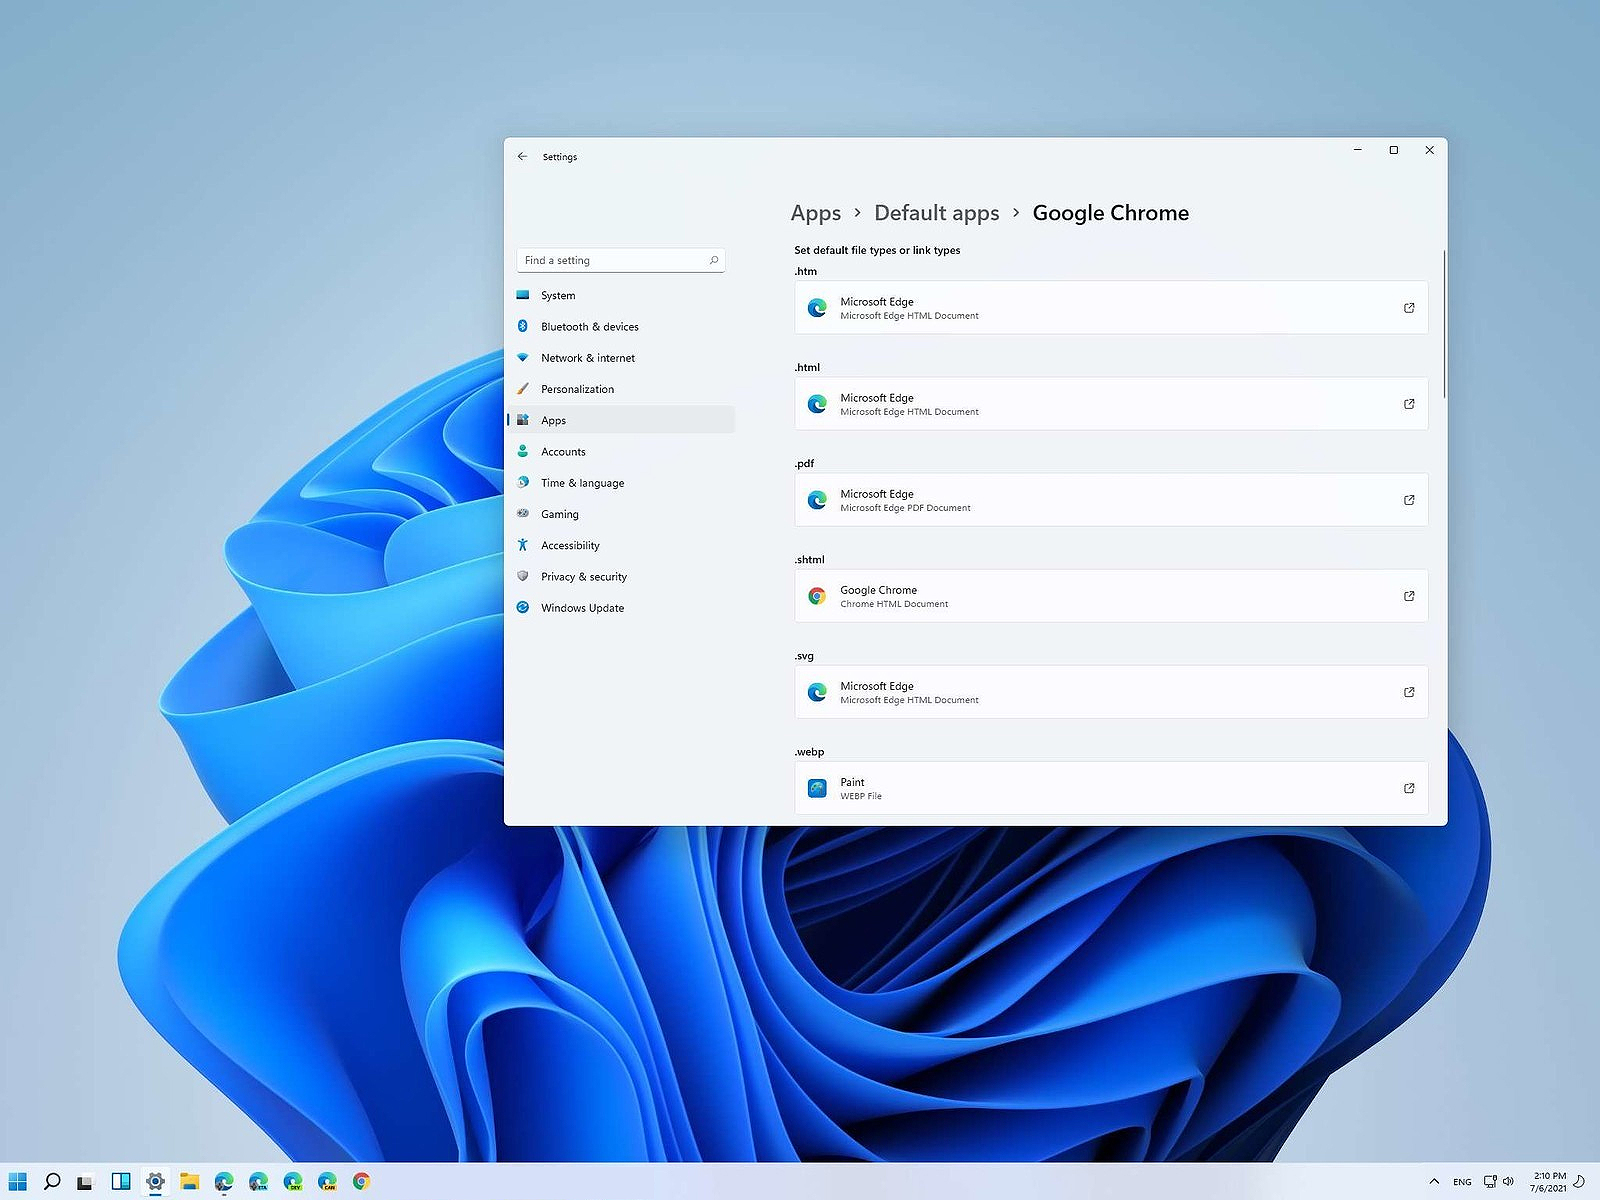
Same as in previous Windows versions, Windows 11 will also use certain applications as default ones for opening certain file types and file extensions. And yes, same as in previous versions it will come preconfigured for certain file types and associated applications like for example photos for pictures. Of course, users usually have their own favorite applications for certain file types and much more prefer to open them inside the application of their choice instead of the default one. We can change the default application like in previous Windows versions but this time there are two ways and overall more control of this process. Windows 11 has settings for choosing default file type applications and default file extension applications giving you more control of this process.

The opening setting for apps

Whatever you wish to change default application or default extension application you will need to open settings for default application. Follow steps to quickly go into it.
  1. Press ⊞ WINDOWS + I to open settings
  2. Select Apps on left
  3. On the right part select Default Apps
Now you are in settings for choosing default applications

Choosing default application by file type extension

This is considering by Microsoft as a typical way to set default applications inside Windows 11. Once you are inside the settings app there is a box labeled Enter a file type or link type. Inside the search box, type in file extension that you wish to associate the application with like .JPG, .TXT, or other. If the file extension is not associated with any application you will be presented with a Choose a Default button, if however, the file extension is already associated with the app, you will need to click on the app box itself. In any case, a pop-up will appear and ask How do you want to open YOUR FILE EXTENSION files from now on? Choose Application from the list of presented ones and click on OK.

Choosing default file type

Another method is to select the default application by file type selecting application for it. In the settings screen, under the search box, you will have a list of installed applications. Choose the application that you would like to associate a file type with and click on it. On the next details screen scroll down and select the file type that you want to associate with the selected application and click on OK.

Other/third method

There is also the third method for choosing the default application for file type but it includes some surfing on your hard drive and it can be more time-consuming for first-time settings. But it is fairly quick when you need to only use it once on some new file type (for example you have a new application installed and want to switch just one file type extension to that application). Locate the file that you want to associate with the application and right-click on it. Select Open With from the menu and then Choose Another App. Pop up will appear, select the application that you would like to use, and check the box beside Always use this app to open CHOOSEN EXTENSION files followed by clicking on the OK button.
Read More
Fix Display driver failed to start Error
Recently, a number of users reported an error when they tried to open graphic-intensive apps like video games. According to users, when they tried to open an app, they get the “Display driver failed to start” error instead. Thus, if you encounter the same error, then you’ve come to the right place as this post will guide you on how exactly you can fix it. Here’s the full content of the error message:
“Display driver failed to start; using Microsoft Basic Display Driver instead. Check Windows Update for a newer display driver.”
This kind of error could be due to several factors. It is possible that it could be a result of a corrupted or outdated graphics driver. Aside from that, it could also be due to some issues with the system settings. Worry not though for there are potential fixes that can help you fix the problem. But before you troubleshoot the problem, you need to update your Windows 10 computer first and if it didn’t help fix the problem, then here are the potential fixes that should help resolve the “Display driver failed to start” error.

Option 1 – Try to restart the Graphics driver

Although Windows 10 can recover the graphics driver on its own when it crashes, there are times when it fails to do its job. To restart the graphics driver in your computer, simply tap the Win + Ctrl + Shift + B key combination. After that, the graphics driver will be back in less than a second.

Option 2 – Try running the Hardware and Devices troubleshooter

Running the built-in hardware and devices troubleshooter can also help you in fixing the “Display driver failed to start” error.
  • The first thing you need to do is click on Start and then on the gear-like icon to pull up the window for Settings.
  • After opening Settings, look for the Update and Security option and select it.
  • From there, go to the Troubleshoot option located on the left-hand side of the list.
  • Next, select Keyboard from the list and open the Troubleshooter and run it. Once it is doing its job, wait for it to complete the process and then restart the system.
  • After the system restarts, check if the problem’s now fixed. If not, refer to the next option given below.

Option 3 – Try to update or rollback the Graphics driver

You can try to update your Graphics card driver using the Device Manager in your computer to resolve the “Display driver failed to start” error or you can also go directly to the website of your graphics card manufacturers like NVIDIA, Intel, or AMD and go to the section called Drivers then check if there’s a new available update – if there is, download and install it. To update your Graphics driver via Device Manager, refer to these steps:
  • First, boot your computer into Safe Mode.
  • After that, tap the Win + R keys to launch Run.
  • Type in devmgmt.msc into the box and tap Enter or click OK to open the Device Manager.
  • After that, a list of device drivers will be displayed. From there, look for the Display Adapters and click on them.
  • After that, right-click on each entry under the Display Adapters and select the “Uninstall Device” option from the menu.
  • Now restart your computer.
  • After restarting your computer, go to the Settings app and Check for Updates in the Windows Update section.

Option 4 – Try setting your system for maximum performance

If the first three options didn’t fix the error, you can try setting your computer for maximum performance since Windows 10 allows you to choose the effects you want to activate your system and you can do this by adjusting the performance ratio. Adjusting the performance ratio can be done via a certain setting in your computer – and this setting should be set to “Maximum Performance” to resolve the error.
  • In the Windows Search bar, type in “performance” and from the search results that appear, select the “Adjust the appearance and performance of Windows” option.
  • Next, a mini window will appear and from there, click on the radio button that says, “Adjust for best performance”.
  • Once done, click on the Apply and OK buttons to save the changes made. This should resolve the problem.
Read More
Babylon Removal Tutorial

What is Babylon?

Babylon is a self-published computer dictionary and translation program. Babylon is a tool used for translation and conversion of currencies, measurements, and time, and for obtaining other contextual information. The program also uses a text-to-speech agent so users hear the proper pronunciation of words and text. Babylon’s translation software adds the Babylon toolbar identified as a browser hijacker. This toolbar may modify the homepage of the browser. It adds a Scheduled Task, Startup file, and Registry Keys that allow it to run at any time. A Windows Firewall exception is also added for the software, allowing it to connect to the internet without content.

About Browser Hijackers

Browser hijacking is actually a type of unwanted software program, commonly a browser add-on or extension, which causes modifications in browser settings. Browser hijackers will do a number of things on your computer. Often, hijackers will force hits to internet sites of their choice either to increase targeted traffic generating higher ad revenue, or to obtain a commission for each and every user visiting there. It could seem harmless, but the majority of these websites aren’t legitimate and can present a significant risk to your online safety. Additionally, hijackers can make the entire infected system fragile – other harmful malware and viruses will take hold of these opportunities to get into your PC effortlessly.

Signs of browser hijacker malware

There are several symptoms of browser hijacking. Here are a few of them: the home page of your browser is changed all of a sudden; new bookmarks pointing to porn websites are added to your favorite pages; the default browser settings have been modified and/or your default search engine is altered; unsolicited new toolbars are added to your internet browser; you notice a lot of pop-ups on your computer screen; your web browser gets sluggish, buggy, crashes frequently; you cannot go to certain sites such as homepages of anti-malware software.

How it infects your computer

Browser hijackers may use drive-by downloads or file-sharing networks or perhaps an email attachment in order to reach a targeted computer system. They may also originate from any BHO, browser extension, toolbar, add-on, or plug-in with malicious intent. Sometimes you might have accidentally accepted a browser hijacker as part of a software bundle (usually freeware or shareware). Examples of well-known browser hijackers include Fireball, GoSave, Ask Toolbar, CoolWebSearch, Babylon Toolbar, and RocketTab. The existence of any browser hijacker on your system will considerably diminish the browsing experience, monitor your online activities that lead to troublesome privacy issues, produce system stability issues and finally cause your PC to slow down or to a nearly unusable state.

Browser hijacker removal tips

Some hijackers can be easily removed by deleting the free software they were included with or by eliminating any add-ons you’ve recently added to your computer system. Sadly, most of the software packages used to hijack a web browser are intentionally designed to be hard to eliminate or detect. And there’s no denying the fact that manual fixes and removal can be quite a difficult task for an inexperienced PC user. Besides, there are numerous risks associated with fiddling around with the pc registry files. Anti-malware application is extremely efficient when it comes to picking up and eliminating browser hijackers that regular anti-virus program has overlooked. To get rid of any kind of browser hijacker from your PC, you could download this top-notch malware removal tool – Safebytes Anti-Malware.

What To Do If You Cannot Install Safebytes Anti-Malware?

Practically all malware is inherently unsafe, but certain types of malicious software do much more damage to your computer than others. Certain malware types alter browser settings by adding a proxy server or modify the PC’s DNS configurations. In such cases, you will be unable to visit some or all websites, and thus unable to download or install the required security software to clear out the infection. So what you should do if malware prevents you from downloading or installing Anti-Malware? Even though this sort of problem can be tougher to get around, there are some actions you can take.

Boot Windows in Safe Mode

If the malware is set to run at Windows start-up, then booting in Safe Mode should prevent it. Just the minimum required applications and services are loaded when you start your laptop or computer into Safe Mode. To launch your Windows XP, Vista, or 7 computers in Safe Mode with Networking, follow the instructions below. 1) After switching on the computer, hit the F8 key before the Windows splash screen begins to load. This should bring up the Advanced Boot Options menu. 2) Use the arrow keys to select Safe Mode with Networking and press ENTER. 3) Once this mode loads, you should have the internet. Now, make use of your internet browser normally and navigate to https://safebytes.com/products/anti-malware/ to download Safebytes Anti-Malware. 4) Immediately after installation, do a full scan and allow the software to delete the threats it detects.

Obtain the antivirus software using a different browser

Certain malware may target vulnerabilities of a particular browser that obstruct the downloading process. The best way to overcome this problem is to opt for a web browser that is well known for its security measures. Firefox comprises built-in Phishing and Malware Protection to help keep you secure online.

Install security software on a flash drive

Another option is to store and run an antivirus program completely from a Thumb drive. Try these simple actions to clear up your affected computer using a portable antivirus. 1) Use another virus-free computer to download Safebytes Anti-Malware. 2) Mount the USB drive onto the same PC. 3) Double-click the exe file to run the installation wizard. 4) When asked, choose the location of the pen drive as the place in which you would like to store the software files. Do as instructed on the screen to finish up the installation process. 5) Remove the flash drive. You may now utilize this portable anti-malware on the infected computer. 6) Double-click the antivirus software EXE file on the pen drive. 7) Press the “Scan Now” button to start the virus scan. If all the previously mentioned methods are not able to help you in downloading and installing the anti-malware, then you have no option but to reinstall the computer’s operating system to wipe out all of the data, including the harmful programs which are obstructing the anti-malware installation. If you are unclear regarding which method works best for you, simply call 1-844-377-4107 to speak to our computer professionals who can walk you through the process to fix your infected computer system.

SafeBytes AntiMalware Overview

Today an anti-malware program can protect your PC from different kinds of internet threats. But how to decide on the best one among countless malware protection application that is available in the market? You may be aware, there are several anti-malware companies and products for you to consider. A few of them do a good job in eradicating malware threats while many will harm your computer themselves. While looking for an anti-malware program, pick one which provides dependable, efficient, and total protection against all known computer viruses and malware. With regards to commercial application options, many people select popular brands, like SafeBytes, and they are quite happy with it. Safebytes is among the well-established computer solutions firms, which offer this all-inclusive anti-malware program. When you have installed this software, SafeBytes' sophisticated protection system will make sure that no viruses or malware can seep through your PC. SafeBytes anti-malware provides a myriad of enhanced features which set it apart from all others. The following are some of the great features included in the tool. Optimum AntiMalware Protection: With its enhanced and sophisticated algorithm, this malware removal tool can detect and remove the malware threats hiding within your computer system effectively. Real-time Active Protection: SafeBytes offers entirely hands-free real-time protection and is set to monitor, block, and destroy all computer threats at its very first encounter. They’re highly efficient in screening and getting rid of numerous threats because they’re regularly revised with new updates and safety measures. Web Filtering: Through its unique safety score, SafeBytes notifies you whether a site is safe or not to visit it. This will ensure that you’re always certain of your online safety when browsing the world wide web. Light-weight: This program is not “heavy” on the computer’s resources, so you’ll not notice any performance difficulties when SafeBytes is operating in the background. 24/7 Guidance: You can obtain totally free 24/7 technical assistance from their IT experts on any product queries or PC security concerns. SafeBytes has put together an excellent anti-malware solution to help you conquer the latest computer threats and virus attacks. There is no doubt that your computer system will be protected in real-time as soon as you put this software to use. So if you’re trying to find a comprehensive antivirus program that’s still easy to use, SafeBytes Anti-Malware is exactly what you need!

Technical Details and Manual Removal (Advanced Users)

If you wish to manually remove Babylon without the use of an automated tool, it may be possible to do so by removing the program from the Windows Add/Remove Programs menu, or in cases of browser extensions, going to the browsers AddOn/Extension manager and removing it. You will likely also want to reset your browser. To ensure the complete removal, manually check your hard drive and registry for all of the following and remove or reset the values accordingly. Please note that this is for advanced users only and may be difficult, with incorrect file removal causing additional PC errors. In addition, some malware is capable of replicating or preventing deletion. Doing this in Safe Mode is advised. The following files, folders, and registry entries are created or modified by Babylon
Files: $APPDATABabylonToolbarBabylonToolbar $APPDATABabylonToolbar $PROGRAMFILESBabylonToolbarBabylonToolbar $PROGRAMFILESBabylonToolbar Registry: key HKEY_CLASSES_ROOT named Babylon.dskBnd. key HKEY_CLASSES_ROOT named Babylon.dskBnd key HKEY_CLASSES_ROOT named bbylnApp.appCore. key HKEY_CLASSES_ROOT named bbylnApp.appCore key HKEY_CLASSES_ROOT named bbylntlbr.bbylntlbrHlpr. key HKEY_CLASSES_ROOT named bbylntlbr.bbylntlbrHlpr key HKEY_CLASSES_ROOT named bbylntlbr.xtrnl” key HKEY_CLASSES_ROOT named bbylntlbr.xtrnl key HKEY_CLASSES_ROOT named escort.escortIEPane. key HKEY_CLASSES_ROOT named escort.escortIEPane key HKEY_CLASSES_ROOT named escort.escrtBtn. key HKEY_CLASSES_ROOT named esrv.BabylonESrvc. key HKEY_CLASSES_ROOT named esrv.BabylonESrvc key 09C554C3-109B-483C-A06B-F14172F1A947 at HKEY_CLASSES_ROOTTypeLib. key 2EECD738-5844-4a99-B4B6-146BF802613B at HKEY_CLASSES_ROOTCLSID. key 2EECD738-5844-4a99-B4B6-146BF802613B at HKEY_LOCAL_MACHINESOFTWAREMicrosoftWindowsCurrentVersionExplorerBrowser Helper Objects. key 3718D0AF-A3B8-4F5E-86F3-FAD8D02043BE at HKEY_CLASSES_ROOTInterface. key 4E1E9D45-8BF9-4139-915C-9F83CC3D5921 at HKEY_CLASSES_ROOTTypeLib. key 6E8BF012-2C85-4834-B10A-1B31AF173D70 at HKEY_CLASSES_ROOTTypeLib. key 706D4A4B-184A-4434-B331-296B07493D2D at HKEY_CLASSES_ROOTInterface. key 78868069-5D96-4B47-BE52-3D625EE3D7CB at HKEY_CLASSES_ROOTInterface. key 78888F8B-D5E4-43CE-89F5-C8C18223AF64 at HKEY_CLASSES_ROOTInterface. key 8B8558F6-DC26-4F39-8417-34B8934AA459 at HKEY_CLASSES_ROOTInterface. key 94C0B25D-3359-4B10-B227-F96A77DB773F at HKEY_CLASSES_ROOTInterface. key 98889811-442D-49dd-99D7-DC866BE87DBC at HKEY_CLASSES_ROOTCLSID. key 9E393F82-2644-4AB6-B994-1AD39D6C59EE at HKEY_CLASSES_ROOTInterface. key A3A2A5C0-1306-4D1A-A093-9CECA4230002 at HKEY_CLASSES_ROOTInterface. key AD25754E-D76C-42B3-A335-2F81478B722F at HKEY_CLASSES_ROOTAppID. key AD25754E-D76C-42B3-A335-2F81478B722F at HKEY_CLASSES_ROOTTypeLib. key B0B75FBA-7288-4FD3-A9EB-7EE27FA65599 at HKEY_CLASSES_ROOTInterface. key B12E99ED-69BD-437C-86BE-C862B9E5444D at HKEY_CLASSES_ROOTTypeLib. key B173667F-8395-4317-8DD6-45AD1FE00047 at HKEY_CLASSES_ROOTInterface. key B8276A94-891D-453C-9FF3-715C042A2575 at HKEY_CLASSES_ROOTCLSID. key BDB69379-802F-4eaf-B541-F8DE92DD98DB at HKEY_CLASSES_ROOTAppID. key BFE569F7-646C-4512-969B-9BE3E580D393 at HKEY_CLASSES_ROOTInterface. key C2434722-5C85-4CA0-BA69-1B67E7AB3D68 at HKEY_CLASSES_ROOTInterface. key C2996524-2187-441F-A398-CD6CB6B3D020 at HKEY_CLASSES_ROOTInterface. key C8D424EF-CB21-49A0-8659-476FBAB0F8E8 at HKEY_CLASSES_ROOTInterface. key D7EE8177-D51E-4F89-92B6-83EA2EC40800 at HKEY_CLASSES_ROOTTypeLib. key E047E227-5342-4D94-80F7-CFB154BF55BD at HKEY_CLASSES_ROOTInterface. key E3F79BE9-24D4-4F4D-8C13-DF2C9899F82E at HKEY_CLASSES_ROOTInterface. key E46C8196-B634-44a1-AF6E-957C64278AB1 at HKEY_CLASSES_ROOTCLSID. key E77EEF95-3E83-4BB8-9C0D-4A5163774997 at HKEY_CLASSES_ROOTInterface. key FFB9ADCB-8C79-4C29-81D3-74D46A93D370 at HKEY_CLASSES_ROOTCLSID. key BabylonToolbar at HKEY_CURRENT_USERSoftware. key BabylonToolbar at HKEY_LOCAL_MACHINESOFTWARE. key dhkplhfnhceodhffomolpfigojocbpcb at HKEY_LOCAL_MACHINESOFTWAREGooglechromeExtensions. key escort.DLL at HKEY_CLASSES_ROOTAppID. key esrv.EXE at HKEY_CLASSES_ROOTAppID. value 98889811-442D-49dd-99D7-DC866BE87DBC at HKEY_LOCAL_MACHINESOFTWAREMicrosoftInternet ExplorerToolbar.
Read More
INF file doesn't support this installation
If you got an error message saying, The INF file you selected does not support this method of installation while trying to install a driver using the “Install” option in the right-click context menu, read on as this post will guide you in fixing the problem. The INF file mentioned in the error message is a text file that’s divided into different types of formatted sections. Each one of the sections is designed for a particular purpose. For instance, one section is designed to copy files or to add entries to the registry. INF files are used to install drivers. However, if something is wrong, you might encounter this error while installing a driver on your Windows 10 computer. To resolve this problem, you can try to download the driver again from the official manufacturer website or check if the driver is compatible with your computer’s operating system architecture or you can also try installing the driver from the Device Manager. For more details, follow the given options below.

Option 1 – Try downloading the driver again from the official website of the manufacturer

Usually, you shouldn’t encounter this kind of issue no matter what installation method you used on your Windows 10 PC. However, there are times when the driver itself is corrupted for some reason which is why you are unable to complete the installation and receive an error message instead.

Option 2 – Try checking if the driver is compatible with the OS architecture

It is possible that you’re getting this error if you have a driver that is compatible with a 32-bit system and you are trying to install it on a 64-bit system and vice versa. Thus, you need to check if the driver you are trying to install is compatible with your operating system if you haven’t done it when you’ve downloaded the driver from the website of the manufacturer. To check the system architecture, in the Start Search, type “msinfo32” in the field and hit Enter to open the System Information window. From there, you should see all the information about your operating system. In addition, you can also search “system information” in the Cortana search box and look for the System Type entry and open it.

Option 3 – Try installing the driver from the Device Manager

If you have the driver files on your PC and you have to update a driver, refer to the steps given below to be guided on how to install the driver from the Device Manager.
  • First, click the Start button and type “device manager”.
  • Then click on the “Device Manager” from the search results to open it.
  • From there, look for the driver you want to update, and then right-click on each one of them and select the Update Driver from the menu.
  • After that, click on the “Browse my computer for driver software” option.
  • Next, select the “Let me pick from a list of available drivers on my computer” option and then click the Next button.
  • On the next screen, you should see the “Have Disk” option. Click on this option and then click on the Browse button to go to the location of the file. After that, you shouldn’t have any problem installing the INF file.

Option 4 – Try running the System File Checker Scan

The SFC or System File Checker scan could detect and automatically repair damaged system files that could be causing the “The INF file you selected does not support this method of installation” error. SFC is a built-in command utility that helps in restoring corrupted files as well as missing files. It replaces bad and corrupted system files with good system files. To run the SFC command, follow the steps given below.
  • Tap Win + R to launch Run.
  • Type in cmd in the field and tap Enter.
  • After opening Command Prompt, type in sfc /scannow
The command will start a system scan which will take a few whiles before it finishes. Once it’s done, you could get the following results:
  1. Windows Resource Protection did not find any integrity violations.
  2. Windows Resource Protection found corrupt files and successfully repaired them.
  3. Windows Resource Protection found corrupt files but was unable to fix some of them.
 Now restart your computer.
Read More
Delete Downloaded, Failed and Pending Windows Updates in Windows 10
There are instances when instead of fixing problems the Windows Update brings you problems on your Windows 10 computer. You might even see some pending Windows Updates which for some reason, refuse to install no matter what you do. The good thing is you won’t have to deal with those failed and pending updates that are incompletely downloaded to your PC as you can actually delete them. Follow the instructions prepared below to delete the failed and pending Windows Updates.

Step 1: The first thing you have to do is delete all the contents in the Temporary folder

  • Tap the Win + R keys to open the Run dialog box.
  • Next, type in “%temp%” in the field and hit Enter or click OK to open the Temporary folder.
  • From there, select all the folders and files within the Temporary folder and then delete them all.
Note: %temp% is one of the many environment variables in Windows that could open the designated folder by Windows as the Temporary folder which is usually located at C:\Users[username]AppDataLocalTemp.

Step 2: Next, remove the pending.xml file

  • Go to the C:\Windows WinSxS folder.
  • Once you’ve opened the folder, look for a file named “pending.xml” file and right-click on it and you can either rename it or delete it.
  • After that, the Windows Update should delete the pending tasks and build a fresh new update.

Step 3: Delete all the contents of the SoftwareDistribution folder

The Software Distribution folder in the Windows operating system is a folder that can be found in the Windows directory and is used to store files temporarily which might be required to install the Windows Update on your PC. Thus, it is required by the Windows Update and maintained by WUAgent. Aside from that, it also contains all the Windows Update History files and once you delete them, you will most likely lose the Update history. As a result, the next time you run the Windows Update, it may result in a longer detection time.
  • Open the WinX Menu.
  • From there, open Command Prompt as admin.
  • Then type in the following command – don’t forget to hit Enter right after typing each one of them.
net stop wuauserv net stop bits
  • After entering these commands, it will stop the Windows Update Service and the Background Intelligent Transfer Service.
  • Next, got to the C:\Windows\Software\Distribution folder and get rid of all the folders and files thereby tapping the Ctrl + A keys to select them all and then click on Delete. Note that if the files are in use, you won’t be able to delete them.
  • Once all the contents in the Software Distribution folder are deleted, restart your PC and then go back to Command Prompt and input the following commands again.
net start wuauserv net start bits
Since the folder has already been flushed, it will be populated afresh the instant your restart your computer and open Windows Update.

Step 4: Try resetting the catroot2 folder

You can also try resetting the catroort2 folder as it is known to fix tons of Windows Update issues. Both the Catroot and catroot2 are Windows operating system folders that are required for the Windows update process.  So when you run the Windows Update, the catroort2 folders stores the signatures of the Windows Update package and helps it in the installation. It makes use of the “%windir%System32catroot2edb.log” file in the updating process. Afterward, the updates are stored in the SoftwareDistribution folder which is used then by the Automatic Updates in order to execute the updating process. Keep in mind that you must not rename or delete the Catroot folder. Although the Catroot2 folder is recreated automatically by Windows, the Catroot folder isn’t.
Read More
WEB sites for cheap game purchases
Gaming can be sometimes a very cheap hobby, sometimes can be really expensive. It really depends on your preferences or gaming habits. So for all of you game spenders, we have compiled a little list of WEB sites where you can find games cheap. Provided sites are checked ones and not scam. You can purchase without concern. Also, note that some of these sites will require you to create an account in order to be able to make a purchase.

List of WEB sites for cheap purchases

is there any deal cheap gamesIs There Any Deal

https://isthereanydeal.com/ Is there any deal really behaves as it sounds, it is basically a search engine tailored to find existing deals on required games. Type in the desired game and see if anywhere you can find a deal on it. The site also features wait for better price options as well as the price history of the game and the trend of its sales.

cheap shark dealsCheap Shark

https://www.cheapshark.com/ On cheap shark by typing game name, you will get its listing on different online retailers, like Steam, EPIC, etc. so you can compare prices among them and pick the best deal. Site packs are also the cheapest ever feature so you can check the lowest price ever on the wished title and you can get alerts and notifications on prices.

humble bundleHumble Bundle

https://www.humblebundle.com/ Humble bundle got famous for its pay what you want approach due to its origins where it was selling games and donate money to charities. Even today they go by this logic once they decide to place great games on sale for charity purposes and you can donate any amount you wish (there is the minimum amount, but it is very cheap). And regular cheap bundles make this site one of the best out there.

fanatical cheap gamesFanatical

https://www.fanatical.com/ Fanatical is a site that will offer you to get titles in a bundle with a discount, the good stuff is that you can create your own bundle and get a discount on bulk purchases. And the site also offers flash deals and holds sales where you can buy stuff cheaper.

sick dealsSlick Deals

https://slickdeals.net/deals/games/ If you are looking for the best deals on daily basis slick deals is the site for you. We could not found a better website that offers cheaper deals on a daily basis and you can subscribe to get notified in email about daily discounts.

green man gamingGreen Man Gaming

https://www.greenmangaming.com/ Green Man Gaming is one of the best stores and game discount sites out there, it might not be the cheapest but one very important thing about it is that keys for Stream and Xbox come directly from the game publisher so you can rest assured that they are all 100% legal and do not come from some third party benefits and resellers. And that's it for now. We hope to see you again on our site for more articles and error fixing tips.
Read More
Fix Windows Update Error 0xc1900403
Running the Windows Update service does not always go well as from time to time, you could encounter some errors when using it. One of these errors is the Windows Update Error 0xc1900403. In such cases, you will see the following error message under the Windows Update section:
“There were problems installing some updates, but we’ll try again later, If you keep seeing this and want to search the web or contact support for information, this may help – 0xc1900403”
The log files displayed in the error message may include, “0XC1900403 – MOSETUP_E_UA_CORRUPT_PAYLOAD_FILES”. This indicates that the payload files are corrupted which is why you’re getting the Windows Update Error 0xc1900403 and to fix it, you can try to restart your computer and install the updates again or reset the Windows Update-related folders. You could also run the Windows Update troubleshooter or use either the Standalone Installer or the Media Creation tool. For more details, refer to each one of the options provided below.

Option 1 – Restart your computer and try installing the Updates again

Restarting your computer can also help in fixing the Windows Update failed to install error 0x80240034. There are cases where the issue resolves on its own as it could just be some simple network or PC error.

Option 2 – Delete the contents in the Software Distribution folder and Catroot2 folder

  • Open the WinX Menu.
  • From there, open Command Prompt as admin.
  • Then type in the following command – don’t forget to hit Enter right after typing each one of them.
net stop wuauserv net start cryptSvc net start bits net start msiserver
  • After entering these commands, it will stop the Windows Update Service, Background Intelligent Transfer Service (BITS), Cryptographic, and the MSI Installer
  • Next, go to the C:/Windows/SoftwareDistribution folder and get rid of all the folders and files thereby tapping the Ctrl + A keys to select them all and then click on Delete. Note that if the files are in use, you won’t be able to delete them.
After resetting the SoftwareDistribution folder, you need to reset the Catroot2 folder to restart the services you just stopped. To do that, follow these steps:
  • Type each one of the following commands.
net start wuauserv net start cryptSvc net start bits net start msiserver
  • After that, exit Command Prompt and restart your computer, and then try to run Windows Update once more.

Option 3 – Try running the Windows Update troubleshooter

You might also want to run the Windows Update Troubleshooter as it could also help in fixing Windows Update Error 0xc1900403. To run it, go to Settings and then select Troubleshoot from the options. From there, click on Windows Update and then click the “Run the troubleshooter” button. After that, follow the next on-screen instructions and you should be good to go.

Option 4 – Try to use the Media Creation tool

The Media Creation tool in Windows allows you to use the ISO installation file to make a bootable device that you can use to install Windows on your PC. Note that this is kind of different from the usual installation process as it could erase your computer’s current settings and data on the primary drive. Thus, before you proceed, you need to backup all your data into some removable drive and then use the Media Creation Tool to make a bootable drive.
  • After making the bootable drive, you need to plug it into your computer and then reboot.
  • Next, tap the F10 or Esc key to open the boot options.
  • Now set the boot priority of the removable drive the highest. Once the setup comes forth, follow the next onscreen instructions and install Windows without any problems.
Read More
1 2 3 171
Logo
Copyright © 2023, ErrorTools. All Rights Reserved
Trademark: Microsoft Windows logos are registered trademarks of Microsoft. Disclaimer: ErrorTools.com is not affiliated with Microsoft, nor claims direct affiliation.
The information on this page is provided for information purposes only.
DMCA.com Protection Status