Logo

MS Visual C++ Runtime Library Error

Microsoft Visual C++ Runtime Library Error

Fix Microsoft Visual C++ Runtime Library Error, Microsoft Windows operating system supports a form of shared libraries that are known as DLL (Dynamic-link libraries). These are also known as code libraries that are used by multiple processes while one copy is loaded into memory.

Runtimes are also code libraries that are loaded by applications when the application is called to run on the system. The most common runtime libraries that are used today are Visual C++ Runtime Library and Java Runtime Environment.

These libraries are practically used for nearly every single application you run on your system. Therefore it is very important that these libraries are in good working order.

Microsoft Visual C++ Runtime Library Error occurs when this runtime library becomes corrupted.

When Microsoft Visual C++ Runtime Library Error occurs, the applications powered by this runtime library fail to run smoothly, resulting in locking you out of those applications and hampering your ability to work on them.

Generally speaking, this error indicates system instability and poor PC maintenance. If this error is not fixed timely it can expose your system to serious PC damages like system freeze, crashes, and data loss.

Solution

Restoro box imageError Causes

Microsoft Visual C++ Runtime Library Error is triggered for numerous reasons. These include:

  • Poor program installation
  • Disk fragmentation
  • Missing and damaged .dll files
  • Registry corruption
  • Malware invasion

In a nutshell, it can be said that the deep-rooted cause of the Microsoft Visual C++ Runtime Library Error is the registry. All the causes listed above are associated with the registry.

For simplification, the registry is the main database of your system that stores all the activities executed on the computer in the RAM, the hard disk.

This includes both the important data and junk files such as temporary files, internet history, bad registry keys, invalid registry entries, and also the files from the uninstalled programs.

If these files are not removed from the registry frequently, it overloads the hard disk and leads to obscure error message displays on your system like the Microsoft Visual C++ Runtime Library Error as warning signs.

Sometimes, rebooting the system may fix the Microsoft Visual C++ Runtime Library Error. However, this is temporary. Error message pops again after some time. So, instead of seeking out a temporary solution, it is advisable to look for a solution that can repair this error for the longest time.

Further Information and Manual Repair

There are two ways to fix the Microsoft Visual C++ Runtime Library Error code. One is to reinstall the Visual C++ runtime libraries. This can be a complex task if you are not a computer programmer or technically sound.

However, the second way, or let’s just say the best and easiest way to resolve this problem is to download Restoro.

This is truly an easy way as it requires no technical expertise or programming knowledge to repair the Microsoft Visual C++ Runtime Library Error.

Restoro is an advanced, user-friendly, and multi-functional repair tool integrated with profound powerful utilities like an intuitive registry cleaner, system stability scanner, and anti-virus.

It has a smooth interface, easy navigation, and a simple layout making it easy for users and even novices to operate it to resolve the Microsoft Visual C++ Error in seconds.

The registry cleaner scans your entire PC for registry issues. It wipes out all the invalid, unnecessary, and obsolete files clearing up your disk space. In addition to this, it repairs fragmented disks, damaged .dll files (runtime code library), and repairs the registry.

Along with these benefits, Restoro also functions as a system optimizer thus boosting the performance of your system. It can be downloaded by all PC Windows users as it is compatible with all Windows versions.

Click here to download Restoro on your PC to resolve the Microsoft Visual C++ Runtime Library Error code and to ensure optimum PC performance and health.

Do You Need Help with Your Device?

Our Team of Experts May Help
Troubleshoot.Tech Experts are There for You!
Replace damaged files
Restore performance
Free disk space
Remove Malware
Protects WEB browser
Remove Viruses
Stop PC freezing
GET HELP
Troubleshoot.Tech experts work with all versions of Microsoft Windows including Windows 11, with Android, Mac, and more.

Share this article:

You might also like

TitleBar, Minimize, Maximize and Close missing
In case you don’t know, the Title bar comes with the Maximize, Minimize, as well as the Close button. However, there are instances when you might notice that the Title bar, Maximize, Minimize and Close buttons are missing in the File Explorer. This kind of problem might be due to some glitch in the computer, or it could also be caused by some built-in tool or an installed program in your computer. Moreover, there are also other factors that you have to consider such as corruption in the system files as well as errors in the user profile which is generated on a domain network, and so on. There are several suggestions you can check out to fix the problem. You can try to boot your computer in a Clean Boot State to see if a third-party program is the root cause of the problem. You can also try to run built-in tools like System File Checker and the DISM tool. You could also get the video buffer emptied, reset or reinstall the program, or recreate the User Profile.

Option 1 – Put your computer in a Clean Boot State

As pointed out, it is possible that some third-party program or service is the one that’s behind the problem. To isolate this possibility and to identify the culprit, you have to put your computer into a Clean Boot State. To do so, follow the steps below.
  • Log onto your PC as administrator.
  • Type in MSConfig in the Start Search to open the System Configuration utility.
  • From there, go to the General tab and click “Selective startup”.
  • Clear the “Load Startup items” check box and make sure that the “Load System Services” and “Use Original boot configuration” options are checked.
  • Next, click the Services tab and select the “Hide All Microsoft Services” check box.
  • Click Disable all.
  • Click on Apply/OK and restart your PC. (This will put your PC into a Clean Boot State. And configure Windows to use the usual startup, just simply undo the changes.)
  • You need to disable one third-party app after the other to really isolate the issue. And once you’ve narrowed down the problem, you can either disable the third-party app that’s causing the problem or remove it.

Option 2 – Run System File Checker scan

You might also try running the System File Checker or SFC scan to fix the issue. System File Checker is a command utility built into your computer that helps restore corrupted files and missing files. Refer to the following steps to run it:
  • Hit the Win + R keys to launch Run.
  • Type in cmd in the field and tap Enter.
  • After opening Command Prompt, type in sfc /scannow
The command will start a system scan which will take a few whiles before it finishes. Once it’s done, you could get the following results:
  1. Windows Resource Protection did not find any integrity violations.
  2. Windows Resource Protection found corrupt files and successfully repaired them.
  3. Windows Resource Protection found corrupt files but was unable to fix some of them.
  • Restart your computer and see if the System32 folder still pops up at startup or not.

Option 3 – Try running the DISM tool

You can try running the Deployment Imaging and Servicing Management or DISM tool to fix the Windows Upgrade problem. Using this built-in tool, you have various options such as the “/ScanHealth”, “/CheckHealth”, and “/RestoreHealth”.
  • Open the Command Prompt with admin privileges.
  • Then type in the following commands and make sure to hit Enter right after you type each one of them:
    • Dism /Online /Cleanup-Image /CheckHealth
    • Dism /Online /Cleanup-Image /ScanHealth
    • exe /Online /Cleanup-image /Restorehealth
  • Do not close the window if the process takes a while as it will probably take a few minutes to finish.

Option 4 – Try to empty the Vide buffer

These kinds of problems could also be due to bad data in the Video Buffer. Thus, you can try to empty the Video buffer to resolve the problem. All you have to do is tap the Shift + Ctrl + Win key + B keys on your keyboard. After that, leave your computer idle for about 10 seconds until you notice it blink once. Now you try using your computer as usual and see if the glitch is now fixed or not.

Option 5 – Try to reset or reinstall the program

Another thing you can do to fix the issue is to reset or reinstall the program where you encounter the problem. Chances are, you are running the application in the Full-screen mode but you can exit it by simply tapping the Esc or F11 key. However, if nothing changed, then consider resetting or reinstalling the program. Just go to the Windows 10 Settings app and navigate to Apps > Apps & Features. From there, look for the entry of the application you’re having problems with and select it and then click on the Advanced options. After that, click on the Reset button under the Reset section.

Option 6 – Try recreating the User Profile

You might also want to try recreating the User Profile on your computer since some errors in the creation of a User Profile can result in problems like this one. Thus, you have to try deleting the User Profile and then recreate it.
Read More
Steam Deck will be able to dual boot
Steam Deck release is almost upon us and more news comes to light. The Latest officially confirmed technical detail is that the user will have access to device's BIOS and that dual booting will be officially supported. steam deck
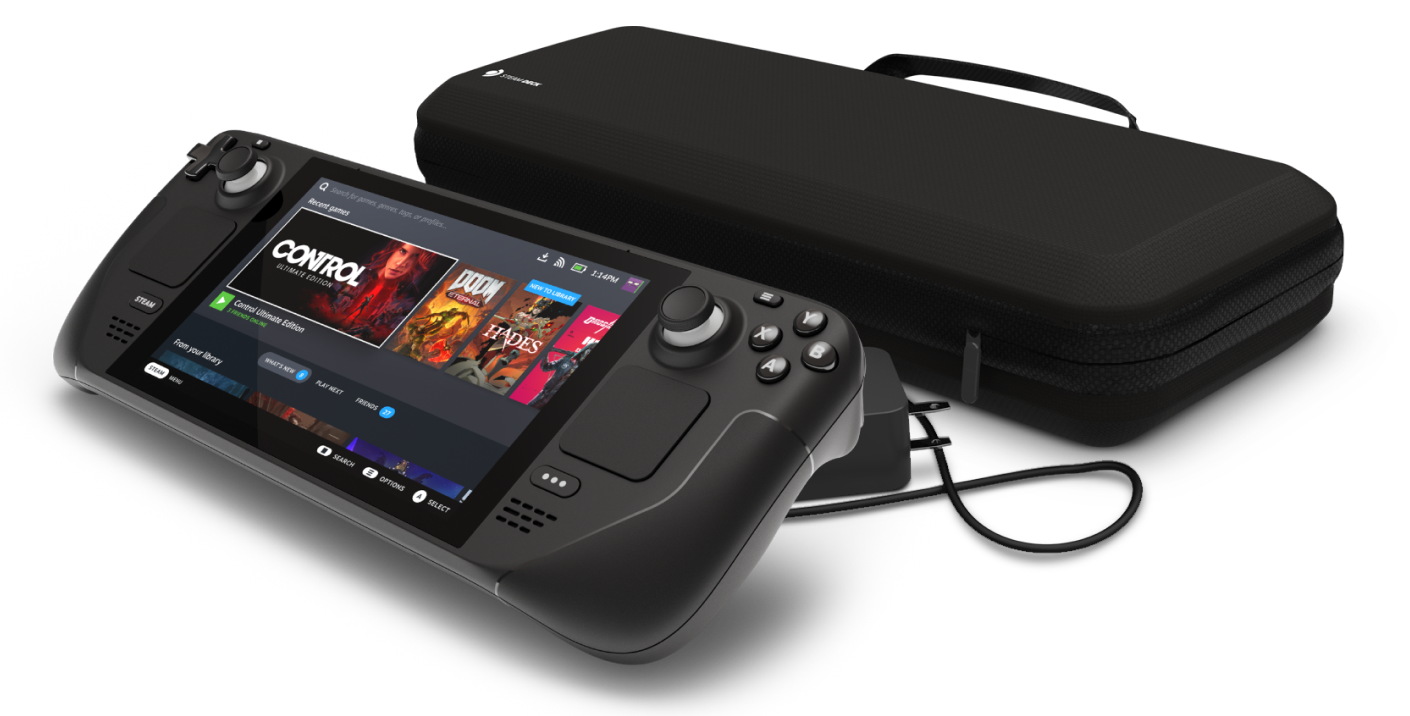
This, of course, means that you will be able to have both Proton and Windows on your device letting you play anything that you wish if the hardware is strong enough. Valve also said that you can launch OS from an SD card! This of course will save space available for games themselves, especially for entry models with less than one available. All of this information really pushes Deck into the territory of a handheld PC and not just another console and I must admit that this announcement left a smile on my face.
Read More
Windows 11 new features and preview
Microsoft has presented its next version of their flagship product, Windows 11, and feelings are divided among users. Some users like it very much and eager to upgrade, some do not like the graphic overhaul it went through, but overall I think Microsoft has done a good job with it. Here in this article, we will discuss some of the new features which Windows brings to the table, well at least ones that were showed, I am sure there are plenty more which we will see once OS has been released.

New Start menu

Winodws 11 start menu
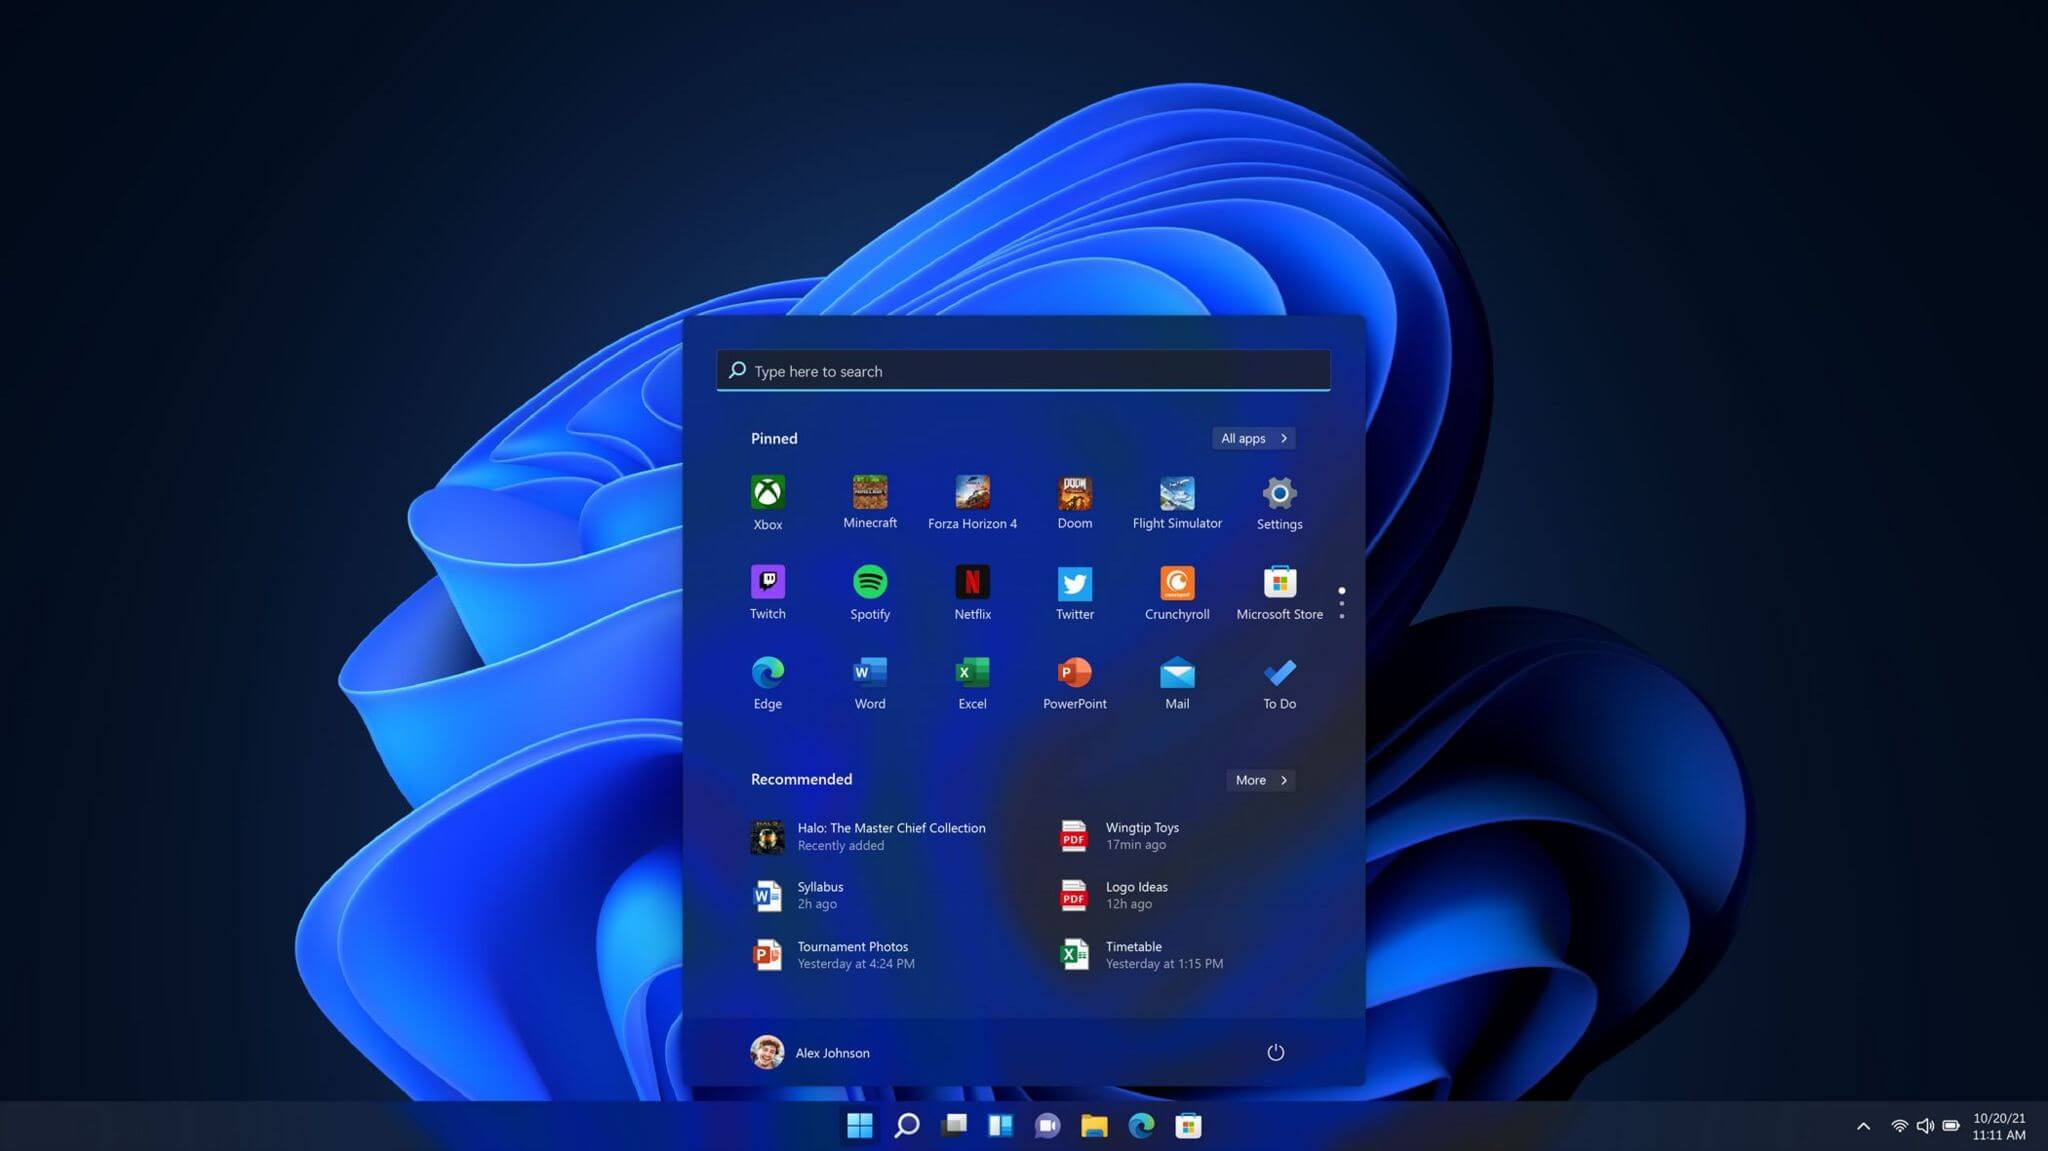
One of the first things that everyone saw when Microsoft has unveiled Windows 11 is its Start menu. Funny enough this is what has caused most of the divide among users, some find it interesting, and some do not like it. Truth is, it is different, and it is centered in the middle instead of the lower left part of the screen. It has been confirmed however that the Start menu can be moved to any part of the screen so if you want, you could place it on the lower left as it has always been. Live tiles do not longer exist in the Start menu, instead, we have styled simple icons.

Windows 11 Snap controls are great

Windows 11 snap controls
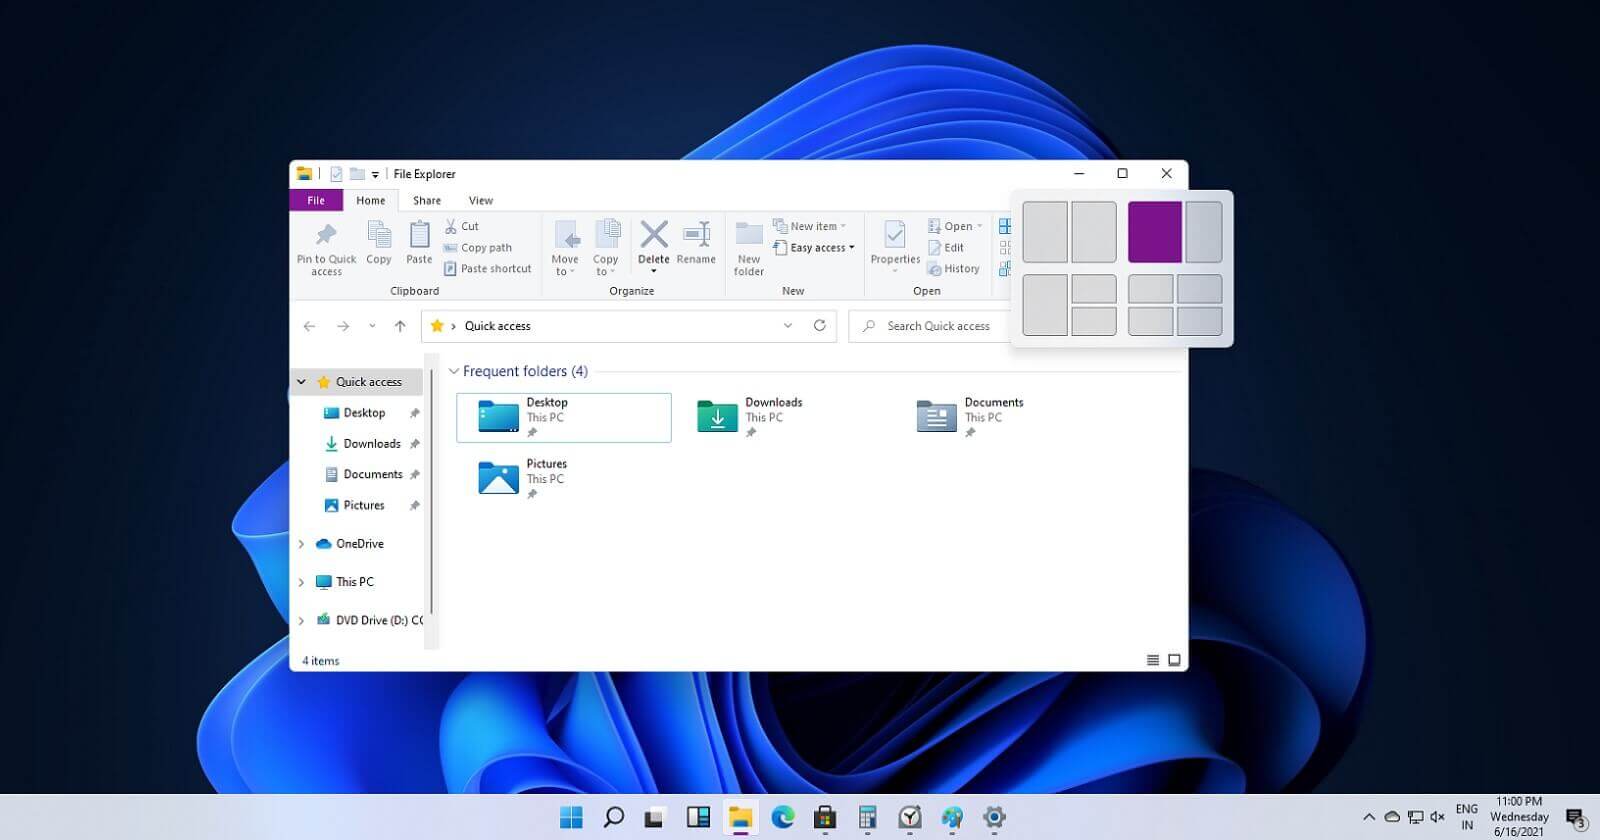
If you have used the cascade option in previous Windows versions then it is most likely that you will like the new Snap controls. You can quickly snap windows side by side, or arrange them in sections on your desktop just by hovering over maximize button on the title bar.

Windows 11 File Explorer

Windows 11 file explorer
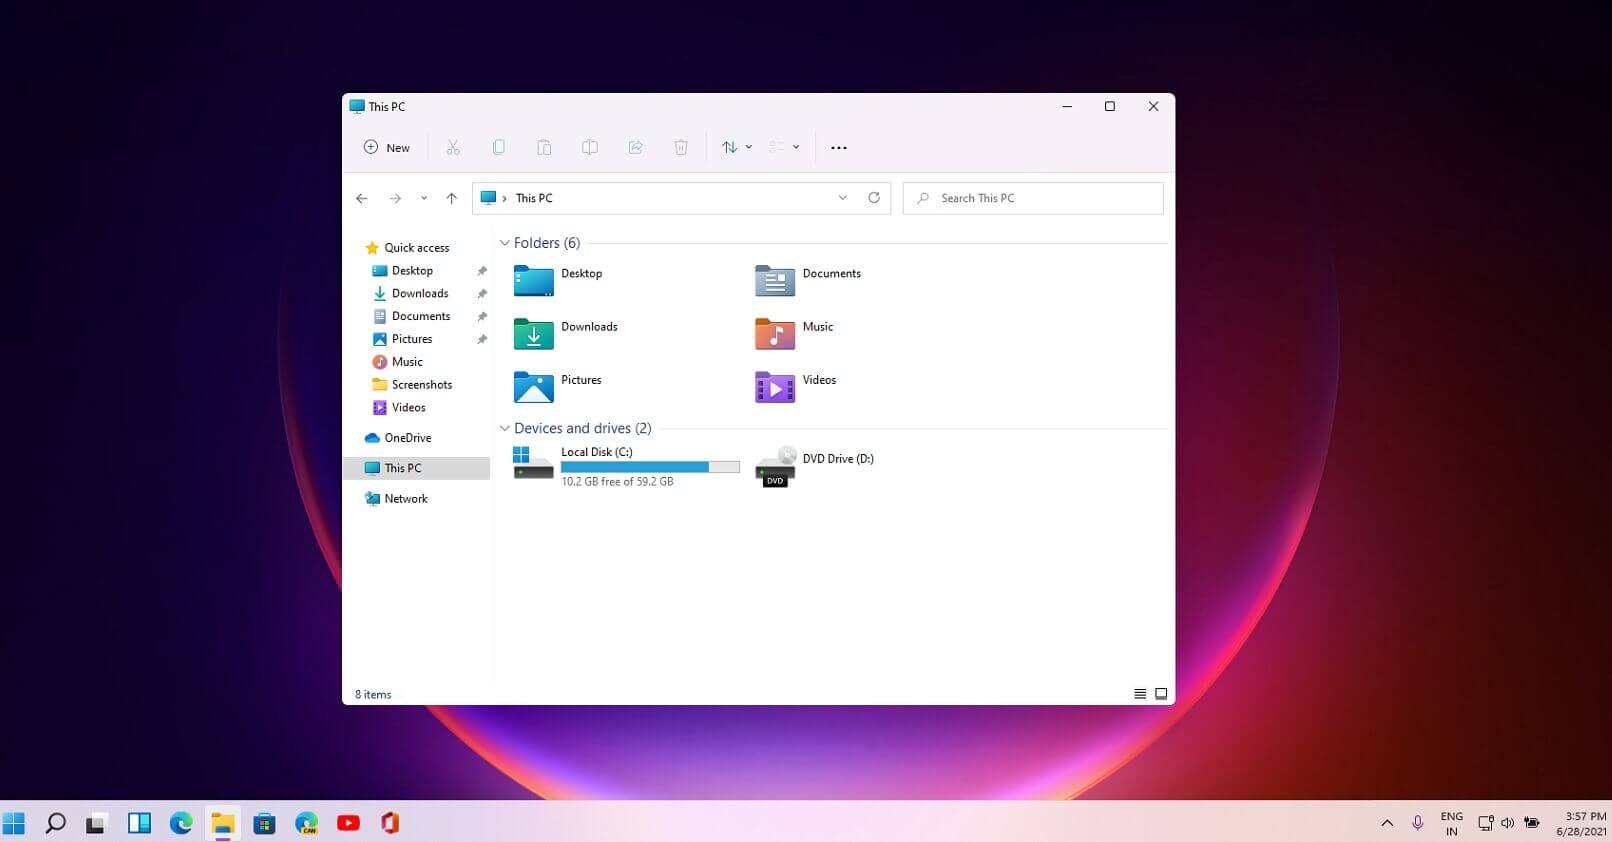
File explorer has gone through some visual and design changes, the ribbon on top has been completely removed and replaced with a header-like feature with a slick and clean design. The header contains a nice organized and designed single row of icons like cut, paste, copy, rename, delete, and new folder icons.

Settings app ovberhaul

Windows 11 settings app
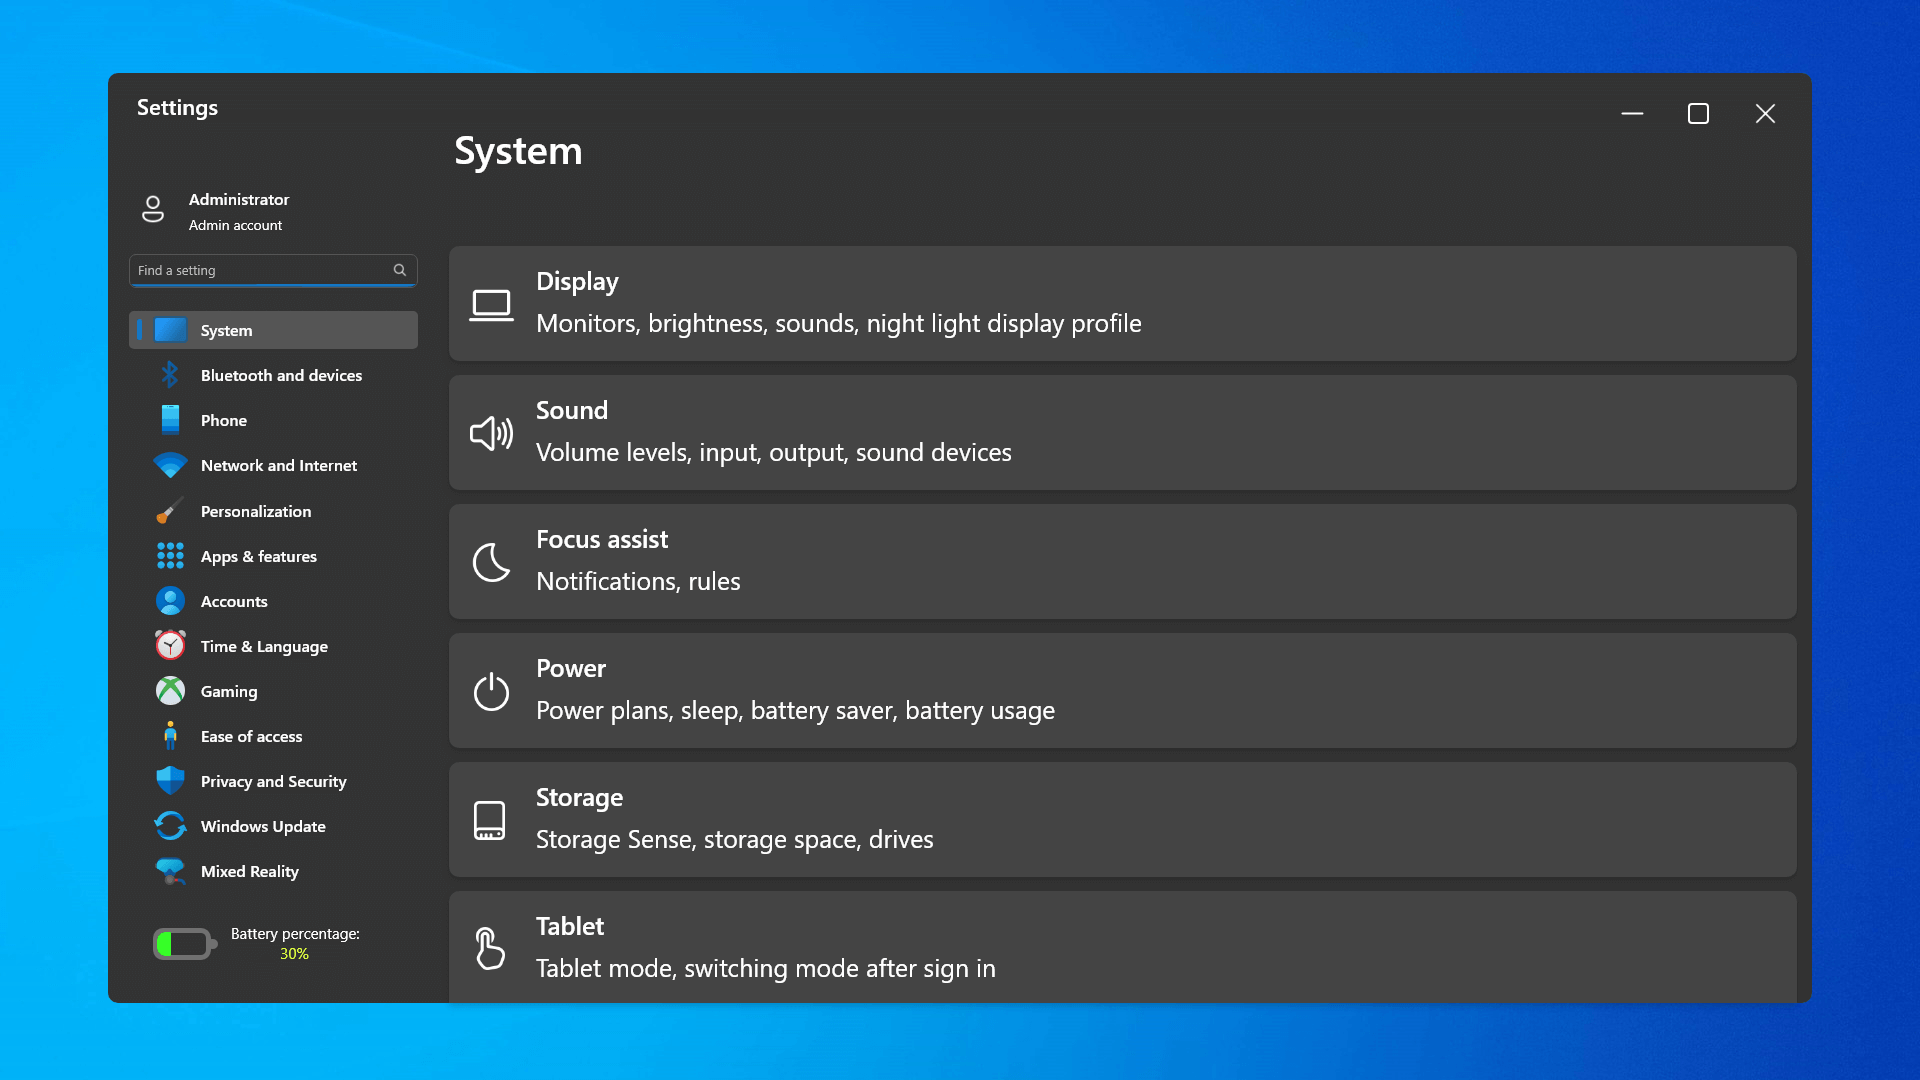
The settings app also has gone through visual and design changes. It has a new design that is very visually appealing and navigation has been simplified and more organized. Finding the right and desired setting is much faster and clearer now.

Widget tab makes comeback in Windows 11

Windows 11 widgets bar
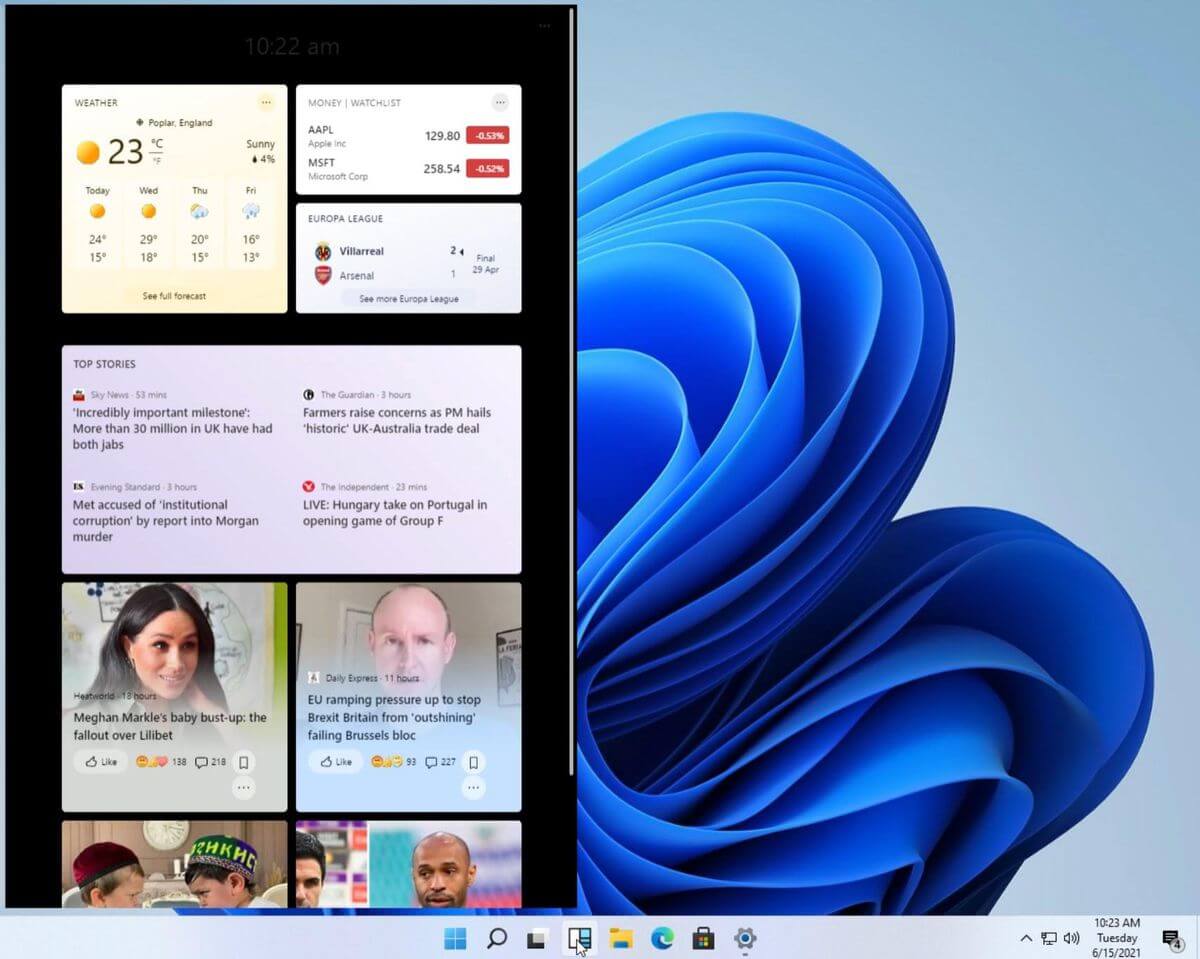
Yes, widgets are back but not like you remember them. Instead of being all-time present at your desktop like once they used to be, now there is a button on the taskbar which brings the widget bar up that contains desired widgets. This way they are easily accessible and do not clutter desktops. So far we have weather, news, calendar, and stocks widget but we will see how development on these goes. I expect to have community-made widgets like in old days for all of our needs.

XBOX app

Windows 11 xbox app
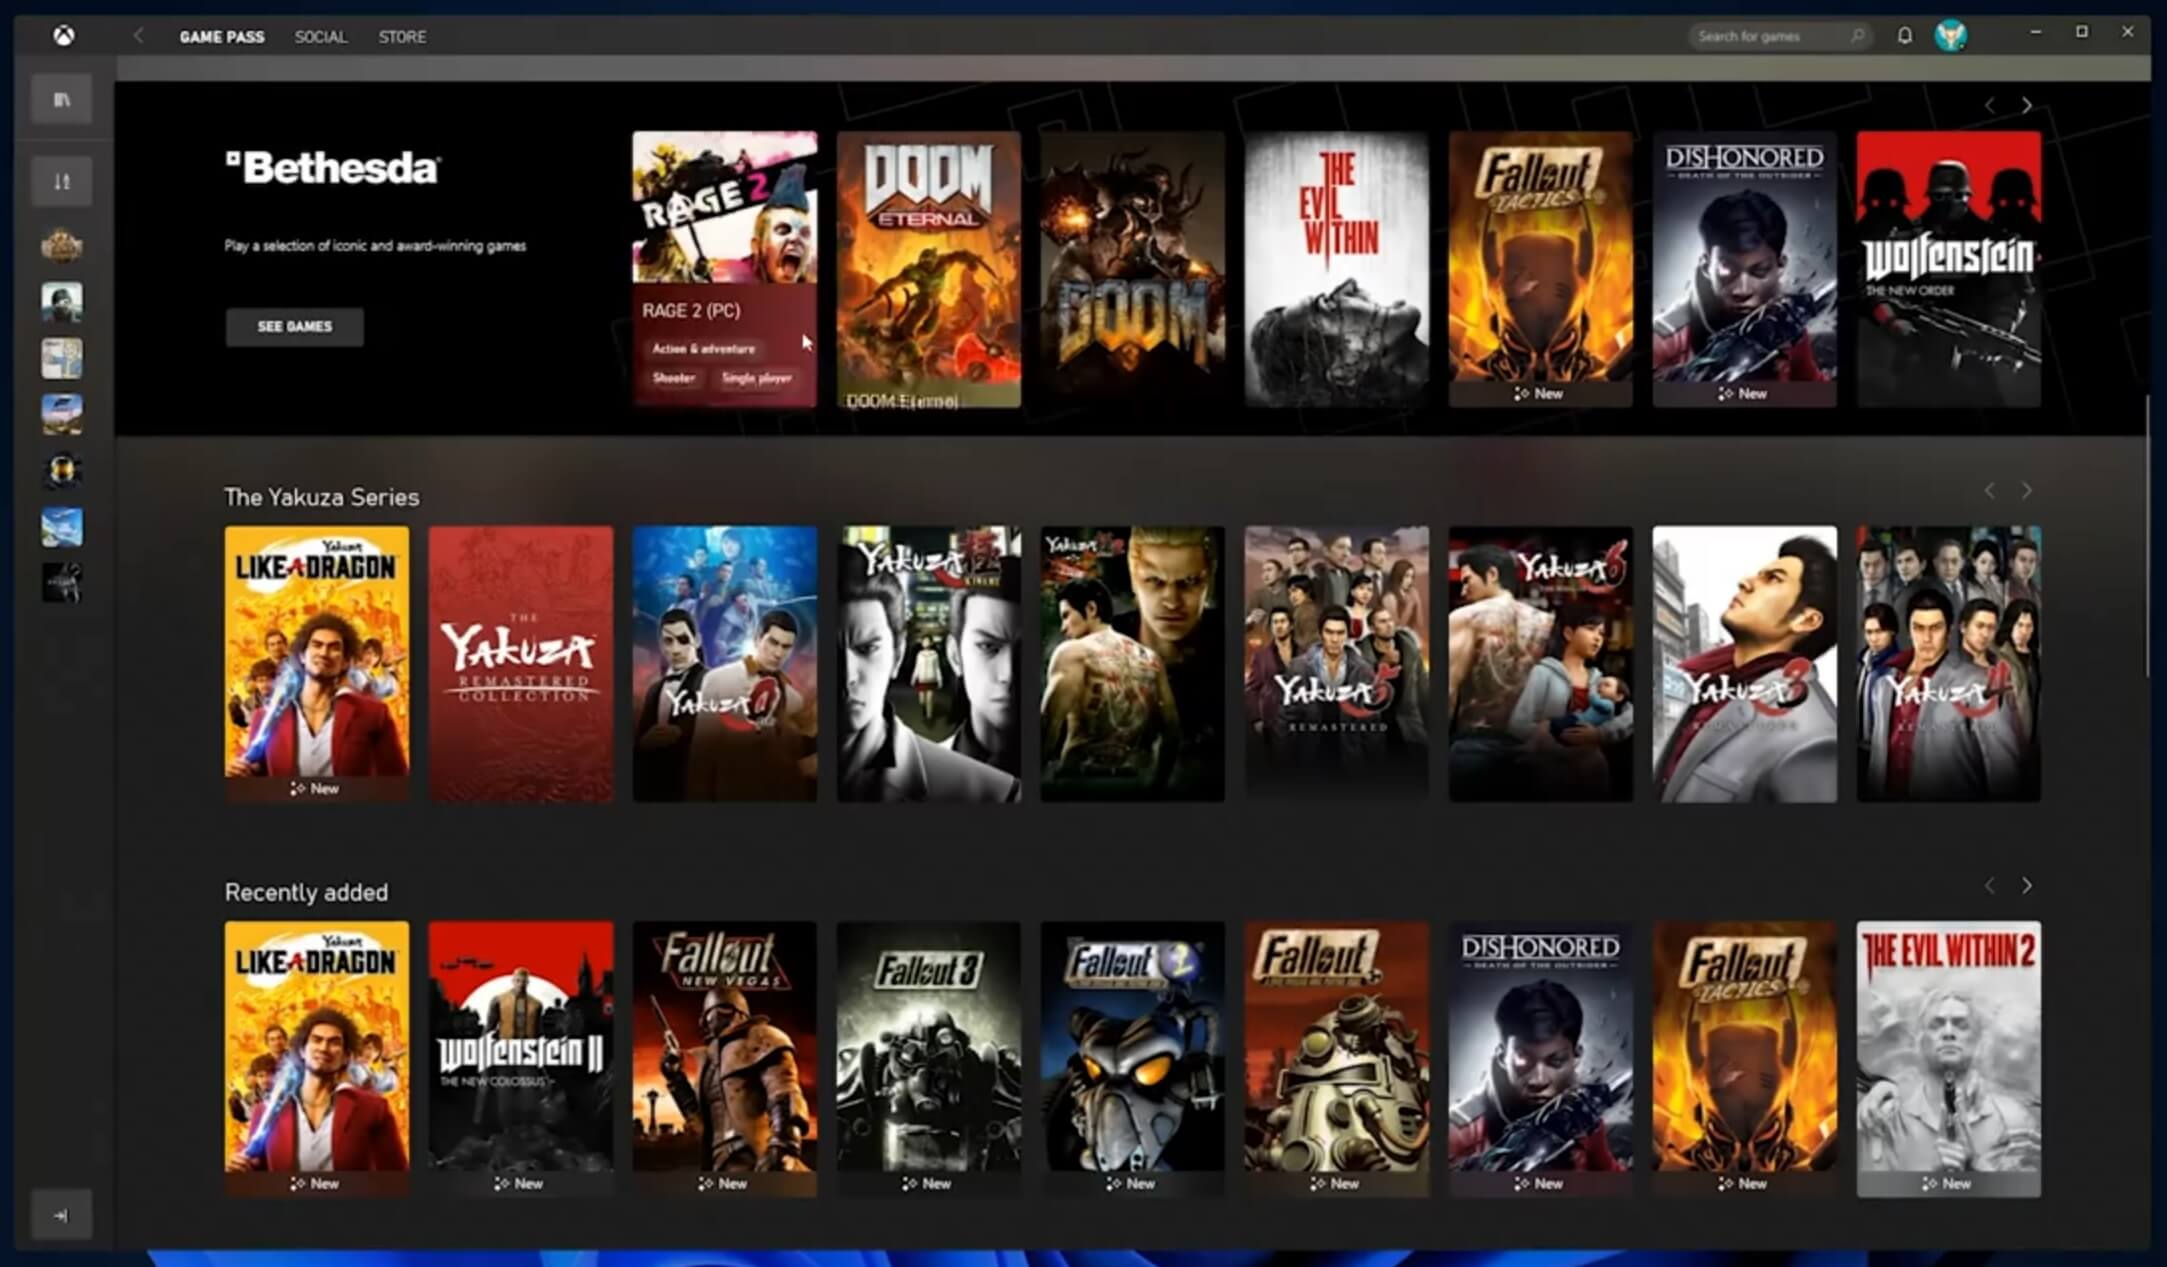
The new Xbox app is now integrated into Windows 11, offering quick access to Xbox Game Pass games, the social parts of the Xbox network, and the Xbox store.

Security and TPM 2.0 in Windows 11

Windows 11As widely known by now Windows 11 will require you to have a TPM 2.0 module capable CPU in order to install it. This system requirement has caused a lot of controversies but essentially it seems that MS's goal is to protect your personal data by using this module. The upside of course is that your data will be protected much more than in previous Windows versions, the downside, of course, will be that you will need newer hardware to run OS on it. and that is essentially it, keep on tuned on more Windows 11 information and overall articles tied to PC and technology here at errortools.com
Read More
Disabling the Blur on Login Screen in Windows
You will notice the blurred background on the login screen right away when you start your Windows 10 computer that’s running the v1903 and up. This kind of blurred background is known as “Acrylic Blur Effect on Sign-in Screen”. This new feature delivers a beautiful experience to users by adding more focus to the login screen. However, no matter how nice this feature is and even if it only stays for less than a minute, not all users like it and if you’re one of these users, read on as this post will guide you in disabling the blurred background login screen in your Windows 10 computer. Disabling the blurred background in the login screen can be done in two methods. The first one is via the Registry Editor and the second one is via the Group Policy Editor. Before you proceed, make sure that you are using an admin account and you must create a System Restore point first. Once you have that covered, follow the options provided below.

Option 1 – Disable the Blurred background in the login screen via Registry Editor

  • First, tap the Win + R keys to open the Run dialog box and type “Regedit” in the field, and hit Enter to open the Registry Editor.
  • After that, navigate to this registry path: KEY_LOCAL_MACHINESOFTWAREPoliciesMicrosoftWindowsSystem
  • Next, right-click on any empty space in the right pane and create a new DWORD (32 bit) and name it as “DisableAcrylicBackgroundOnLogon”.
  • Once you’ve created the DWORD, double click on it and set its value to 1 to disable it and 0 to enable it.
  • After you make the necessary changes, restart your computer. You won’t now see the blurred background on the login screen.
Note: No matter what option you select to change the background, it will stay blurred when you click on the login button. At the time of writing, there is no way to disable this feature in the Personalization section so the Registry Editor will have to suffice for now.

Option 2 – Disable the Blurred background in the login screen via Group Policy Editor

  • Tap the Win + R keys to open the Run utility and type “gpedit.msc” in the field and tap Enter to open the Group Policy Editor.
  • After that, navigate to this policy setting: Computer ConfigurationAdministrative TemplatesSystemLogon
  • From there, double click on the “Show clear logon background settings” and since its default value is “Not configured”, set it to “Disabled”. You will see the following description under this setting:
    • “This policy setting disables the acrylic blur effect on the logon background image.”
    • “If you enable this policy, the logon background image shows without blur.”
  • Now click on OK and then check the login screen.
Note: If you don’t configure or if you disable this policy, the logon background image adopts the acrylic blur effect. However, if it didn’t work, you have to restart your computer and then check.
Read More
Fixing the Machine Check Exception Blue Screen Error in Windows 10
BSOD or Blue Screen of Death errors are one of the toughest issues you can encounter in Windows 10 as well as the hardest ones to resolve as they simply shut the system down or restart it abruptly and claims that it isn’t possible to boot Windows again. One of the difficult BSOD errors is the Machine Check Exception BSOD error. The reason why it is hard to fix is that in most cases, it occurs soon after Windows loads which gives users little to no time in resolving it. To make things worse, the system also freezes right before it displays the blue screen error and shuts the system down. Usually, the Machine Check Exception Stop error occurs due to the failure or overstressing of the hardware components. And in the case of almost all Blue Screen of Death errors, the issue usually has something to do with the drivers. So if you frequently see this BSOD error from time to time, now’s the time to act on it by following the solutions given in this post.

Option 1 – Update the Device drivers

  • Tap the Win + R keys to launch Run.
  • Type in devmgmt.msc into the box and tap Enter or click OK to open the Device Manager.
  • After that, a list of device drivers will be displayed. Look for the device driver you and then select either “Update driver” or “Uninstall device”. And if you find any “Unknown device”, you need to update it as well.
  • Select the “Search automatically for updated driver software” option and then follow the instructions to complete the process.
  • If you have chosen to uninstall the driver, follow the screen options to complete the process and then restart your PC.
  • Connect the device and Scan for hardware changes – you can see this option under Device Manager > Action.

Option 2 – Try running the Blue Screen Troubleshooter

The Blue Screen troubleshooter is a built-in tool in Windows 10 that can be found on the Settings Troubleshooters page. To use it, refer to these steps:
  • Tap the Win + I keys to open the Settings panel.
  • Then go to Update & Security > Troubleshoot.
  • From there, look for the option called “Blue Screen” on your right-hand side and then click the “Run the troubleshooter” button to run the Blue Screen Troubleshooter and then follow the next on-screen options. Note that you might have to boot your PC into Safe Mode.

Option 3 – Try running the System File Checker

System File Checker or SFC is a built-in command utility that helps in restoring corrupted files as well as missing files. It replaces bad and corrupted system files with good system files that might be causing the Machine Check Exception BSOD error. To run the SFC command, follow the steps given below.
  • Tap Win + R to launch Run.
  • Type in cmd in the field and tap Enter.
  • After opening Command Prompt, type in sfc /scannow
The command will start a system scan which will take a few whiles before it finishes. Once it’s done, you could get the following results:
  1. Windows Resource Protection did not find any integrity violations.
  2. Windows Resource Protection found corrupt files and successfully repaired them.
  3. Windows Resource Protection found corrupt files but was unable to fix some of them.

Option 4 – Run the Startup Repair

In the Blue Screen where the Machine Check Exception error is displayed, tap the F8 key to go to the Startup Settings where you can find Startup Repair and then run it. Note that this is a must-try option especially if you are unable to start your computer and if you can use your computer for a few moments.

Option 5 – Run the DISM tool

There are cases when the Machine Check Exception error is caused by the Windows System Image so you need to repair it using the DISM or Deployment Imaging and Servicing Management tool. The DISM tool is another command-line tool in the Windows operating system that could help users fix various corrupted system files. To use it, follow these steps:
  • Open the Command Prompt as admin.
  • Then type in this command: Dism /Online /CheckHealth
  • Do not close the window if the process takes a while as it will probably take a few minutes to finish.

Option 6 – Try resetting the BIOS

If you have made some modifications in the BIOS that might have caused this error, you have to revert those changes to resolve the issue. On the other hand, if you have made a couple of changes and you do not remember which is which, you might have to reset the BIOS.

Option 7 – Try resetting Windows 10

To fix this BSOD error, you can try resetting Windows 10. Doing so won’t get rid of any file in your system – instead of erasing all your media files and documents, this reset option resets all the system settings and files.
Read More
Fix One Drive Error: This is not a valid file name
As you know, Microsoft’s consumer cloud storage platform is none other than OneDrive. It is where users can save any of their files albeit it’s mostly used to store common files like documents and photos. However, there are times when you might encounter some problems when saving these files. Recently, some users reported that they had problems saving Word documents to OneDrive and if you experience the same issue, then you’ve come to the right place as this post will guide you on how to resolve it. According to users who encountered the problem, when they try to save Word documents on OneDrive, an error message appears instead stating, “This is not a valid file name”. This kind of error only occurs when the file is opened from within OneDrive for saving in a different folder. In other words, if the file is saved in the same folder, the error won’t pop up but if it is saved in a separate folder, that’s when the error appears. Worry not though for fixing this error is not complicated and won’t take too long. It seems that this error is due to the 259-character limitation when creating and saving files as far as the Office products are concerned. To resolve it, there are several workarounds you can check out. Before you proceed with these workarounds, make sure that you have a stable internet connection.

Option 1 – Try renaming the file with a shorter name

The first thing you can do to fix the problem is to rename the file with a shorter name. Just right-click on the file and select the Rename option from the menu and then type in the new name and click OK or tap Enter to rename the file.

Option 2 – Try renaming the folders where the file is located

Like what you did in the first given option, all it takes is a right-click but this time on a folder. Rename the folder with a different name and save the changes made and then check if you can now save the Word document on OneDrive.

Option 3 – Try moving the file to a folder with a shorter path

If the first two options didn’t work, you can try moving the file to a folder with a shorter path. Note that it is not the same as doing it locally on a Windows 10 computer so you have to right-click on the file and select the “Move to” option. After that, locate the folder where you want to move the file and select it and then click on the Move button to complete the task.

Option 4 – Try making some changes in the document

You could also try to make some modifications to the document. Once you’ve done that, click the File tab and select the Save As option and then go to the folder where you want to save the file and tap enter.
Read More
Computer is stuck on the Hi there screen
As you know, installing Windows 10 is quite a complicated process in the background even though it may look like an easy task in the foreground. There are times when the setup is stuck on the “Hi there” screen where you won’t be able to input any information in the fields given and you wouldn’t be able to do anything else since the screen does not move ahead. There are a lot of possible reasons why this issue occurs. It could be due to a damaged setup image, invalid boot configuration, and many more. To resolve this problem, there are several options you can check out. You can try to get a new setup image or run the Automatic Repair or you could also try to recreate the Boot Configuration files or BCD. To get started in checking out these solutions, make sure to follow the instructions provided below.

Option 1 – Try to run the Automatic Repair Utility

You might also want to use Automatic Repair in fixing the error. To do so, follow the steps below.
  • You can start by creating and booting from a bootable Windows 10 USB Stick.
  • After that, click on Repair your computer located on the bottom left corner when you are on the initial Windows Startup screen.
  • Next, click on Troubleshoot, and then on the other screen, click the Startup Repair option.
  • Now select the operating system you want to repair. Once you do that, it will start to repair your operating system. Wait until the process is completed and then check if the problem’s now fixed.

Option 2 – Try to rebuild the BCD files

You can also try rebuilding the BCD files to resolve stuck screen issue in your Windows 10 computer.
  • You can start by booting into the installation environment for Windows 10 from an installation media.
  • After that, click on Repair your computer and on the blue screen, select Troubleshoot and then select the Advanced options menu.
  • From there, select Command Prompt and once you open it, enter each one of the commands given below by sequence.
    • bootrec /FixMbr
    • bootrec /FixBoot
    • bootrec /ScanOS
    • bootrec /RebuildBcd
  • Once you’re done executing the commands given above, type “exit” to close the Command Prompt window and then restart your computer and see if it fixed error code 0xc000014c.

Option 3 – Try recreating the Windows 10 installation USB

Recreating the Windows 10 installation USB might help in fixing the problem. You can use a USB drive to do so but make sure that it has a great read-write speed. Follow the steps below to recreate Windows 10 installation USB”
  • Click this link and then click the Download Tool Now button.
  • Next, click the “Use the tool to create installation media (USB flash drive, DVD, or ISO file)…” option and follow the next given instructions on the screen.
  • Now select the ISO file option in step 5.
  • After that, you should now have an ISO file.
  • Next, go to the location where you’ve downloaded the ISO file.
  • Then right-click on the Windows 10 ISO file and select the Open with option and then select File Explorer.
  • Now click on “setup.exe” and follow the next instructions that appear on the screen. When asked, you have to select either Nothing (clean install) or Keep personal files only option. Take note that you must not select the “Keep personal files, apps, and Windows settings since it doesn’t really work.

Option 4 – Try getting a new Windows image file

If none of the four given options above worked, you might want to get a newer installation image using the Windows Media Creation tool. After that, create the bootable USB drive and once completed and then try to run the Windows 10 setup again.
Read More
Troubleshooting Error 106

What Is Error 106?

Error 106 is a common error experienced by Windows 7 users. Generating as a result of Misconfigured, damaged or corrupt system files on the computer, this is not a critical error. However, troubleshooting this error is important to keep any undesired inconvenience at bay. Essentially, error 106 is one of the error codes employed by Windows and other compatible driver and software vendors. The 106 in this error is essentially the memory address or location where the instructions reside when the error was generated.

Solution

Restoro box imageError Causes

Primarily, error 106 is caused by the damaged, Misconfigured or corrupt system files. The error may appear harmless at first. However, if allowed to persist, it can lead to grave consequences. Allowing an error to thrive on your system is synonymous with putting the well-being of your system at risk. As far as the events, conditions, or scenarios are concerned that lead to the generation of error 106, they are listed below as follows. It is important to understand that these conditions lead to the corruption of system files in most cases.
  • An improper or incomplete installation or uninstallations
  • Improper or incomplete deletion of hardware or applications
  • Improper, unintentional or sudden system shutdown
  • Existence of adware, spyware, malware, or virus on your computer
It is worth mentioning that any of the conditions listed above can lead to the corruption of system files or registry entries in the system. Since the system needs correct and complete files for proper functioning which the system will be unable to find, it will result in unexplained behavior. This also happens because the system will be lead to wrongly linked or missing information.

Further Information and Manual Repair

There are different ways to rectify this error but two of the most useful ones are briefly listed below as follows.
  • This solution is for the advanced user. First and foremost, turn on your system. Log on to it as the Administrator. Now click on the start button and follow this sequence: All Programs -> Accessories -> System Tools -> System Restore.A new window will appear in front of you. On this window, choose the option, ‘Restore my computer to an earlier time’. Now click Next.A list of restore points will appear in front of you. From this list, choose the most recent Restore Point and click Next. Click Next on the confirmation windows. Restart the computer when the restoration is complete.
  • This solution for the novice user. Download an error 106 windows repair utility. Now install this program on your computer and use it to scan your computer. Try to locate the option for fixing errors as soon as the scan complete. Make use of this option. Once all the errors have been fixed, restart your computer once again. You will now realize that the error has vanished and your computer is now free of error 106.
Use any of the solutions listed above according to your skill level.
Read More
Fix Invalid file handle Error during ...
If you encounter an error saying, “Invalid file handle” when you try to rename, copy, delete a file or other operations in your Windows 10 computer, then read on as this post will guide you in what you can do to fix it. This kind of error pops up when the operating system tries to carry out an operation on a folder or file using the following words:
CON, PRN, AUX, NUL, COM1, COM2, COM3, COM4, COM5, COM6, COM7, COM8, COM9, LPT1, LPT2, LPT3, LPT4, LPT5, LPT6, LPT7, LPT8, and LPT9
When you rename or create a folder or file using the reserved words given above, you could encounter an error that says, “The specified device name is invalid”. This occurs since these words are Windows system reserved words that you can’t use, unlike any other words. Thus, if you have a folder or file which contains any of the reserved words on another computer that runs a non-Windows operating system and you try to copy or rename it Windows, then it’s no wonder why you’re getting this error message. In such cases, you can always click on the Skip button to stop the operation. However, if there are various folders or files, you can just use the Command Prompt to carry out the task. All it takes is a simple command that will get rid of the folder as well as the files in it. How? Refer to the instructions given below. Step 1: Tap the Win + R keys to open the Run utility. Step 2: Next, type “cmd” in the field and then tap Enter to open Command Prompt. Step 3: After opening Command Prompt, execute the following command:
rd \.file-folder-path /S /Q
Note: The “rd” command will remove the directory or the folder while the “\.” command will select the current computer. The “/S” command, on the other hand, helps you in removing all the sub-directories and the files that are in the CON folder. The “/Q” command is not really mandatory since it helps you remove everything silently without any confirmation message. For example, if you have a folder named “CON” located on your Desktop, the path will be like this “C:/Users/<username>/Desktop/CON”. In this case, the command should be like this:
rd \.C:Users<username>DesktopCON /S /Q
However, if the error pops up for a whole different reason, you could use the following command instead to remove the reparse point extended functionality. Once you’ve entered the given command below, you should now be able to delete the file.
FSUTIL reparsepoint delete C:Users<username>DesktopFileName DEL C:Users<username>DesktopFileName
Read More
How to Fix Error 126

Error 126 - What is it?

Error 126 is a Windows PC error that mostly occurs either during program installation or removal. It is commonly experienced by Vista, XP and Windows 7 users. When the error 126 is generated, it usually terminates the program installation process, immediately. It is advisable to take corrective error repair measures immediately to ensure that you are easily able to install your desired program and you don’t encounter the error again.

Solution

Restoro box imageError Causes

There are multiple reasons for the occurrence of the error code 126 including. The reasons are listed below:
  • Dll file corruption
  • Missing or damaged dll files
  • Corrupt and misconfigured system files
  • Improper program installation
  • Viral infection
  • Corrupt registry
  • Improper hardware

Further Information and Manual Repair

To resolve the error 126 on your PC, you don’t always have to hire a technician or be a computer programmer yourself. Though this error is critical the good news is that it is very easy to resolve. You can fix the error even if you are not technically sound. Try the solutions that we have listed below to help you resolve error 126 immediately:

Solution 1: Disable Firewall Protection

Sometimes Firewall protection may stop you from installing new programs on your PC successfully and this may display the error 126 on your PC. In such a scenario, disable Firewall protection and then try installing the desired program again. See if it works.

Solution 2: Restore Points

Sometimes dll files can go missing due to program removals and you may come across the error 126. To resolve it, restore points. This will help you restore your PC back to the way it was functioning before you removed a program and will also help you recover the lost and missing dll files.
  • This can be done, by clicking the start menu.
  • Now go to all programs, then accessories, and then system tools.
  • Here you will see the ‘System Restore’ option. Simply click on it.
  • This will help you open a new window. Here select the option ‘Restore My Computer to an Earlier Time’ point.
  • As you select it, it will show you a list of restore points.
  • Choose the latest restore point you see in the list and click ‘Next’ to continue. Now confirm to finish restoration.
  • Restart your PC to activate the changes.

Solution 3: Scan for Viruses

The underlying cause for the error could also be related to viruses on your PC. To remove the viruses, you will have to download a powerful antivirus and scan your entire PC. Please note, anti-viruses are notorious for slowing down system performance, so you might have to compromise on the speed of your PC.

Solution 4: Run a Hardware Diagnostic

To find out which hardware is causing the error message to pop up, you will have to run a hardware diagnostic. For this, simply go to the start menu, type Memory Diagnostic in the search bar. Now access this tool and click on Diagnose your Memory problems. As you click on it, it will ask you to perform the check by either restarting the PC immediately or on the next restart. Select the immediate one to get going. The system will carry a scan on the memory and show you the list of problematic errors detected during the scan. To resolve this error then all you have to do is replace the piece of faulty hardware. Nonetheless, if no faulty hardware is detected, this means the error is related to the registry.

Solution 5: Clean and Restore the Registry

The error 126 is also sometimes generated due to poor PC maintenance which leads to registry issues. The registry basically saves and stores all the data and activities performed on the PC. This also includes junk files, invalid registry entries, bad keys, temporary files, internet history, and cookies. This accumulates a lot of disk space. If not removed, they damage the registry and corrupt other important files like system and dll files, thereby generating PC-related error codes like error 126. The best way to resolve this error on your PC in seconds is to download Restoro on your PC. This is an advanced and multi-functional PC repair tool embedded with multiple powerful utilities including an intuitive registry cleaner, an antivirus, and a system optimizer. The registry cleaning feature detects all registry issues and errors. It wipes out all the unnecessary and obsolete files cluttering the system, fixes the damaged dll files, and restores the registry back to normal. Simultaneously, the antivirus utility scans for all privacy errors and malicious software infecting your system. This includes malware, adware, spyware, and Trojans. The system optimizer feature ensures your PC performance does not slow down. It boosts the speed of your PC to its optimum level. This PC fixer is safe, user-friendly, and efficient. It can be downloaded on any Windows version. Click here to download Restoro on your system and resolve error 126 right away!
Read More
1 2 3 171
Logo
Copyright © 2023, ErrorTools. All Rights Reserved
Trademark: Microsoft Windows logos are registered trademarks of Microsoft. Disclaimer: ErrorTools.com is not affiliated with Microsoft, nor claims direct affiliation.
The information on this page is provided for information purposes only.
DMCA.com Protection Status